Who is this for?
As many of you may have noticed, Stripe has changed quite a bit in the past year to keep up with payment regulations around the world.
This tutorial is for online business owners looking to update their subscription billing workflow to support new requirements such as Strong Customer Authentication, or SCA (more on that below).
What do I need before I start?
This post assumes you have a working Stripe account and know how to set up a basic Node / Express server to receive HTTP requests and serve HTML files. You can also reference our post on setting up a basic Node app with Stripe integration, which we build off of in this tutorial.
Recommended technology versions:
-
Node 8+
(Used Node 8.11.1 for this tutorial)
-
Any Stripe API version (the version set via the Stripe Dashboard) that supports subscriptions.
You may want to upgrade your Stripe API version to take full advantage of new features and speed optimizations, but changing your API version may result in receiving different response object structures, especially for features such as webhooks.
(Used Stripe API version 2019-12-03, or the latest version, for this tutorial)
What will I learn?
In this tutorial, you will learn how to
- Create subscriptions that support Strong Customer Authentication, or SCA
- Set up a custom payment form to charge your customers' credit or debit cards (we won't be covering other payment methods in this tutorial)
- Work with Stripe's new Payment Methods and Payment Intents APIs
You can find all of the code posted here at:
https://github.com/code-nebula/stripe-subscriptions-sca
For anyone familiar with our blog, this tutorial is essentially an updated version of our Creating Monthly Recurring Subscriptions in Stripe using Node.js post from last year.
Before we dive into the code, let's quickly go over what's changed.
PSD2, SCA, and 3DS2 — what are these new regulatory terms?
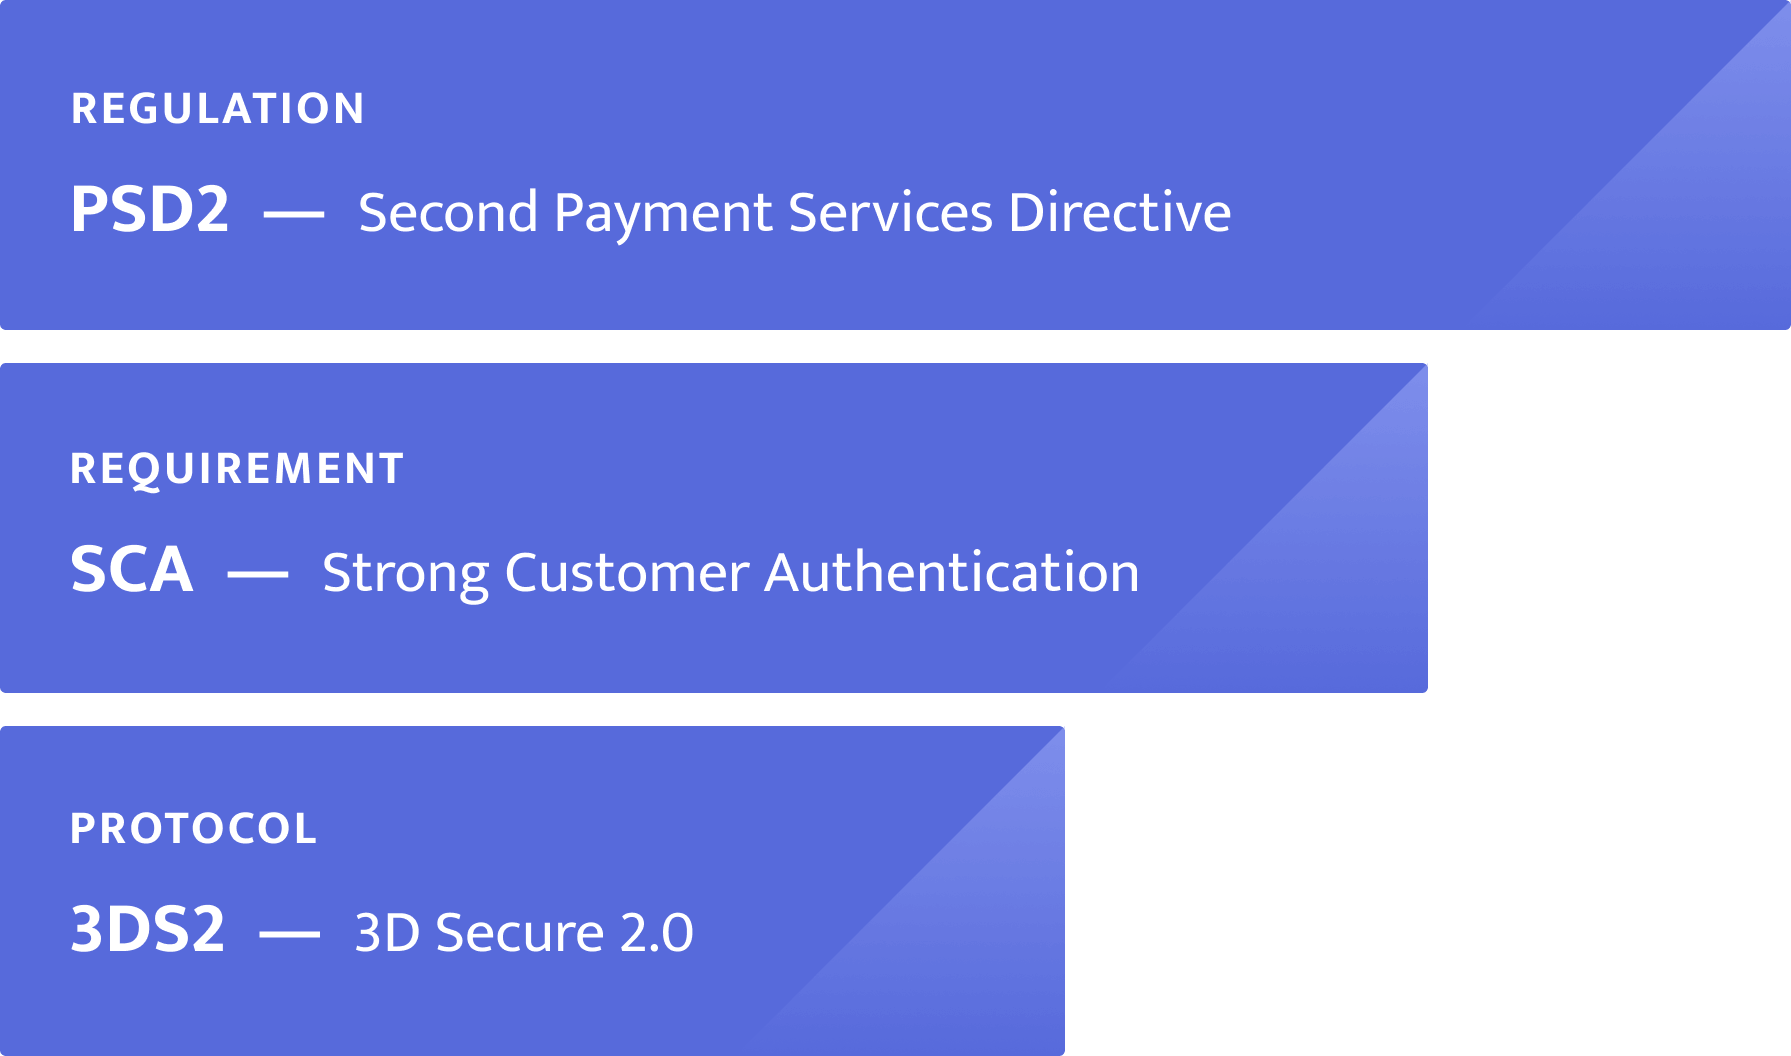
PSD2
PSD2, or the Second Payment Services Directive, is a new, revised regulation in Europe that aims to make online payments safer and more secure.
Its purpose is to protect buyers online, urge financial providers like banks to adopt the latest payment technologies, and increase innovation via open banking (e.g., having financial institutions provide public APIs, having more transparency on transaction information, etc.)
SCA
SCA, or Strong Customer Authentication, is one of the most important requirements under PSD2. SCA mandates that electronic payments use multi-factor authentication to provide an additional layer of security and decrease fraud.
This means that just providing card information (card number, CVV/CVC, and zip code) isn't enough. To complete a payment, cardholders might have to
- Enter a one-time code that was sent to them on their phone
- Provide their fingerprint on a mobile banking app
3DS2
3DS2, or 3D Secure 2.0, is a protocol which implements SCA. When your subscription workflow supports SCA, Stripe will conditionally trigger 3D Secure and show an authentication modal to your customer on payment.
The "3D" in 3D Secure stands for 3-domain, since the idea behind the protocol is based on the following 3 domains :
-
The Acquirer domain — the bank and merchant to which the money is being paid
- Merchant — Fast Forms, the example used in this tutorial
- Bank — Whichever bank you're using to receive the funds from your customers
-
The Issuer domain
- Your customer's bank — the bank associated with the card used to make a purchase
-
The Interoperability domain
- The underlying infrastructure to support this protocol — servers, software providers, etc.
Timeline
- PSD2 was officially introduced on September 14, 2019
- Stripe expects SCA to be completely enforced by banks by December 31, 2020
Supporting SCA
Stripe recommends you update your workflow to support SCA if
- You accept credit or debit cards
- You have customers in the European Economic Area (EEA)
- Your business is in the EEA, or you create payments for businesses in the EEA
Refusing to support SCA (especially by December 31, 2020, when most banks will have enforced SCA) may mean that several of your customers' payments will be declined.
If you're unsure about updating your workflow, know that supporting SCA means that you will use Stripe's new Payments API, which was created to keep up with changing global regulations.
If you accept cards as your primary payment source, I'd recommend updating your workflow now, so that you future-proof your subscription signup solution (you won't have to worry as much about any additional upcoming changes).
You can read more about PSD2, SCA, and 3DS here:
- Stripe's Guide to PSD2 & SCA
- Stripe's 3D Secure Docs
- Stripe's Guide to 3D Secure 2
- SCA Readiness
- The new Payment Intents API, which supports SCA
- The new Payment Methods API, which supports SCA
Tutorial Overview
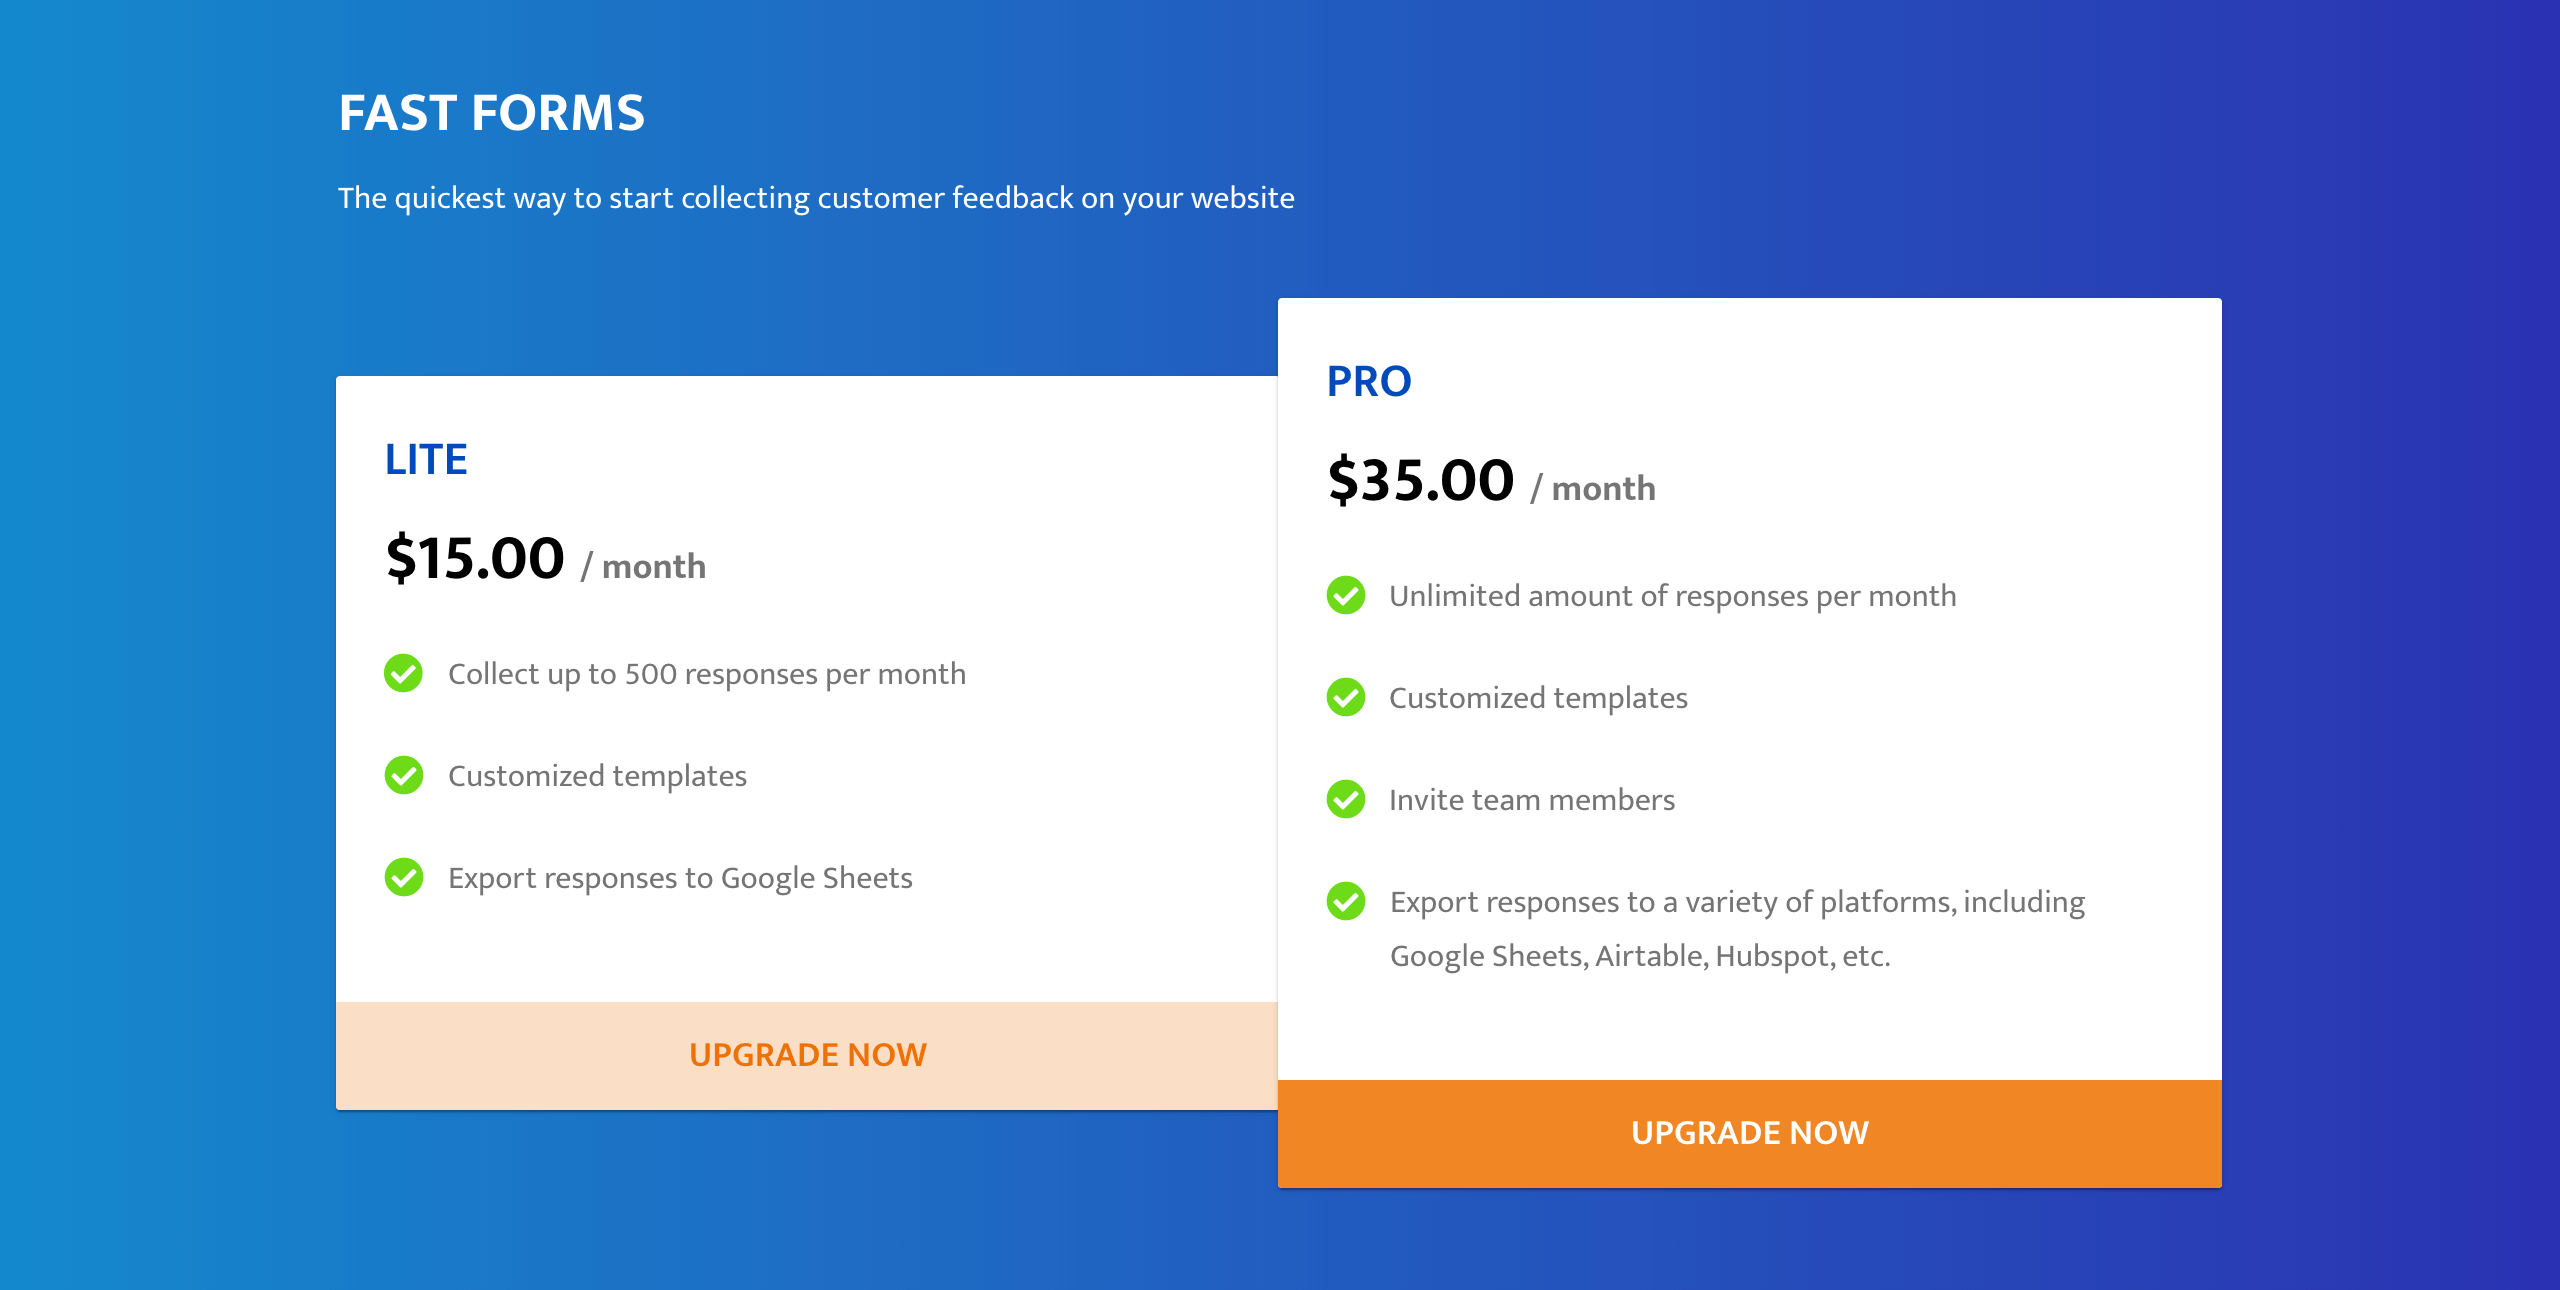
We'll be showing you how to set up Stripe subscriptions with built-in SCA (via 3DS2) for a fabricated software-as-a-service called "Fast Forms." Fast Forms is a site where users can create customized pop-up surveys to embed on their business' website.
Fast Forms offers the following paid plans:
- Lite — $15.00 / month
- Pro — $35.00 / month
The following video outlines the subscription workflow:
A user's trial of Fast Forms has expired, and now it's time for them to pay in order to continue using the site (there is no freemium option). When they click to pay for a specific plan, they will enter their personal information and payment credentials. If their card requires SCA, they will see a 3D Secure popup that requires authentication.
In the real version of the site, since a user has already signed up for your app and has included their personal information on initial sign-up, you wouldn't need to include the "name" or "email" fields — these values could be pre-populated from the session information.
In the Bonus section of this tutorial, we show you how you could also convert this workflow into customer sign-up workflow, with payment information required upfront before a trial begins. Creating a trial does not trigger 3D Secure, which is why we're not immediately showcasing the trial workflow for this tutorial.
Stripe Terminology
Product — A product usually represents your business, or some portion of your business. It is the subscription service you are providing.
Plan — A product can have many plans. A plan in this case is the equivalent of a plan you might see on a website's pricing page.
Subscription — A subscription connects a Customer to a Plan.
Payment Method — A payment method is your Customer's payment tool. In this tutorial, the Payment Method will be of type "card".
Payment Intent — A payment intent represents the payment state of a transaction (e.g., whether it has succeeded or needs authentication via 3D Secure). It also can include the amount of money to collect, the currency, etc. Stripe recommends that you think of it as a "customer session" in your payment workflow.
Payment Methods replace Tokens and Sources.
The Payment Intents API replaces the Charges API. You can view the differences here .
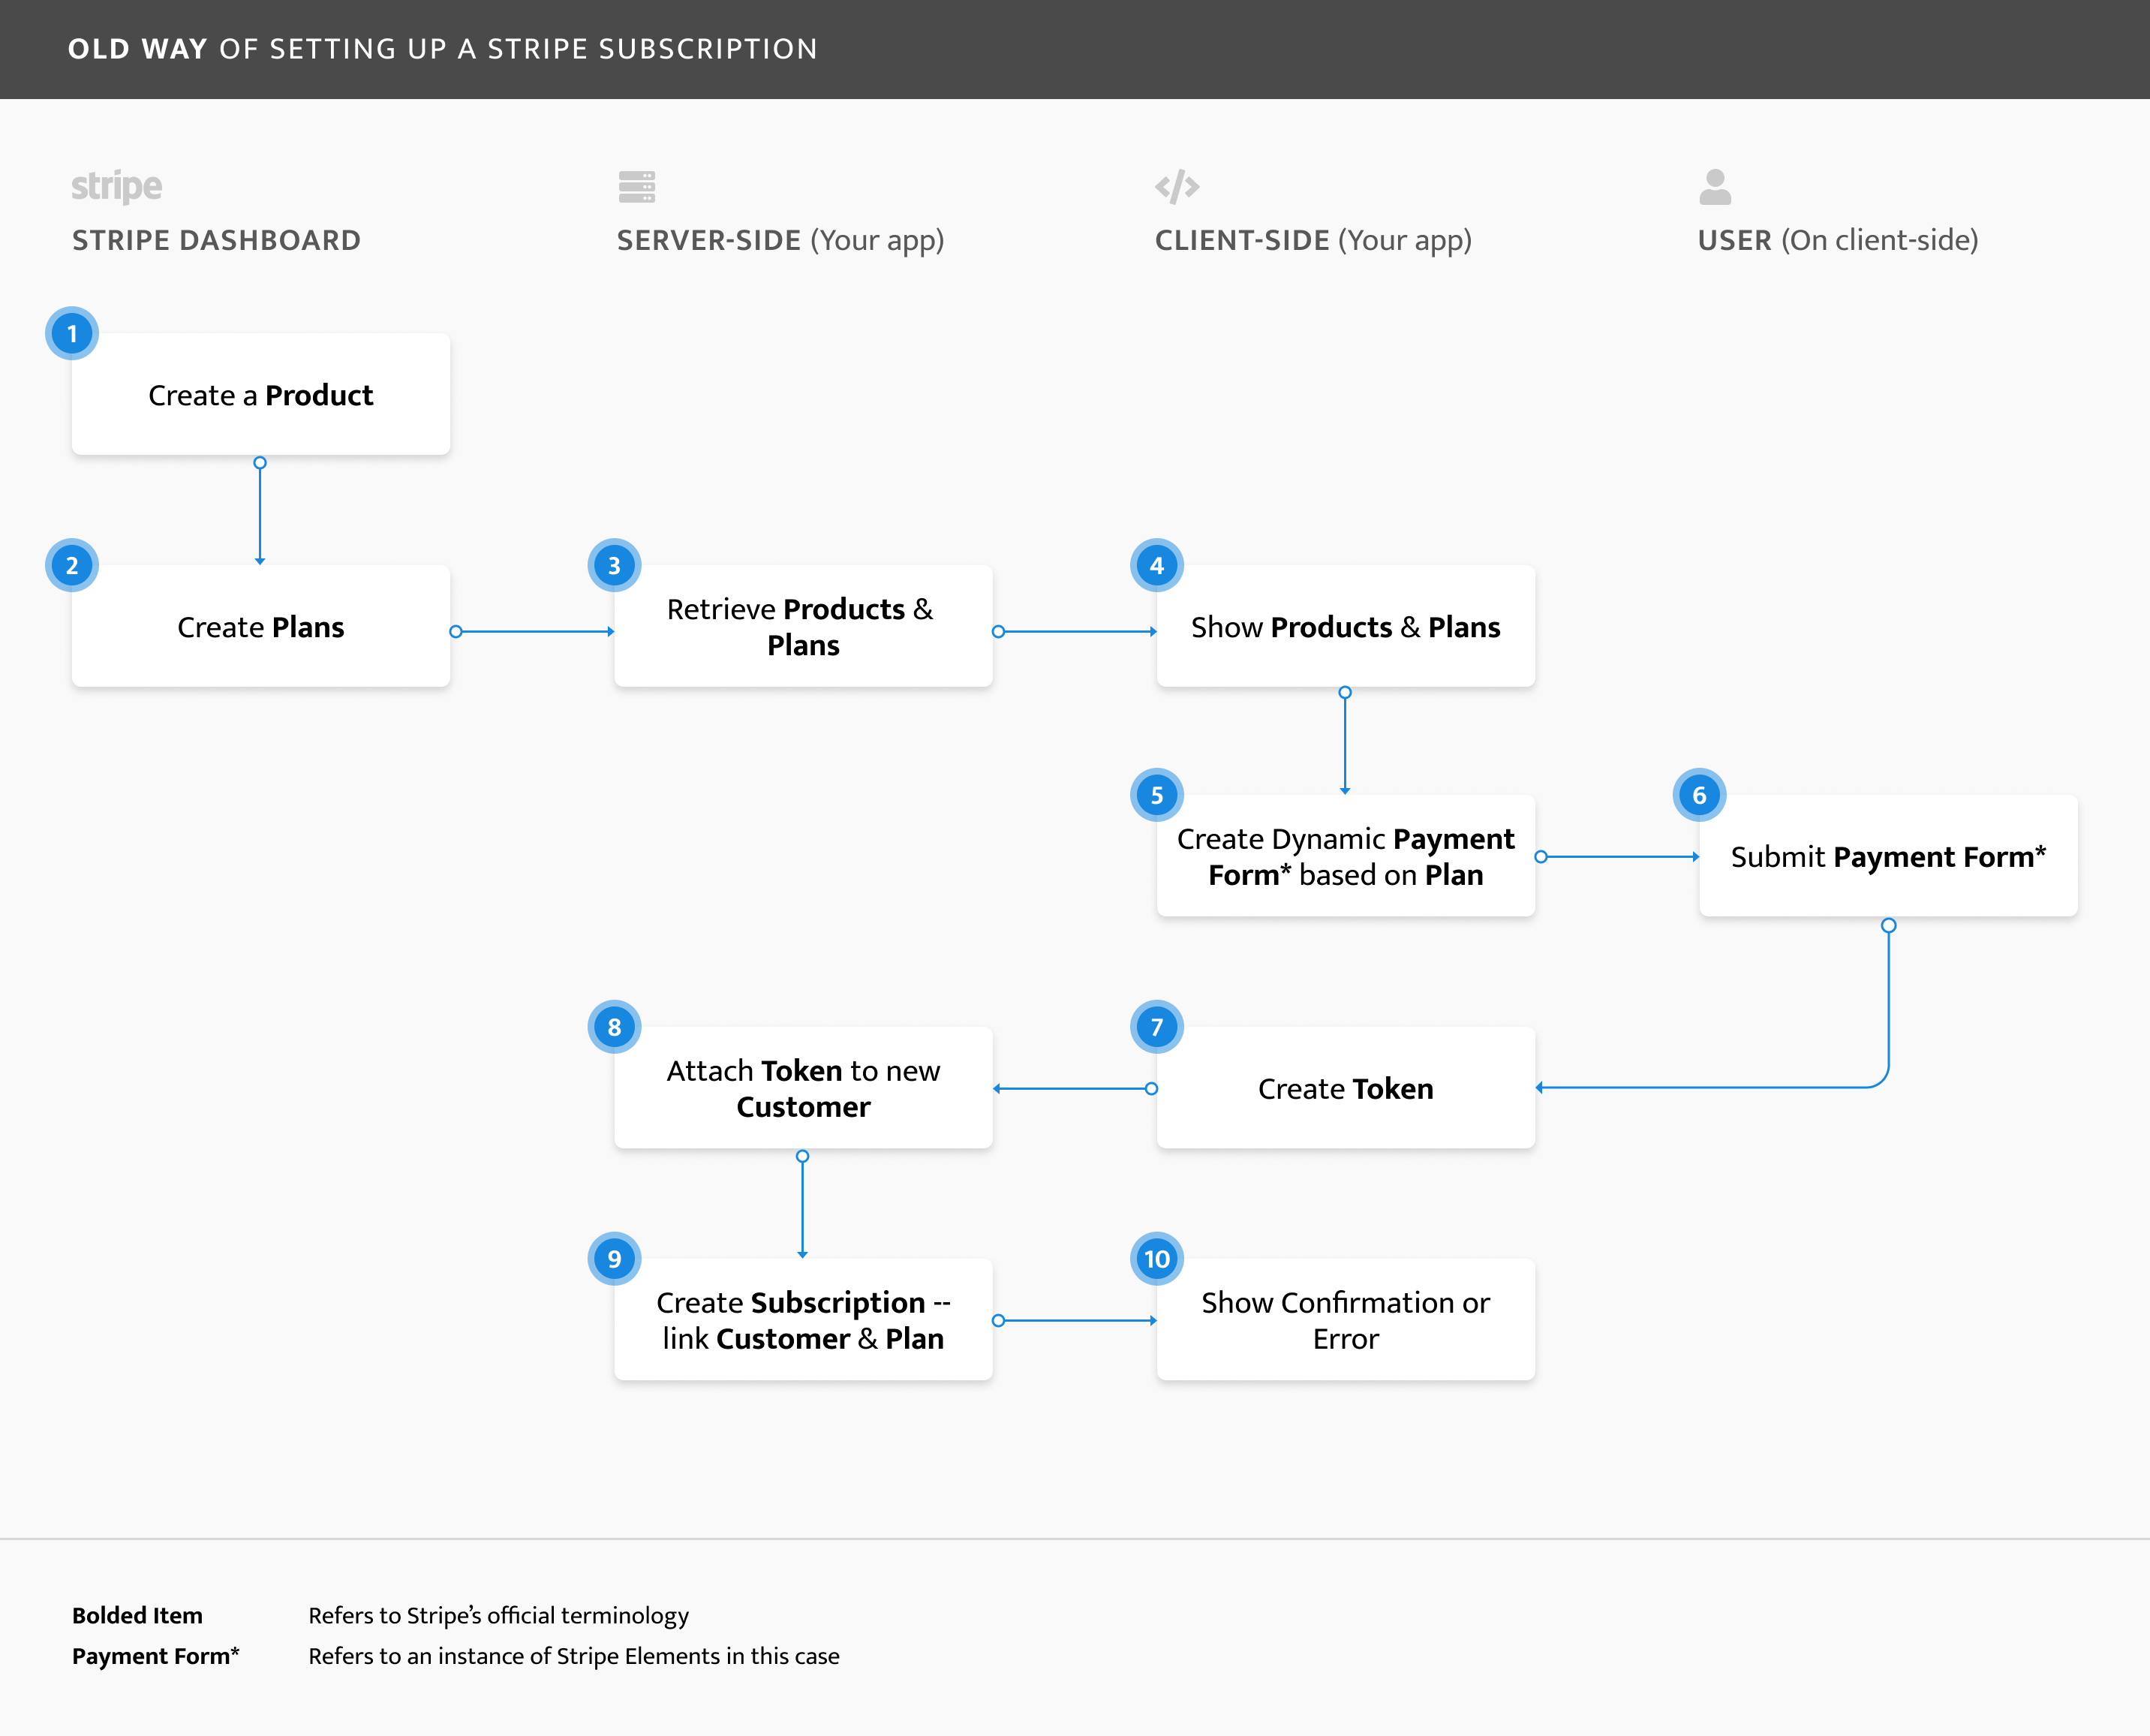
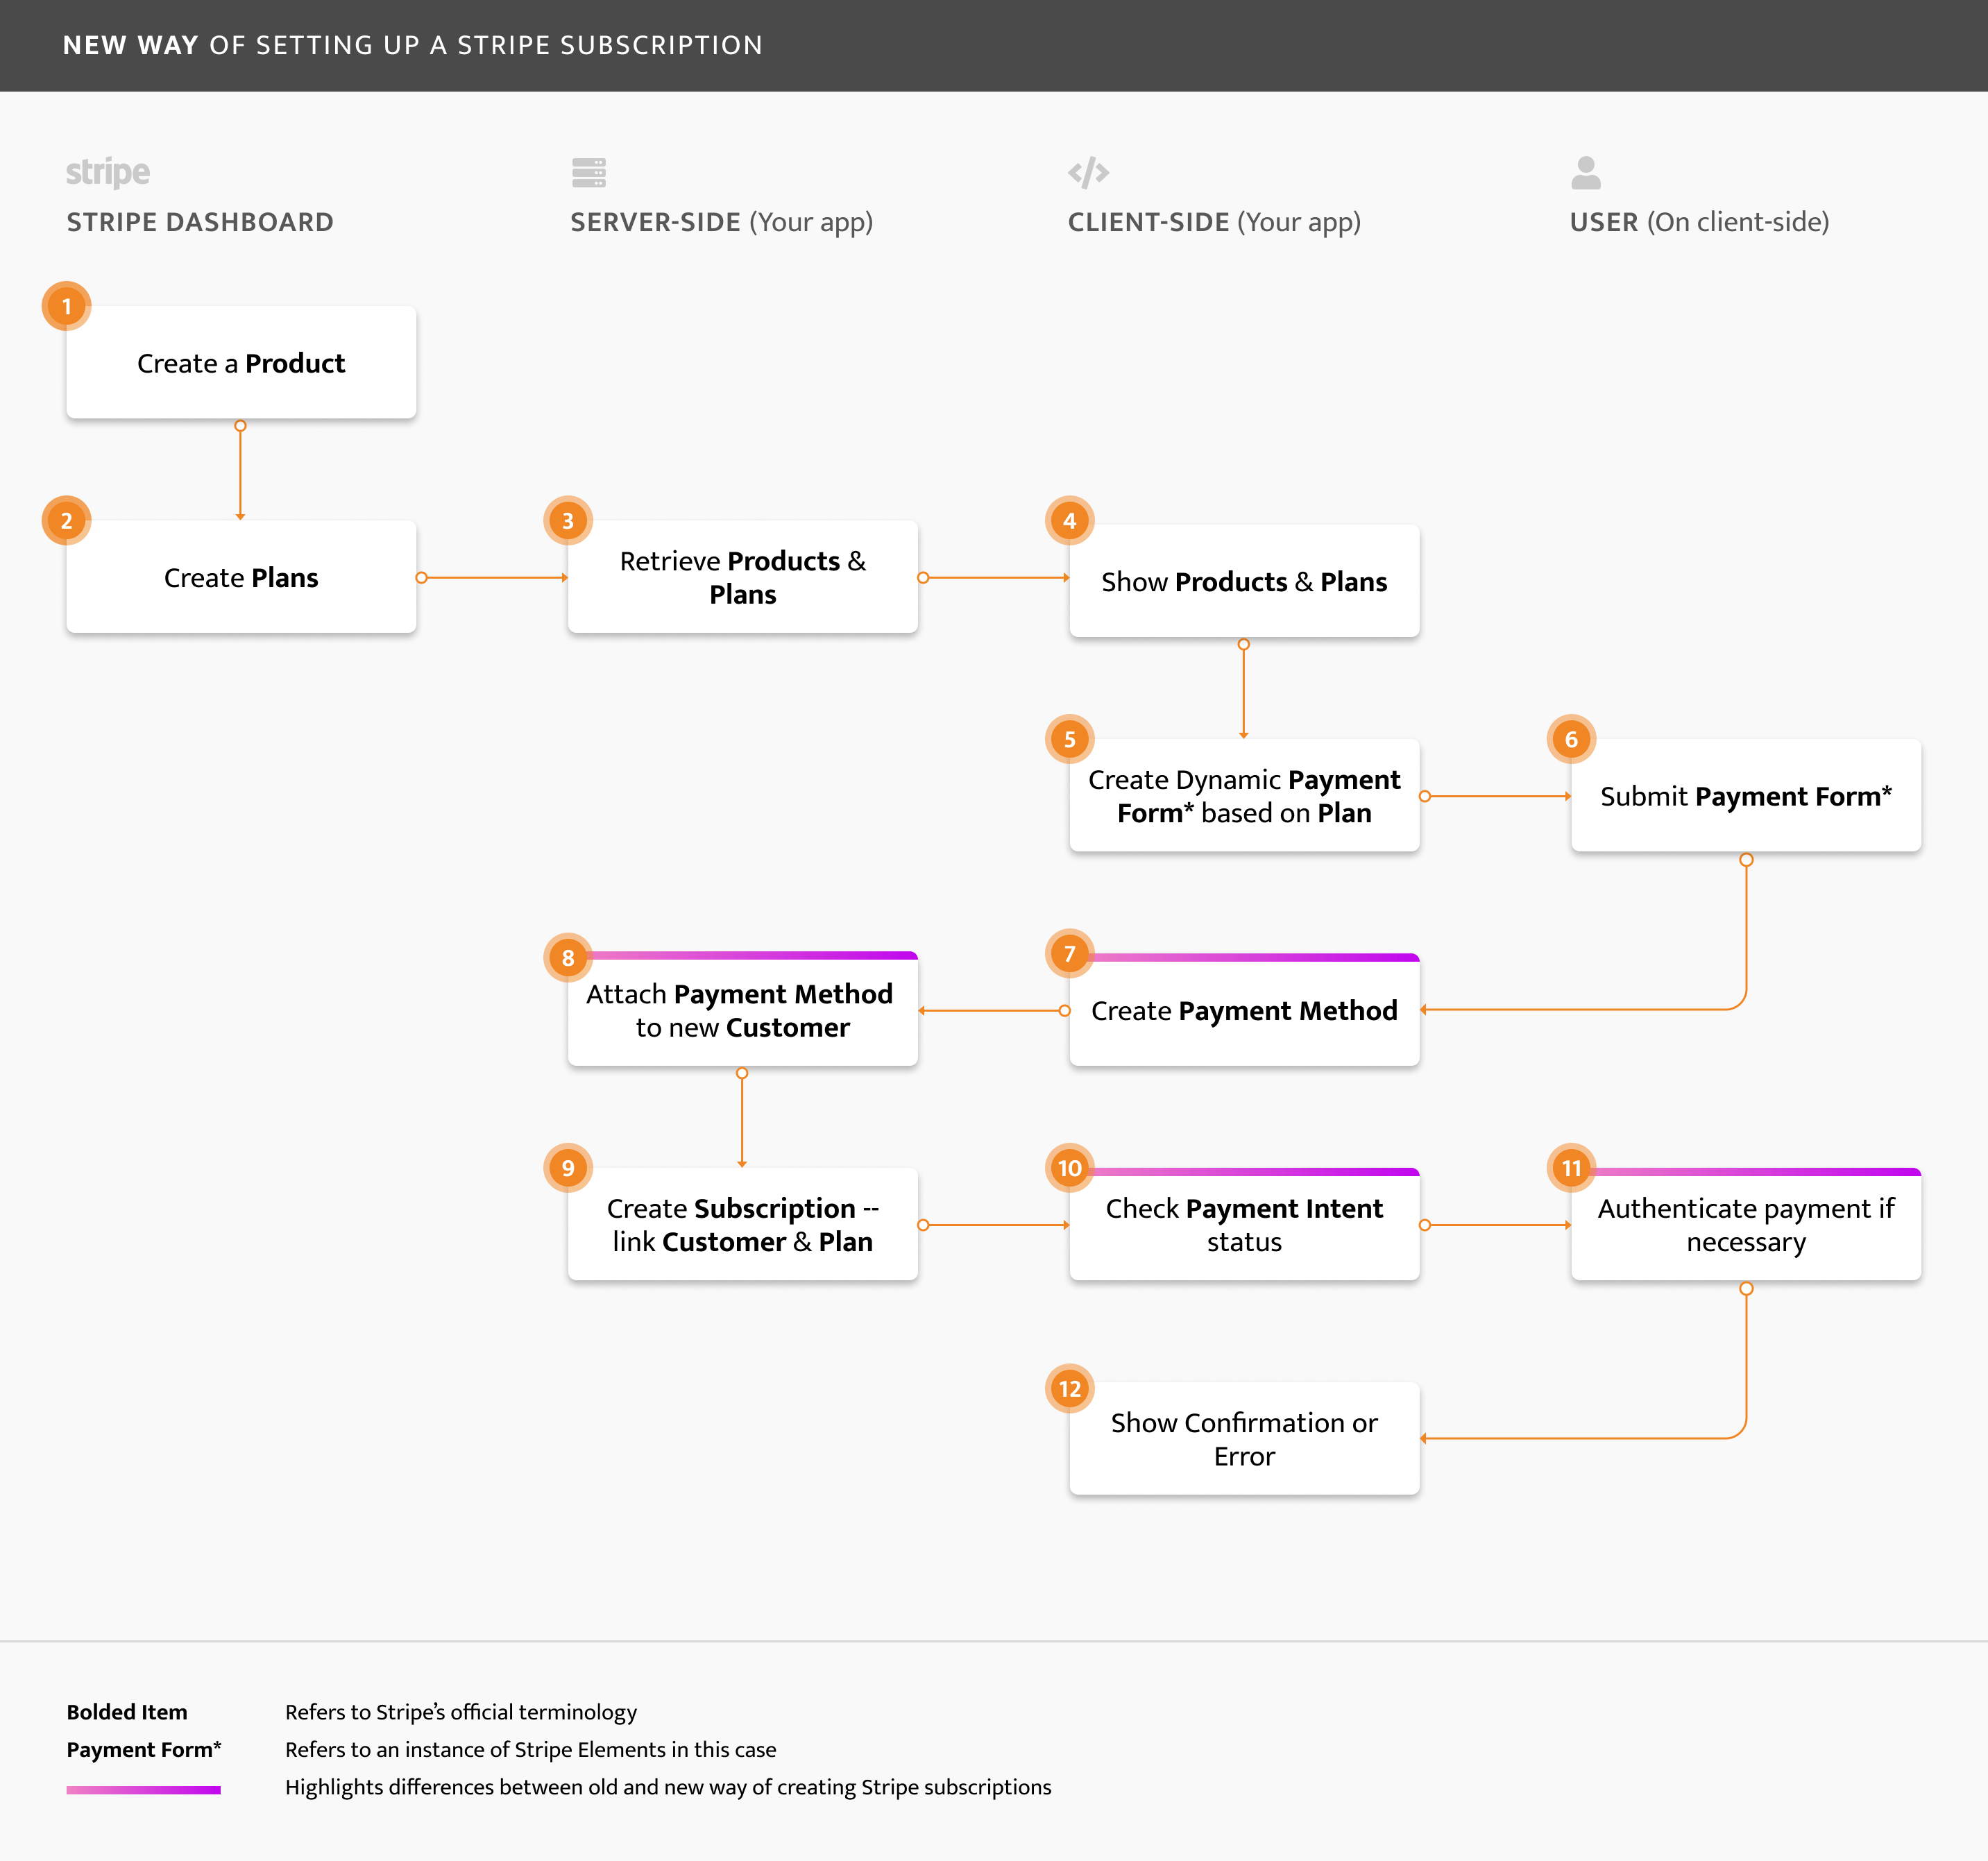
Old vs. New Subscription Workflow
1. Set up Your Payment Form with built-in SCA
Now we'll interact with Stripe's new Payment Methods and Payment Intents APIs and show you how to set up a subscription.
In this section, we'll first set up the following payment screen:
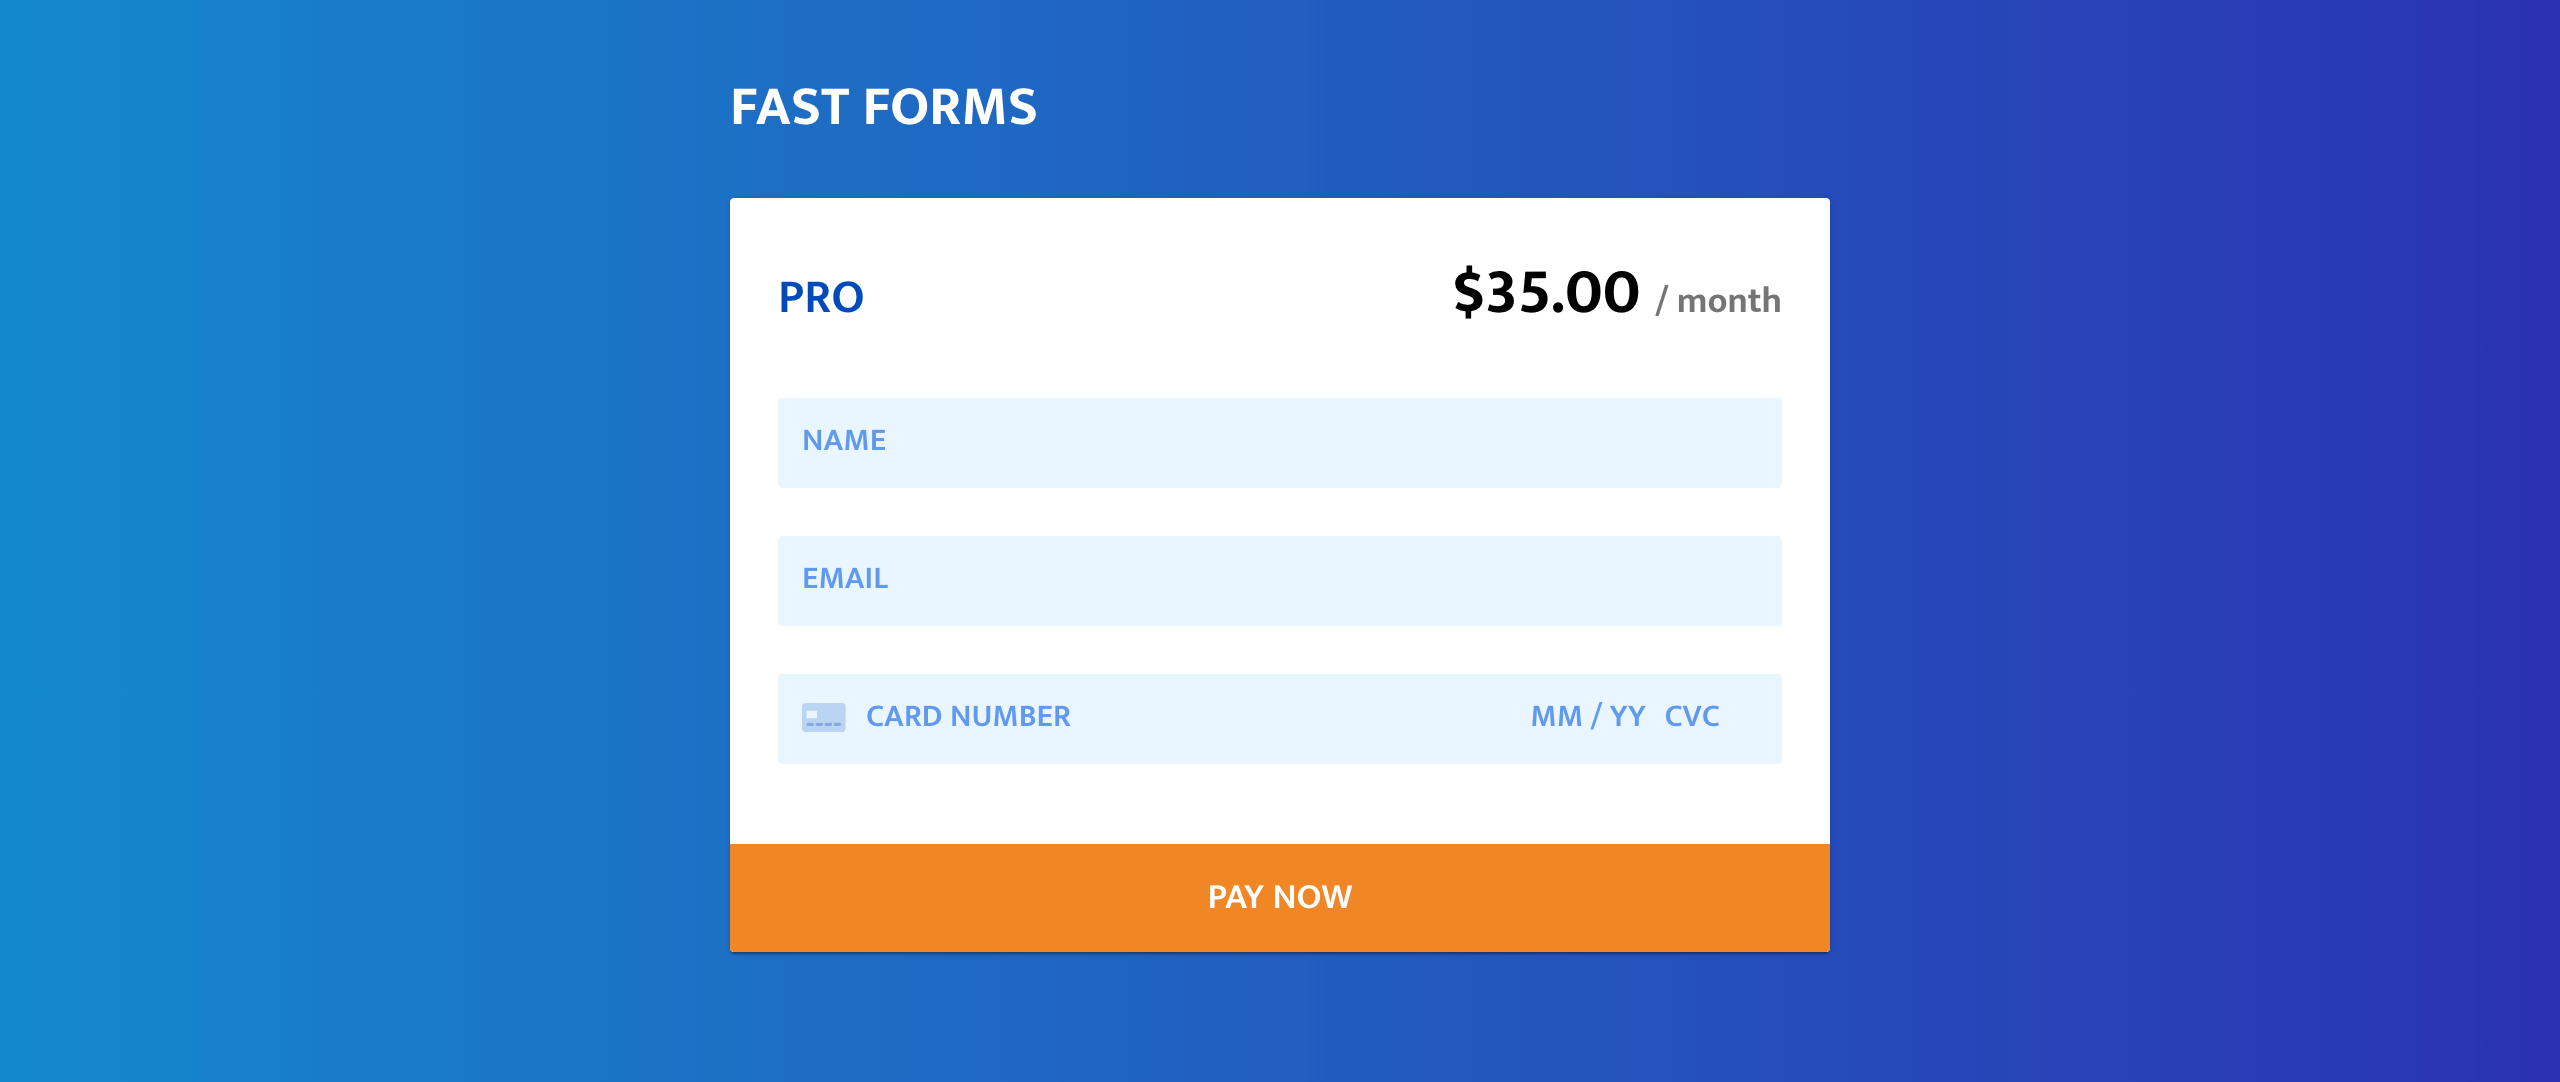
For the remainder of this tutorial, we'll be building off of our example boilerplate Node & Stripe environment. Feel free to follow along with that or adapt the instructions to your own app's structure.
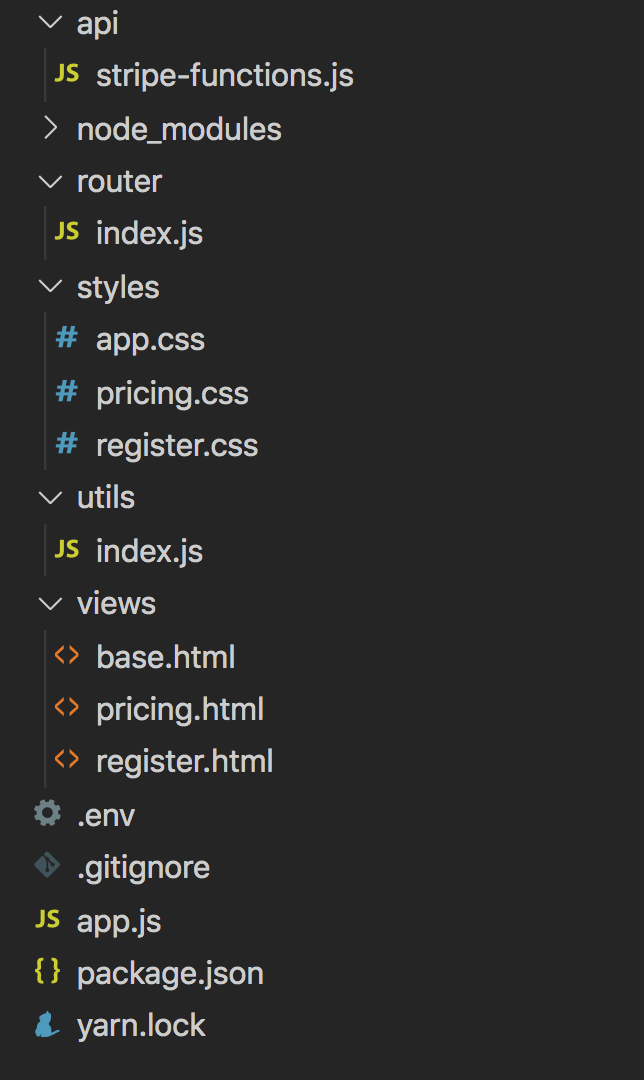
To ensure we're on the same page, the following instructions will assume you have a Node-Express app that uses Nunjucks to render HTML files with a file and folder structure that looks like this:
First, we'll be setting up Stripe Elements to collect and handle card information. We're using Stripe Elements over Stripe Checkout to provide a more brand-specific, customized payment experience.
Before we begin, make sure you include the Stripe client library in all of your app's html files that are rendered to the frontend, regardless of whether those pages will contain Stripe elements. This is something Stripe recommends to protect against fraud:
<script src="https://js.stripe.com/v3/"></script>Now let's dive into the code for our subscription registration page!
If you'd prefer to see all the code for this page all at once instead of broken down as snippets, please check out this Github link:
https://github.com/code-nebula/stripe-subscriptions-sca/blob/master/views/register.html
HTML section — views/register.html
The code below is an expanded version of the register.html file from our boilerplate, where we pass in {{ productName }} and {{ plan }} using Nunjucks and Express.
Our original register.html file contained a form for customers to input their name and email, along with the setup to mount a Stripe card element.
Let's add to that by creating various divs to represent different states after form submission — loading, success, and error. These divs are won't be shown initially because of the "hide" class, but in the Javascript Section, we'll conditionally show those divs when appropriate.
<script>
</script>
Javascript section — views/register.html
First, we'll initialize an instance of the Stripe client-side Javascript library by passing our Publishable Test key as a parameter.
You can find this key on the Stripe dashboard under the Developers section:
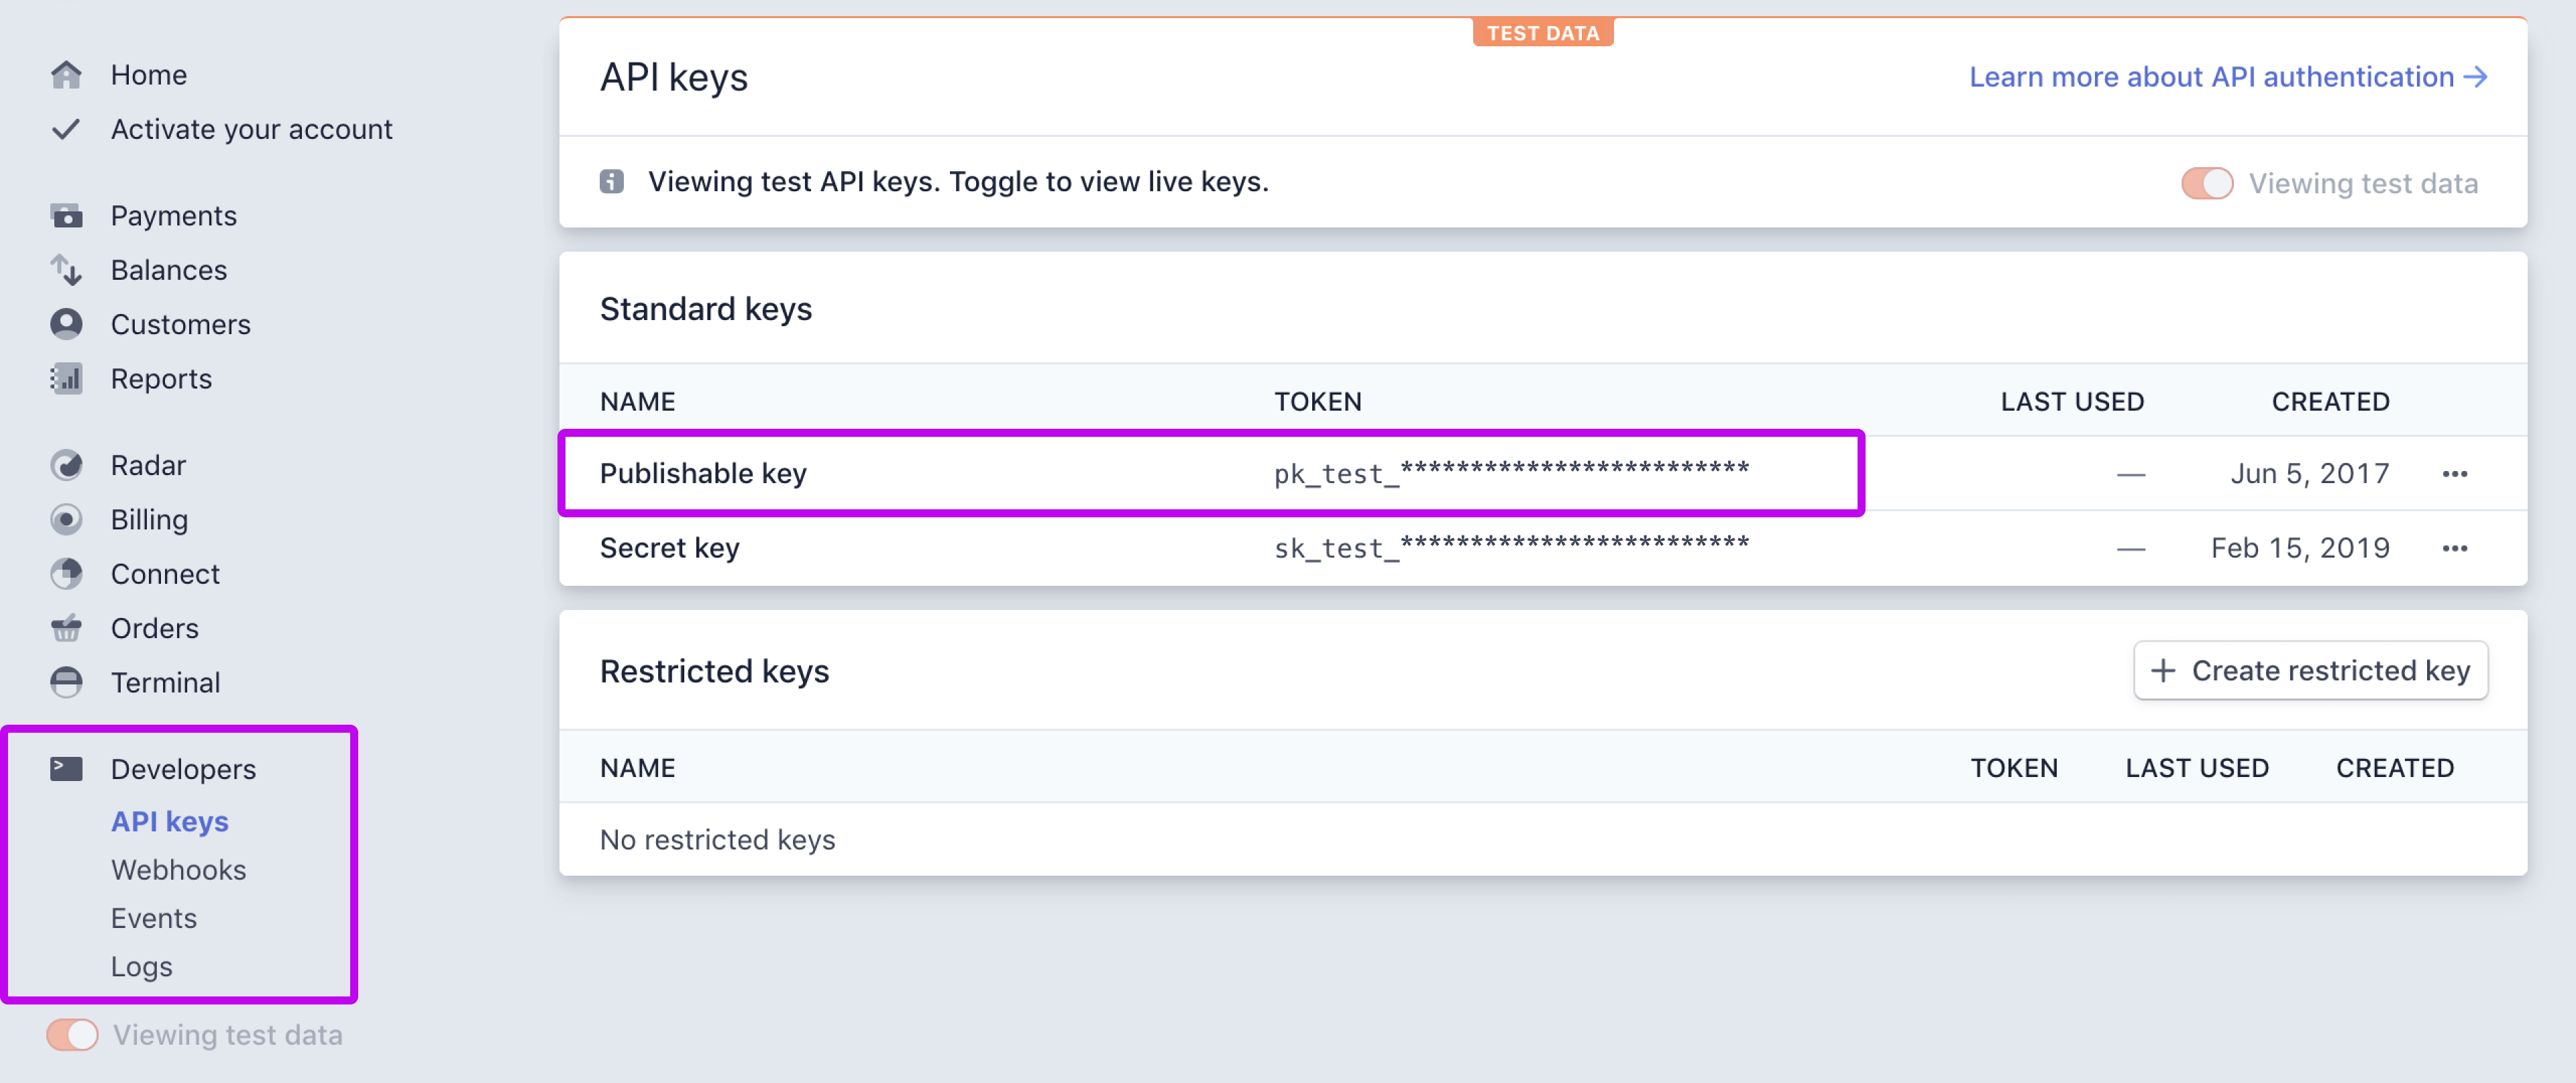
Our Stripe Publishable key (unlike our Stripe Secret Key) is safe to include in your client-side code and is necessary to render Stripe elements on the frontend. Let's add that to our register.html between the script tags.
      <script>
      var stripe = Stripe('pk_test_************************');
      </script>
Next, we create an instance of Stripe Elements. Since we're using a less common web font (Mukta) in this tutorial, we need to provide the font source if we want our Stripe Elements instance to have the font.
The Stripe Elements instance is wrapped in an iframe, which makes it difficult to style with our own CSS. Stripe understands this, so they allow us to define our own custom styles object that can be passed into the Elements instance.
The styles object will affect the card input itself and not the container. The styling for the container is handled in our app.css file.
The base property refers to the normal state of the Elements instance, whereas invalid refers to the error state.
      /* INITIALIZE STRIPE ELEMENTS */

      /* To use certain web fonts, load in source */
      var elements = stripe.elements({
        fonts: [
          {
            cssSrc: 'https://fonts.googleapis.com/css?family=Mukta:400,600,700&display=swap',
          }
        ],
      });

      /* Set up styles for your Stripe Elements instance --
       * To make it match your site's design
       */
      var elementsStyles = {
        base: {
          color: "#004ABB",
          iconColor: "#004ABB",
          fontFamily: "'Mukta', Helvetica, sans-serif",
          fontWeight: "600",
          fontSmoothing: "antialiased",
          fontSize: "16px",
          "::placeholder": {
            color: "#6099EE",
            textTransform: "uppercase",
          },
        },
        invalid: {
          color: "#ff5252",
          iconColor: "#ff5252",
        },
      };
Next, since we want to accept card payments, we tell our Stripe Elements instance to create the card element. The Stripe card element is an input field that allows users to enter their credit or debit card information securely.
We then use Javascript to mount that Stripe Elements card instance to the #card-element div in our register.html file.
We also set up an event listener on the instance to handle any errors. It listens for changes on the input, and if an error does occur, it displays the error within the #card-errors div.
      /* HELPER FUNCTIONS */

      /* Display error within "#card-errors" div */
      function displayError(error) {
        var cardError = document.getElementById('card-errors');
        cardError.textContent = error ? error.message : '';
      }

      /* Show element specified by the "id" parameter
       * Hide all other "states"
       */
      function showState(id) {
        document.getElementById('payment-form').classList.add('hide');
        document.getElementById('loading').classList.add('hide');
        document.getElementById('success').classList.add('hide');
        document.getElementById('error').classList.add('hide');

        document.getElementById(id).classList.remove('hide');
      }


      /* MORE STRIPE ELEMENTS ACTIONS */

      /* Create "card" instance of Stripe Elements and mount it to "#card-element" div */
      var cardElement = elements.create("card", { style: elementsStyles });
      cardElement.mount("#card-element");

      /* Set up event listeners on card */
      cardElement.addEventListener('change', ({error}) => {
        displayError(error);
      });
Using the Form Submission to Create a Payment Method
Next, we set up our form submission handler. We'll be using the fetch API to pass user submissions to our Express server.
To do this, we'll first want to prevent the form's default submission action using event.preventDefault(), and then grab our customer's name and email from the respective form inputs.
This is also when we start interacting with Stripe's new Payment Methods API! The Payment Methods API replaces tokens, which we used in the past to securely submit customer card information.
We want to use the form submission to create a Stripe Payment Method of type card by calling stripe.createPaymentMethod, with the Stripe Elements instance and the customer's information under billing_details as parameters.
If there are any errors, we populate that in the #card-errors div. Otherwise, we pass the newly created payment method to our stripePaymentMethodHandler function.
      /* FORM SUBMISSION */
      var form = document.getElementById('payment-form');

      form.addEventListener('submit', (event) => {
        event.preventDefault(); // Prevent the default form submission
        const customerName = document.getElementById('customerName').value;
        const customerEmail = document.getElementById('customerEmail').value;

        /* Create your 'card' payment method */
        stripe.createPaymentMethod({
          type: 'card',
          card: cardElement,
          /* Reference: https://stripe.com/docs/api/payment_methods/create#create_payment_method-billing_details */
          billing_details: {
            name: customerName,
            email: customerEmail,
            // address
            // phone
          },
        }).then((result) => {
          if (result.error) {
            displayError(result.error);
            console.error('Error creating Stripe Payment Method: ', result.error);
          } else {
            /* Proceed to next step of creating customer and subscription */
            stripePaymentMethodHandler(result.paymentMethod);
          }
        });
      });
Using the Payment Method to Create a Subscription
Here's an overview of what our stripePaymentMethodHandler will do:
- Show a loading screen while we process the payment
- Use the Fetch API to make a POST request to the /handlePayment route (we will show you how to set this up below), passing in the customer email, customer name, plan information, and the payment method ID in the request body
-
Once the request is processed, if there's an error, we'll show our error screen. Otherwise, we call
manageSubscriptionStatus(defined in an upcoming section) to check if SCA is required based on the customer's card
      function stripePaymentMethodHandler(paymentMethod) {
        showState('loading'); // Show loader

        fetch('/handlePayment', {
          method: 'post',
          headers: {'Content-Type': 'application/json'},
          body: JSON.stringify({
            email: document.getElementById('customerEmail').value,
            name: document.getElementById('customerName').value,
            plan: document.getElementById('plan').value,
            paymentMethodId: paymentMethod.id,
          }),
        }).then((response) => {
          /* Can only call response.json() once, otherwise you will get an error */
          return response.json();
        }).then((parsedResponse) => {
          /* Proceed to next step of checking Payment Intent status */
          manageSubscriptionStatus(parsedResponse.subscription);
        }).catch((err) => {
          console.error('Error creating subscription:', err);
          showState('error'); // Show error state
        });
      }
Next, we'll show how to set up your /handlePayment route.
api/stripe-functions.js
Let's create a new function called createCustomerAndSubscription.
This function first creates a new Stripe customer and attaches the ID of the payment method created in the form submission to this customer, setting it as their default_payment_method.
It then creates a subscription and links it to the customer, automatically charging the payment method they provided based on the subscription plan's price and default trial settings.
We also expand the latest_invoice.payment_intent object attached to the subscription, as we'll want to check the latest invoice's Payment Intent to see if SCA is required for this card.
Finally, we return the subscription that was created.
      /**
       * @param {string} paymentMethodId The id of your customer's Stripe Payment Method (an
       * abstraction of your customer's card information)
       * @param {Object} customerInfo An object containing your customer's email, name,
       * and the plan your customer wants to pay for
       * @return {Object} Your customer's newly created subscription
       */
      async function createCustomerAndSubscription(paymentMethodId, customerInfo) {
        /* Create customer and set default payment method */
        const customer = await stripe.customers.create({
          payment_method: paymentMethodId,
          email: customerInfo.email,
          name: customerInfo.name,
          invoice_settings: {
            default_payment_method: paymentMethodId,
          },
        });

        /* Create subscription and expand the latest invoice's Payment Intent
         * We'll check this Payment Intent's status to determine if this payment needs SCA
         */
        const subscription = await stripe.subscriptions.create({
          customer: customer.id,
          items: [{
            plan: customerInfo.planId,
          }],
          expand: ["latest_invoice.payment_intent"],
        });

        return subscription;
      }


      module.exports = {
        getProductsAndPlans,
        createCustomerAndSubscription
      };
router/index.js
Here we'll set up our /handlePayment route to process the request body and call the createCustomerAndSubscription method we just defined. We return the subscription that was created and send it as a JSON.
      router.post('/handlePayment', async (req, res) => {
        const parsedPlan = JSON.parse(req.body.plan);

        const customerInfo = {
          name: req.body.name,
          email: req.body.email,
          planId: parsedPlan.id,
        };

        const subscription = await STRIPE_API.createCustomerAndSubscription(
          req.body.paymentMethodId,
          customerInfo,
        );

        return res.json({ subscription });
      });
Checking the Payment Intent Status to see if SCA is required
After creating our Stripe customer and subscription on the backend, we now head back to the Javascript section of our registration page.
Javascript section — views/register.html
It's time to set up the manageSubscriptionStatus function we mentioned earlier. We call this on the frontend after our subscription has been created and is passed to the client-side from within stripePaymentMethodHandler.
manageSubscriptionStatus should take the subscription JSON returned from the API (createCustomerAndSubscription) and check the subscription's latest invoice for a Payment Intent. If a Payment Intent exists, then we extract its client_secret and status.
The client_secret is a key that is specific to each PaymentIntent. This key is needed when invoking functions like stripe.confirmCardPayment.
Do NOT log the client secret, embed it in URLs, or share it with anyone besides the customer and make sure you have TLS enabled on any page that includes this secret (this shouldn't be an issue when you take your Stripe integration live and have an SSL).
If the Payment Intent status has a value of requires_action or requires_payment_method, you will need to call stripe.confirmCardPayment to trigger a 3D secure modal.
A full list of Payment Intent statuses can be found here.
The code below walks you through successful cases and when to display certain error messages.
      function manageSubscriptionStatus(subscription) {
        const { latest_invoice } = subscription;
        const { payment_intent } = latest_invoice;

        if (payment_intent) {
          /* Do NOT share or embed your client_secret anywhere */
          const { client_secret, status } = payment_intent;
          if (status === "requires_action" || status === "requires_payment_method") {
            stripe.confirmCardPayment(client_secret)
            .then((result) => {
              if (result.error) {
                showState('payment-form');
                displayError(result.error); // Display error message to customer
              } else {
                showState('success'); // Show success state
              }
            }).catch((err) => {
              console.error('Error confirming card payment:', err);
              showState('error'); // Show error state
            });
          } else {
            showState('success'); // Show success state
          }
        } else {
          /* If no payment intent exists, show the success state
           * Usually in this case if you set up a trial with the subscription
           */
          showState('success');
        }
      }
Congrats on making it this far! You should now be able to start your application via npm run start and test out your SCA payment form.
2. Test your Integration
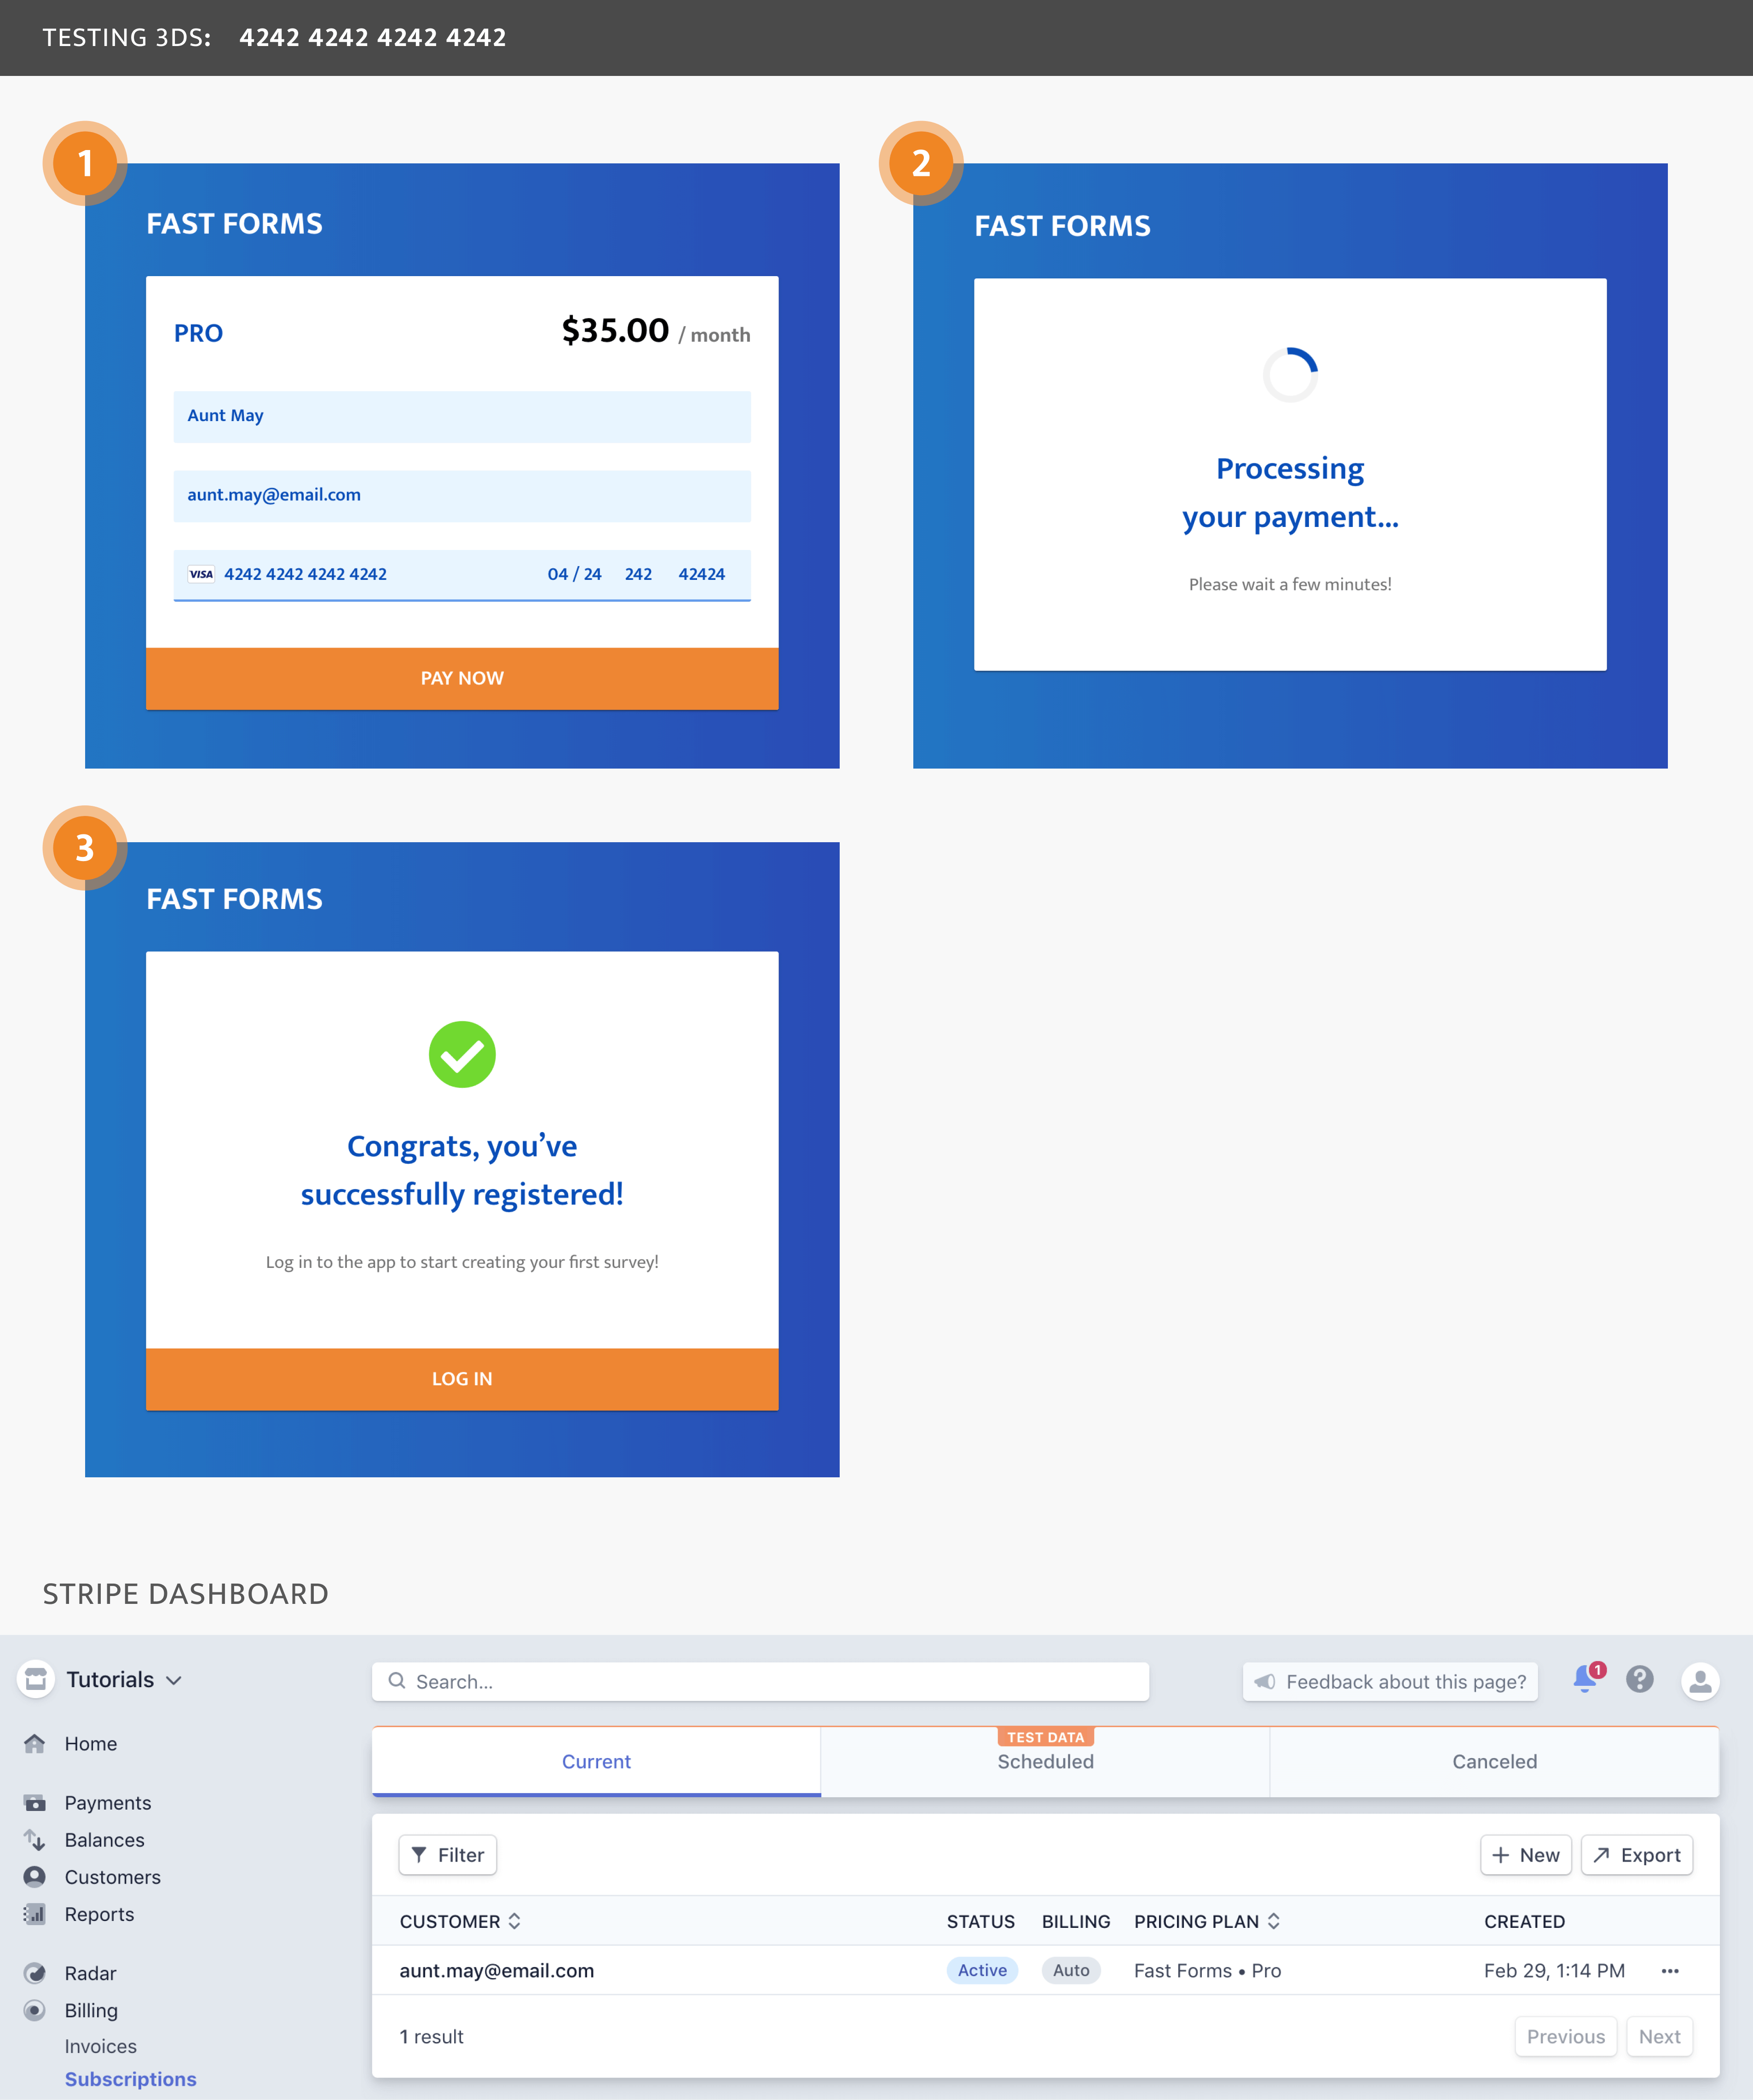
We can test our integration by using a few test card numbers that Stripe recommends. Keep in mind that these will only work if both the Publishable and Secret Stripe Keys you use are from test mode:
- 4242424242424242 — This card does not require authentication. It should successfully create an active subscription.
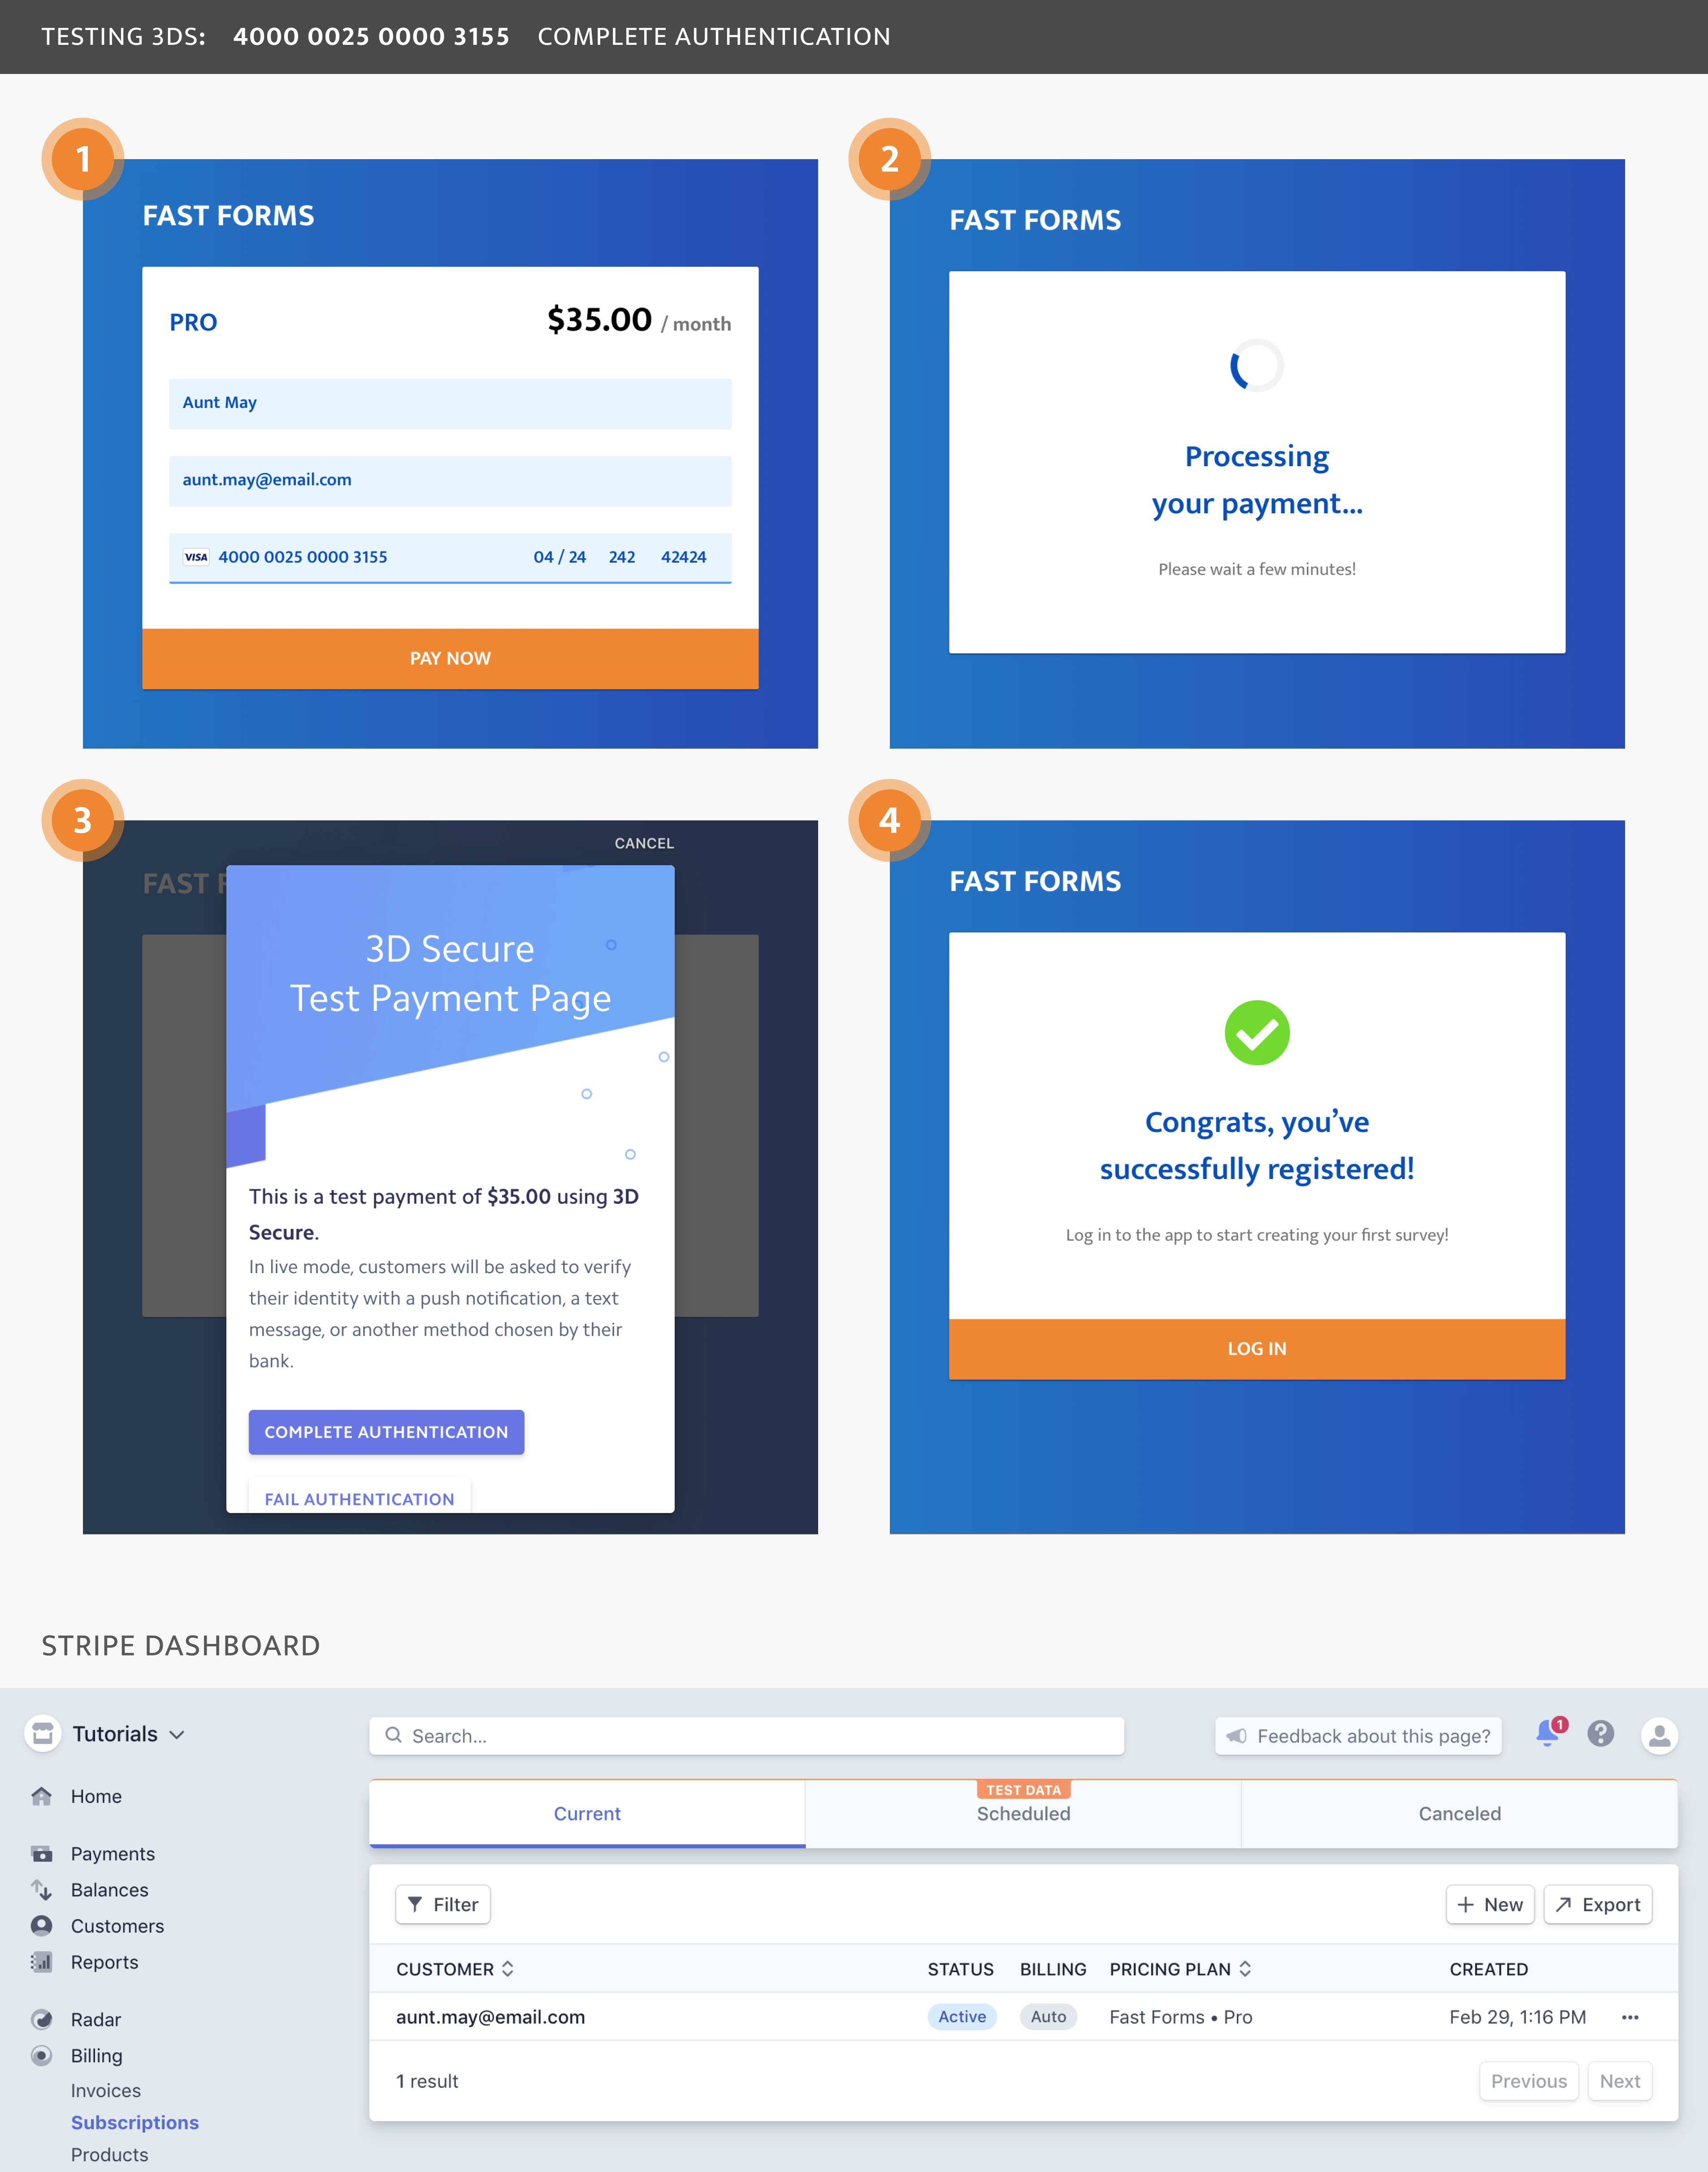
- 4000002500003155 — This card requires SCA. Your customer will see a 3D Secure modal asking them to authenticate the payment. Once the user authenticates the payment, an active subscription is successfully created.
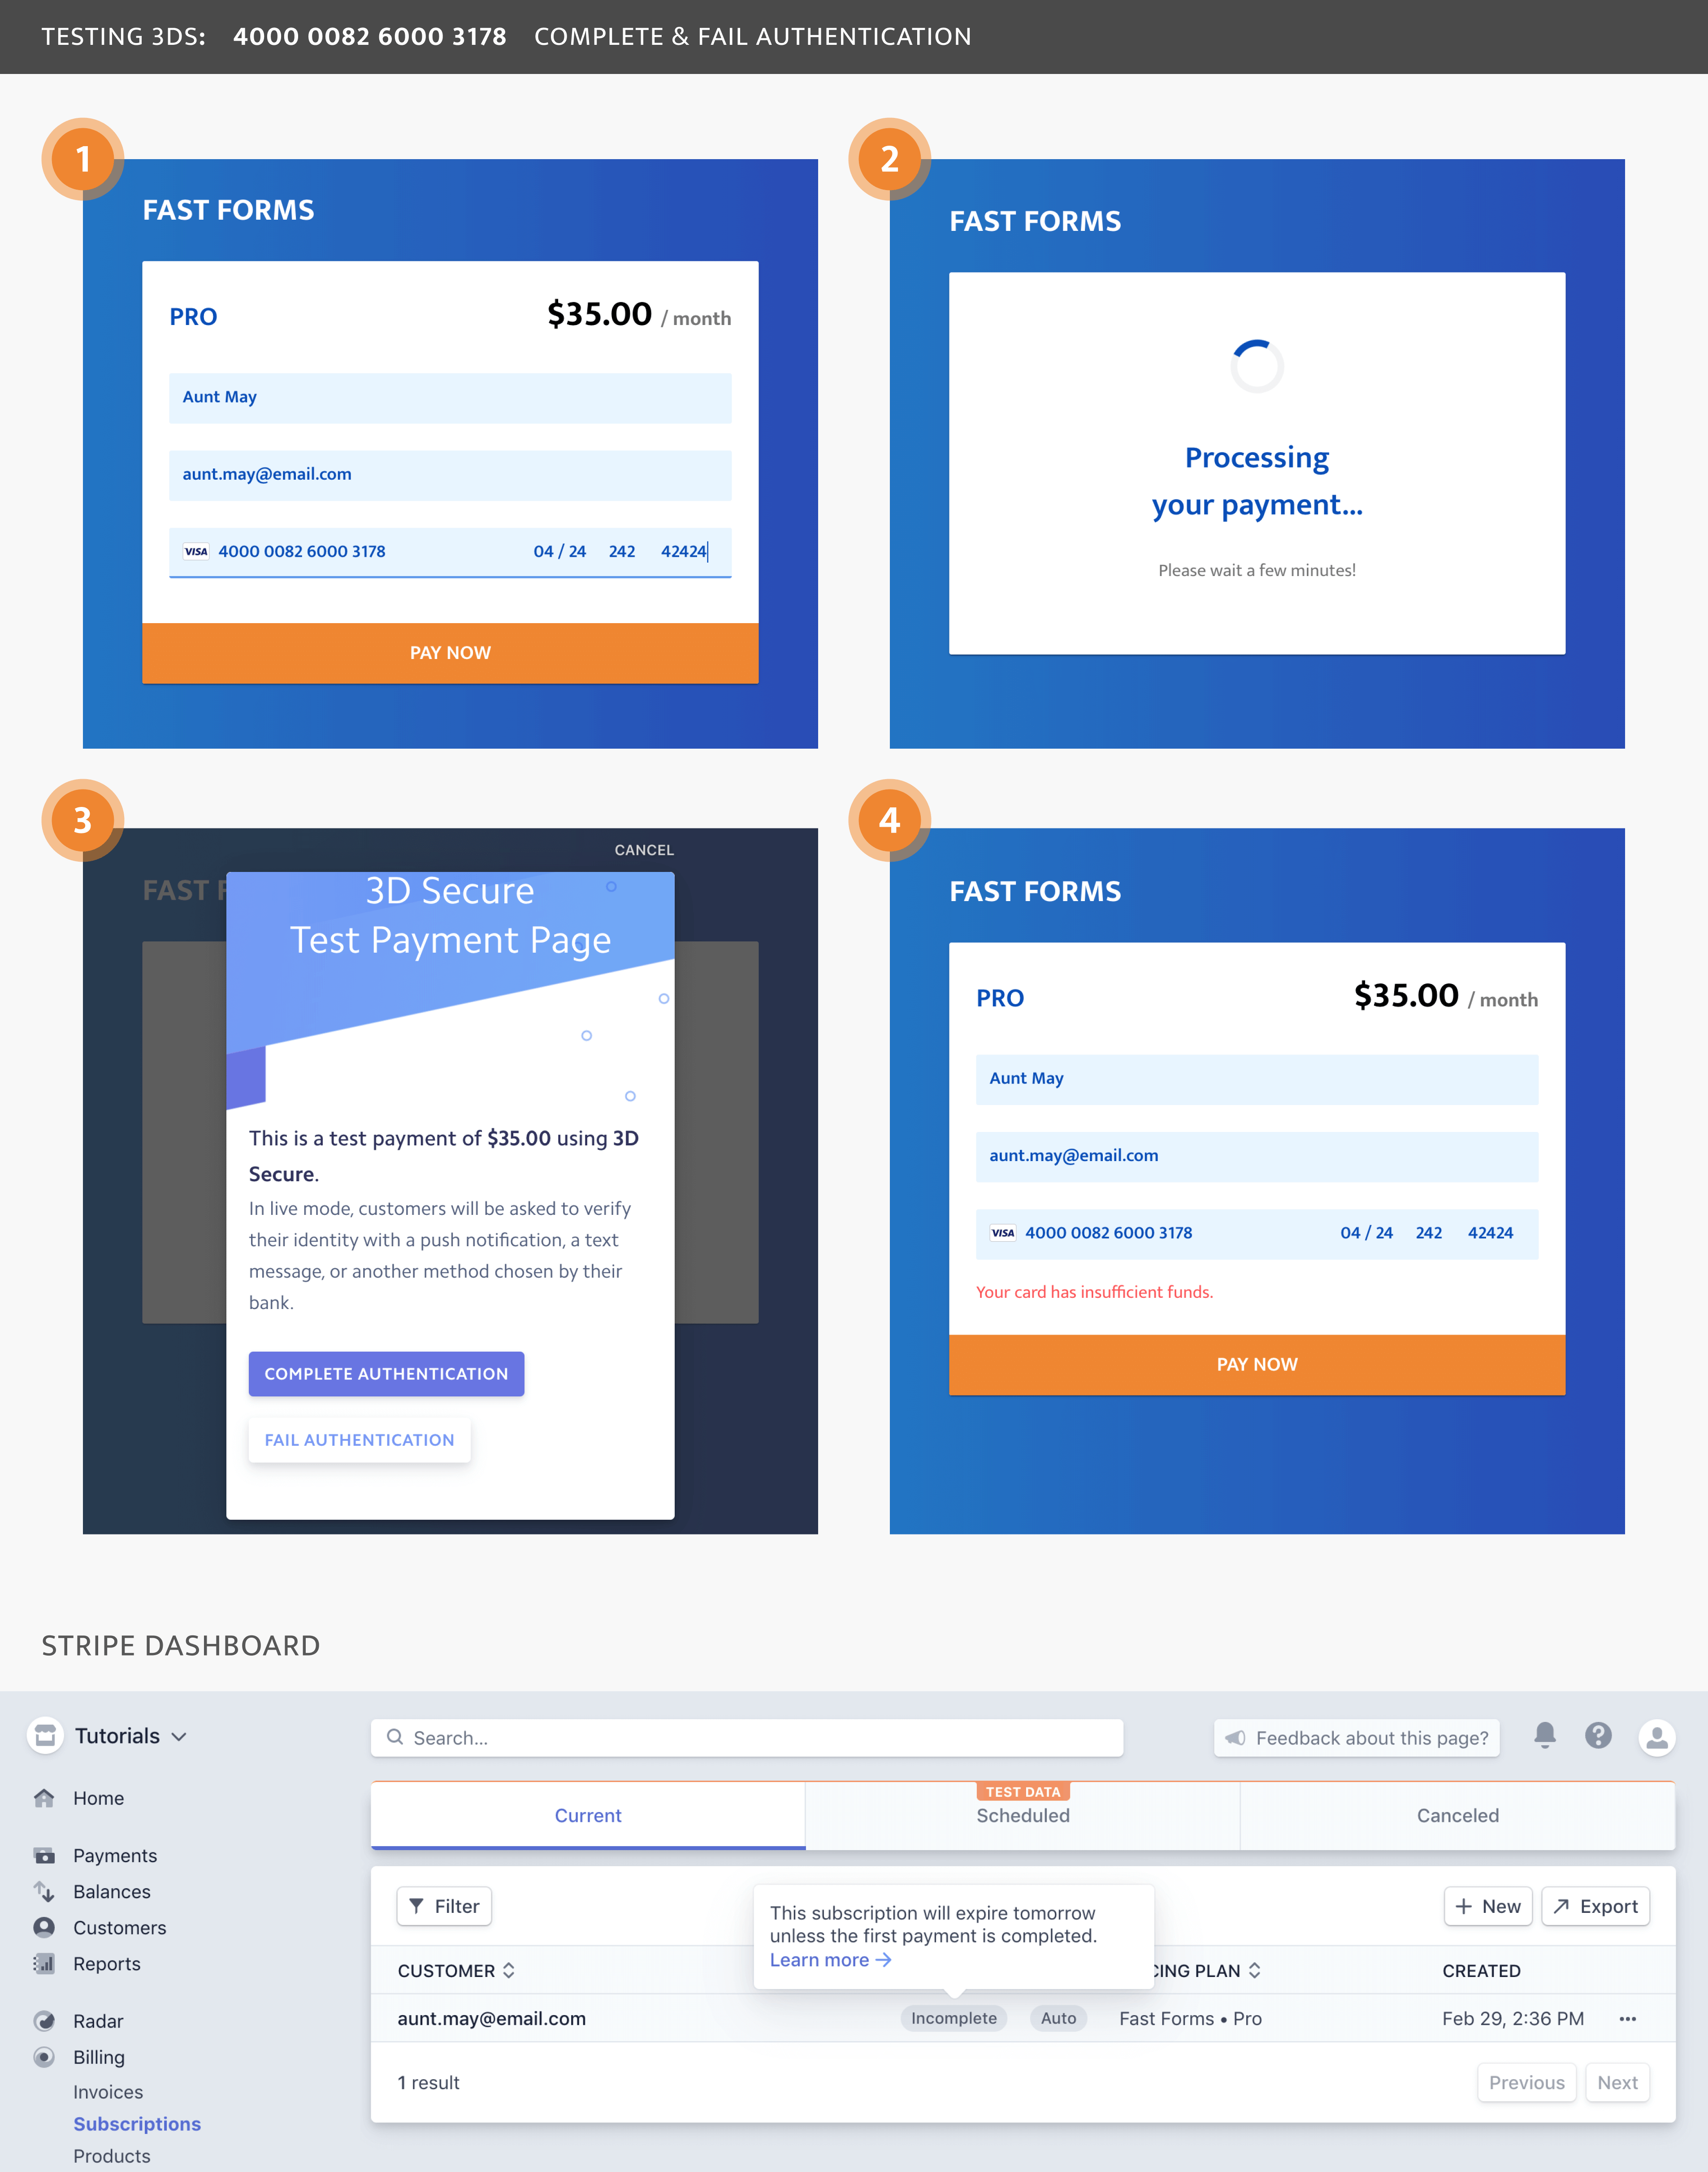
- 4000008260003178 — This card will always fail with an insufficient_funds message.
- Additional 3D Secure Test Cards
When testing your integration, you can simply enter the appropriate card number along with any valid expiration date, CVC/CVV number and zip code.
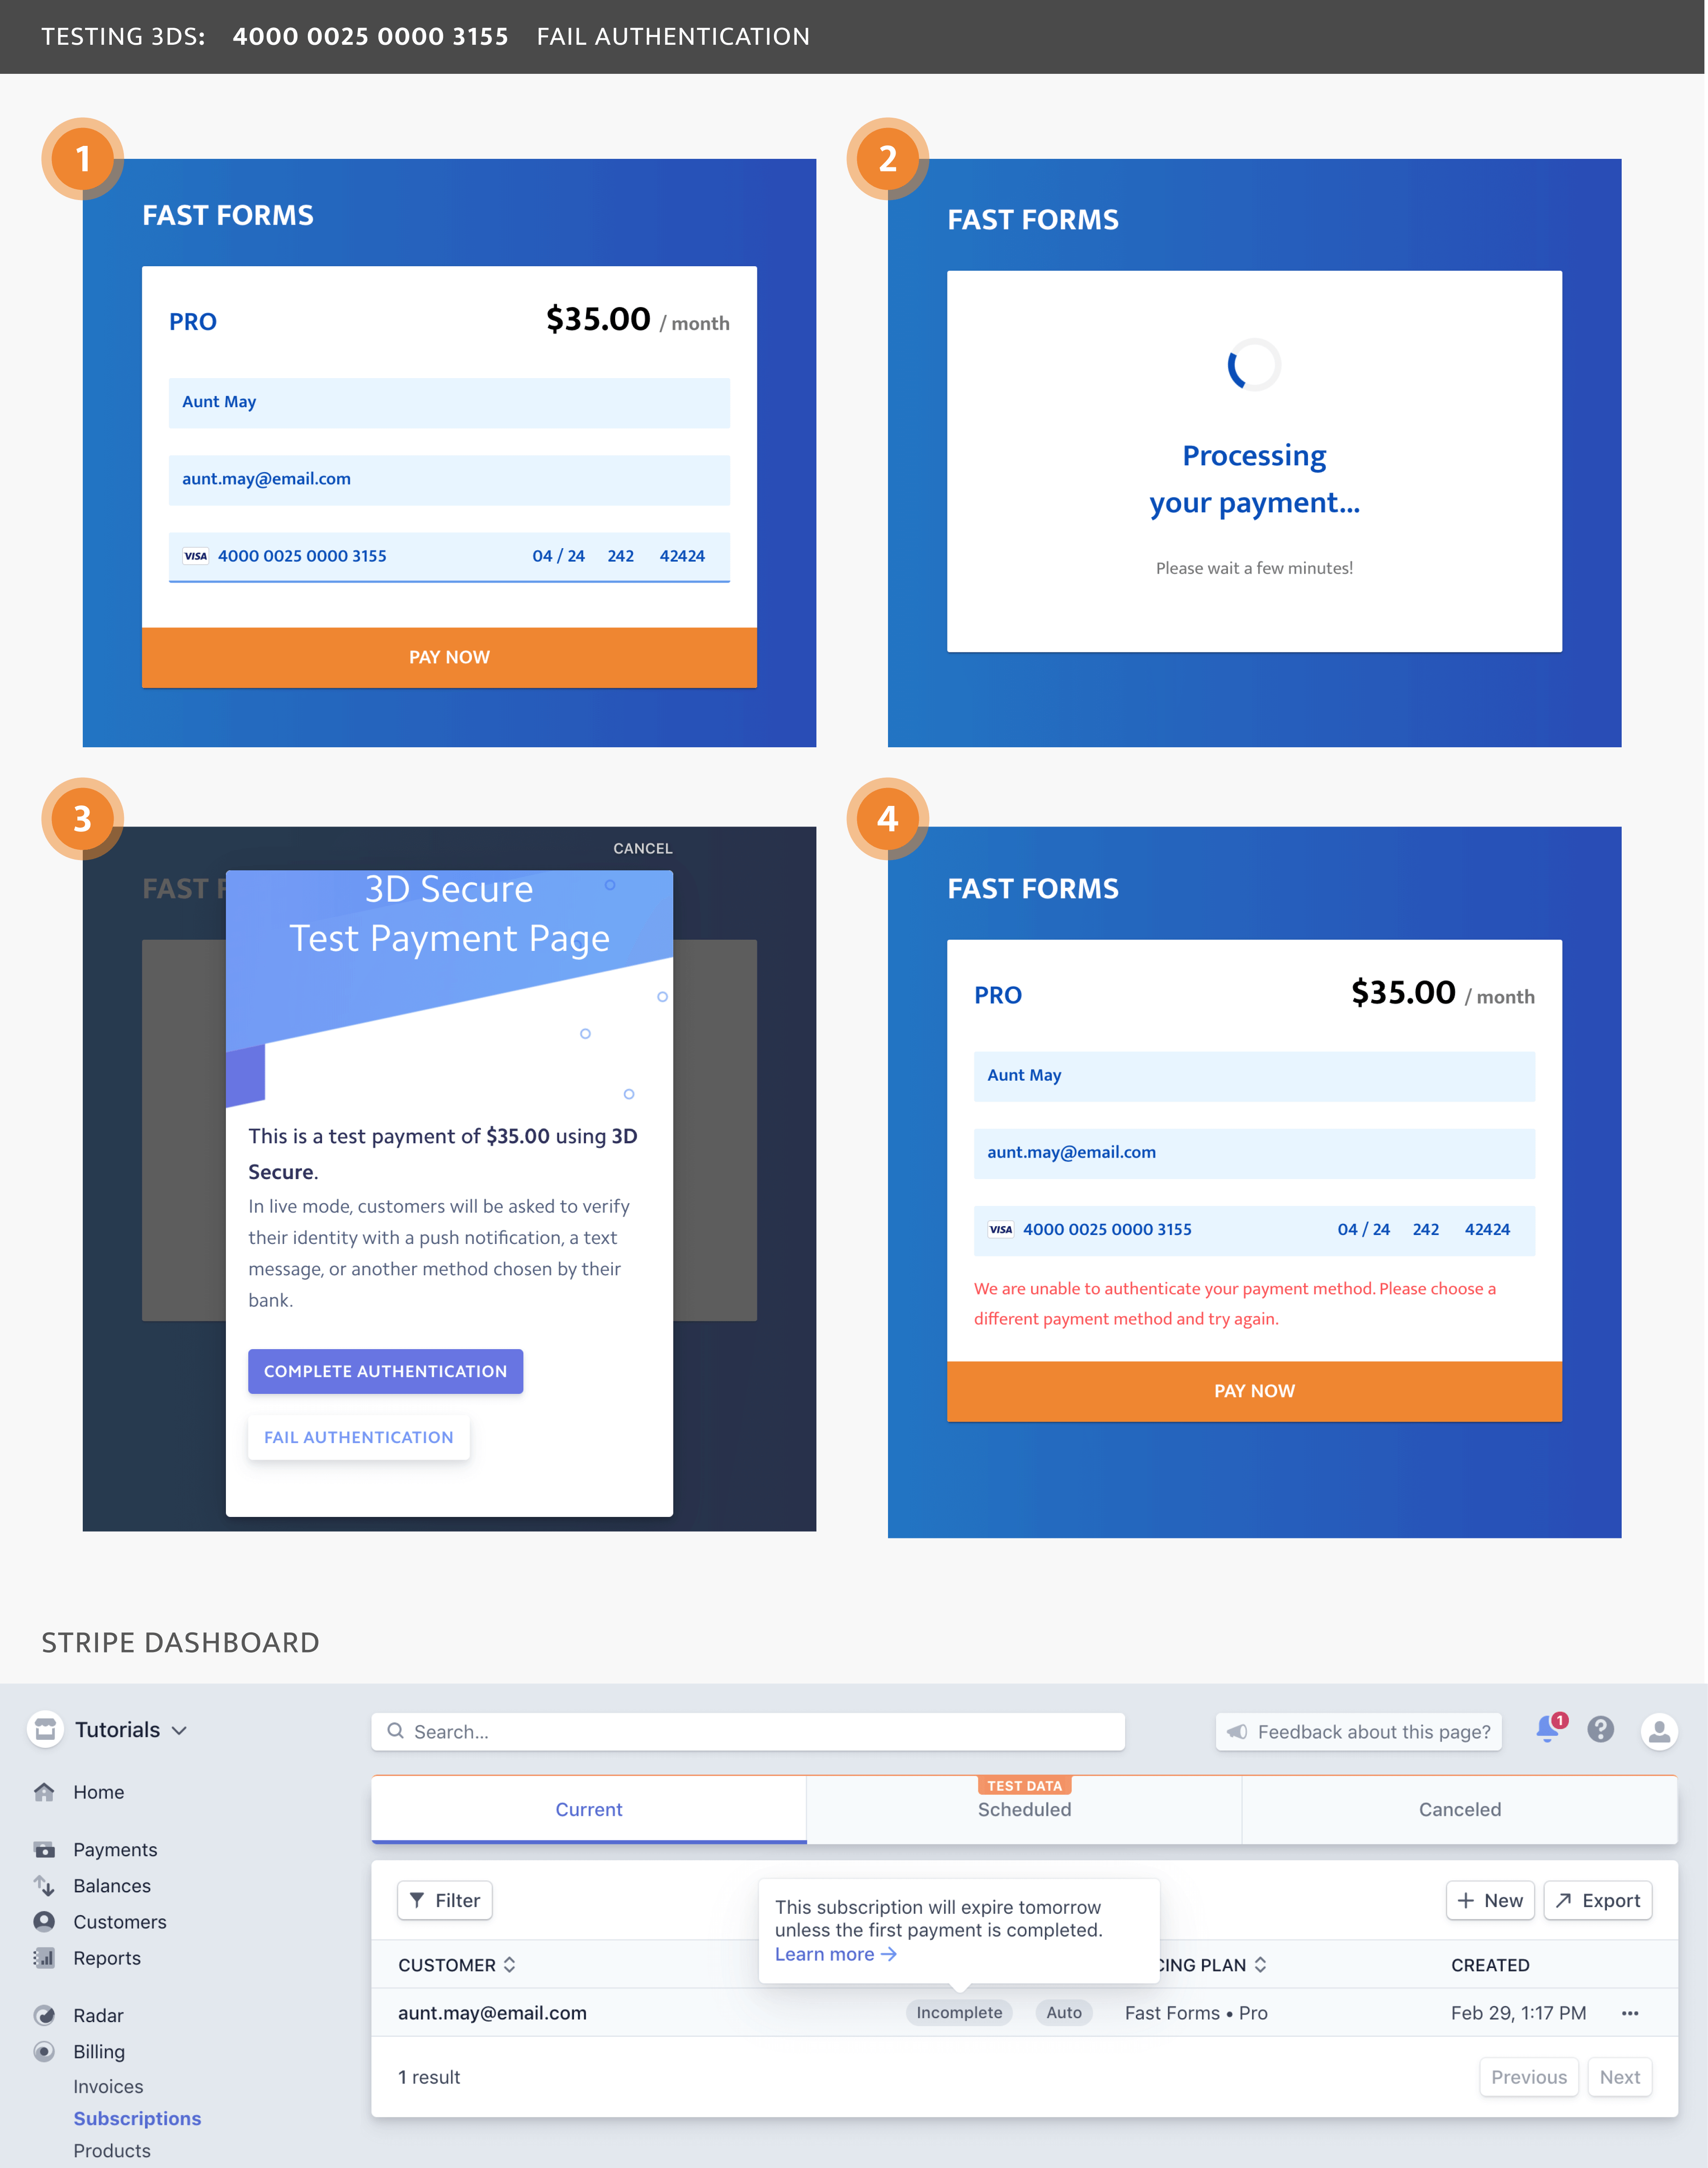
As you'll see in the cases below, when SCA fails, a customer's subscription status changes to Incomplete. Incomplete subscriptions will expire automatically in 24 hours.
In these cases, Stripe will return an error message that prompts the customer to enter another card.
If the customer enters a valid card and successfully signs up, a new subscription will be created with a status of Active, and the Incomplete subscription can be ignored.
Case 1: No SCA Required (4242424242424242)
Case 2a: SCA Required and Completed Authentication (4000002500003155)
Case 2a: SCA Required and Failed Authentication (4000002500003155)
Case 3: SCA Required and Failed Authentication from Insufficient Funds (4000008260003178)
3. Bonus: Setting up a trial
You can adapt this tutorial to automatically provide users with a trial when they sign up. Creating a trial does not create a Payment Intent, so your customers won't see a 3D Secure authentication modal when they enter their card information.
The easiest way to set up a trial is to specify a trial period on your plan via the Stripe Dashboard and then reference that trial period when creating a subscription by setting trial_from_plan: true
api/stripe-functions.js
      async function createCustomerAndSubscription(paymentMethodId, customerInfo) {
        const customer = await stripe.customers.create({
          payment_method: paymentMethodId,
          email: customerInfo.email,
          name: customerInfo.name,
          invoice_settings: {
            default_payment_method: paymentMethodId,
          },
        });

        const subscription = await stripe.subscriptions.create({
          customer: customer.id,
          items: [{
            plan: customerInfo.planId,
          }],
          trial_from_plan: true, /* Use trial period specified in plan */
          expand: ["latest_invoice.payment_intent"],
        });

        return subscription;
      }

      module.exports = {
        getProductsAndPlans,
        createCustomerAndSubscription
      };
You could also use trial_end
(API docs)
or trial_period_days
(API docs)
instead of trial_from_plan.
4. Bonus: View & Configure Radar Rules
You can configure Radar, or Stripe's built-in fraud detector, to specify when a payment should use 3D Secure:
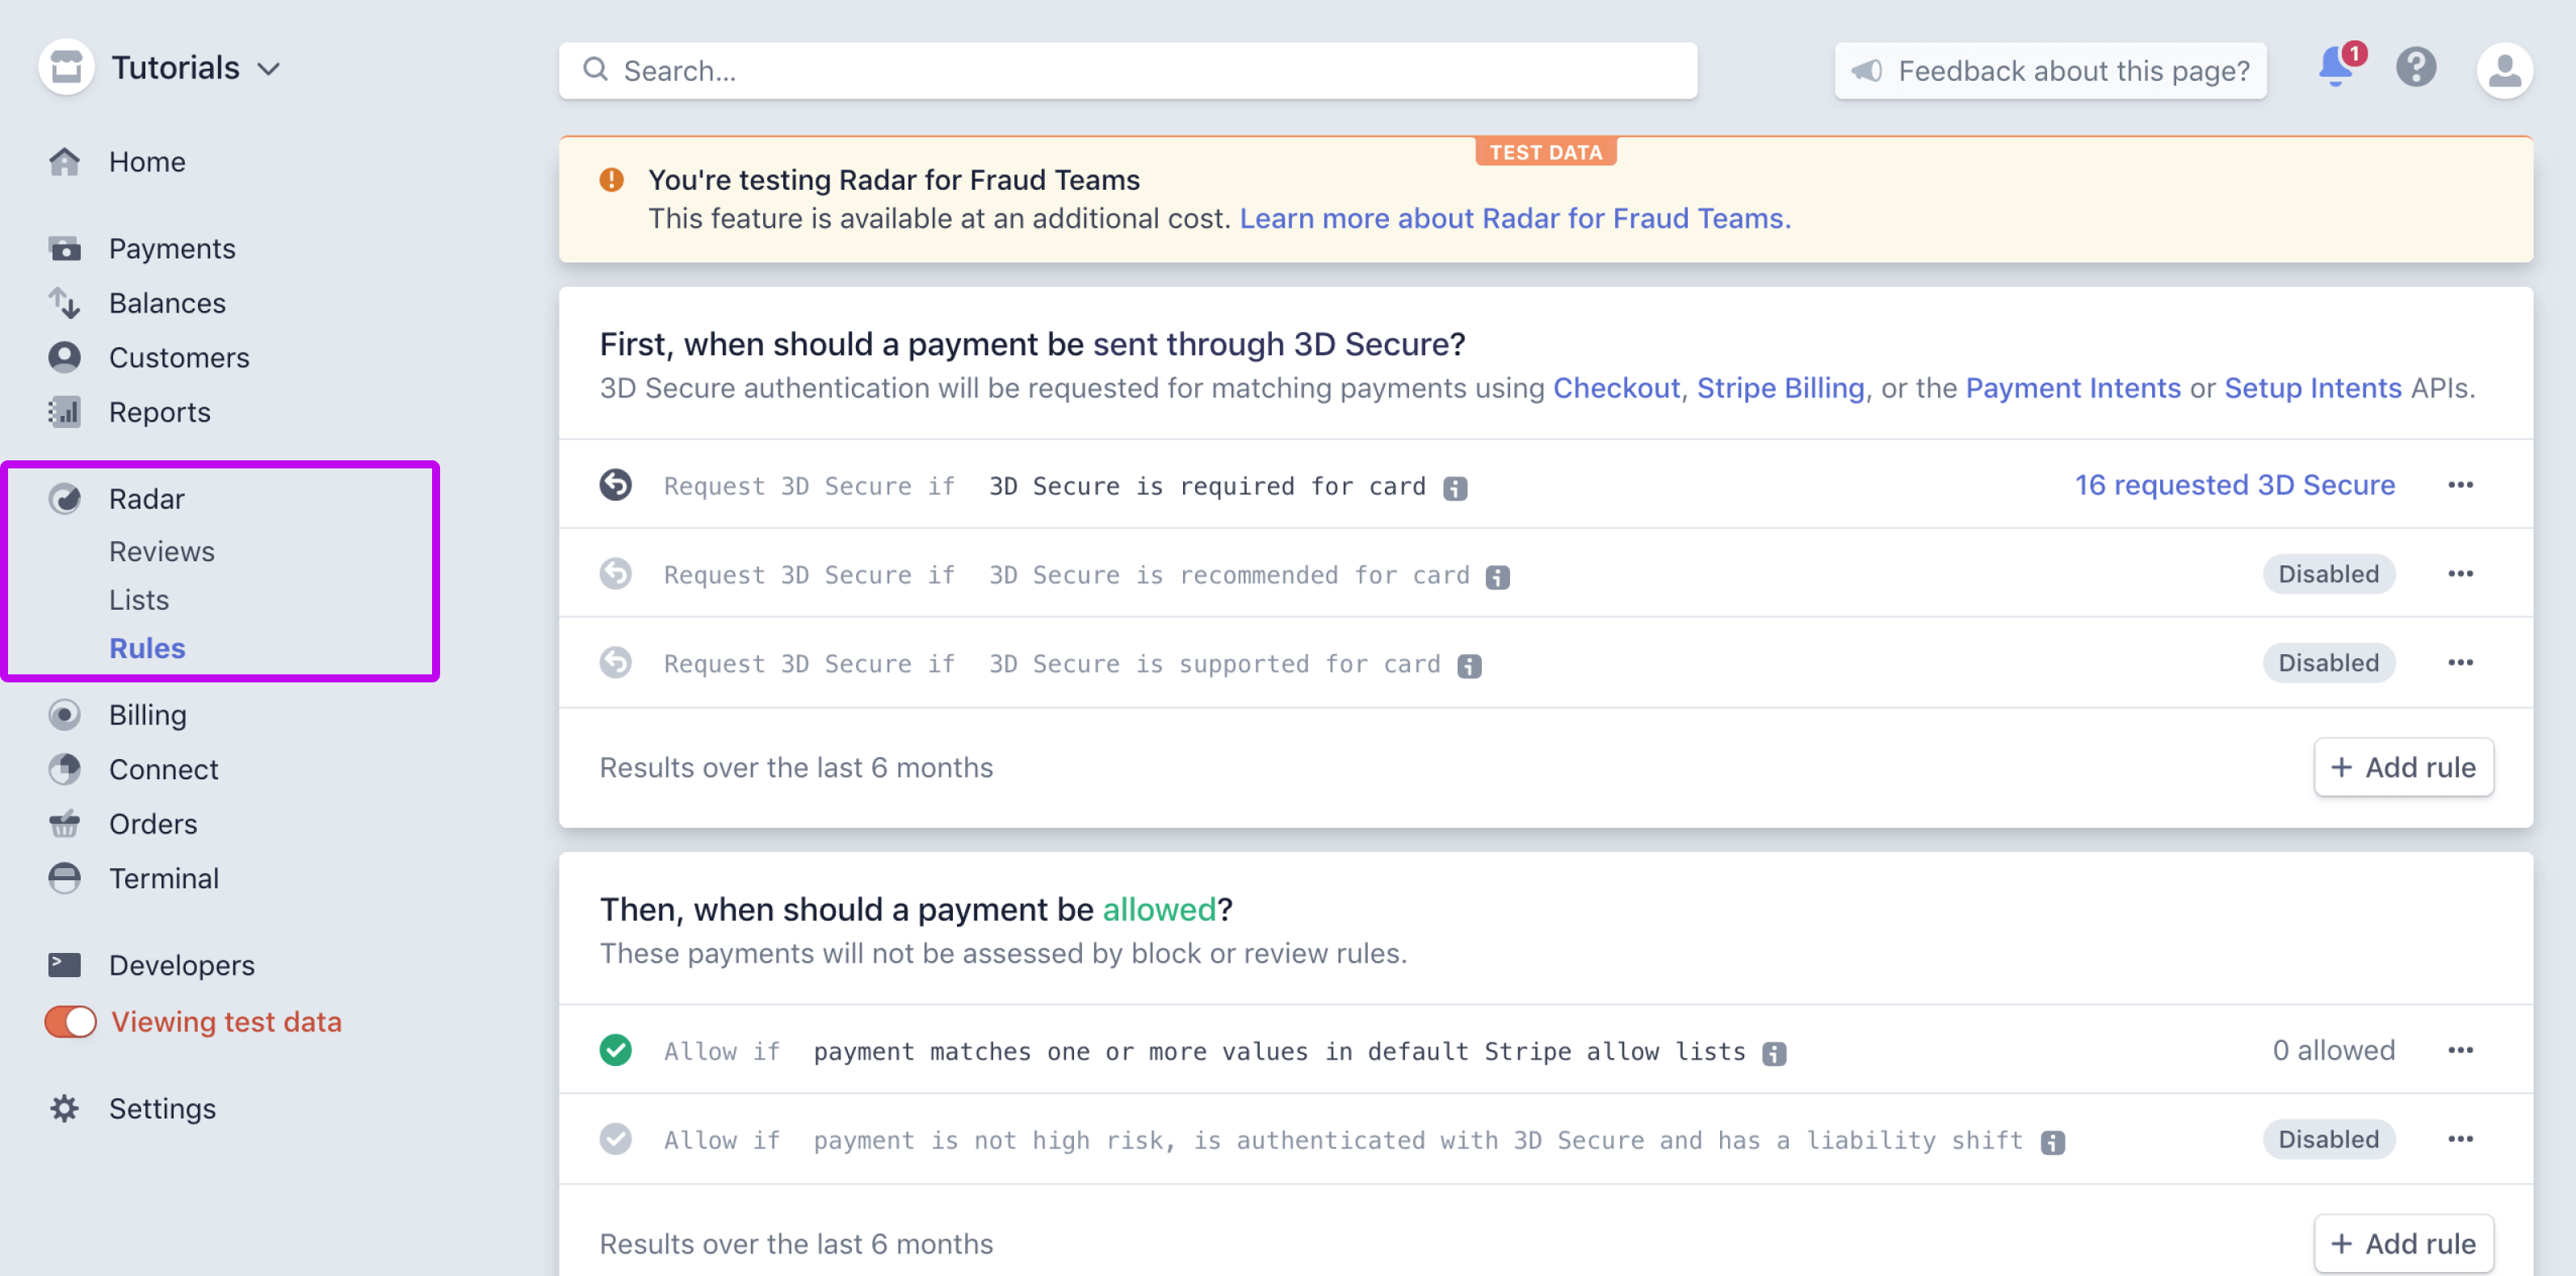
By default, 3D Secure is requested if a card absolutely requires 3D Secure. I would recommend adhering to this default setting, since 3D Secure does add another layer of friction to your payment flow.
5. Next Steps — Going Live
- Activate your account to accept live payments on your site (we've been working in test mode throughout this tutorial).
- Once you've activated your account, make sure View Test Data is switched off on your Stripe Dashboard before following the next 2 steps
- Create live versions of your Stripe Products and Plans
- In your application code, switch out your test Stripe Secret Key and Stripe Publishable Key for live versions
- Serve your site over HTTPS to keep payment information safe and uncompromised
