Who is this for?
This tutorial is for developers and technical business owners looking to set up a basic Node application — either a standalone app or an API for a separate frontend — that can access the Stripe API.
What do I need before I start?
This post assumes you have a working Stripe account and know how to set up a basic Node / Express server to receive HTTP requests and serve HTML files.
Recommended technology versions:
-
Node 8+
(Used Node 8.11.1 for this tutorial)
-
Any Stripe API version (the version set via the Stripe Dashboard) that supports subscriptions.
You may want to upgrade your Stripe API version to take full advantage of new features and speed optimizations, but changing your API version may result in receiving different response object structures, especially for features such as webhooks.
(Used Stripe API version 2019-12-03, or the latest version, for this tutorial)
What will I learn?
In this tutorial, you will learn how to
- Create a product and pricing plans for an existing Stripe account using the Stripe dashboard
- Set up a working Node application with Stripe integration
- Securely pass your Stripe Secret Key into your Node application
- Use the Stripe API to render a list of your products and plans to the frontend
You can find all of the code posted here at:
https://github.com/code-nebula/stripe-subscriptions-sca
Tutorial Overview
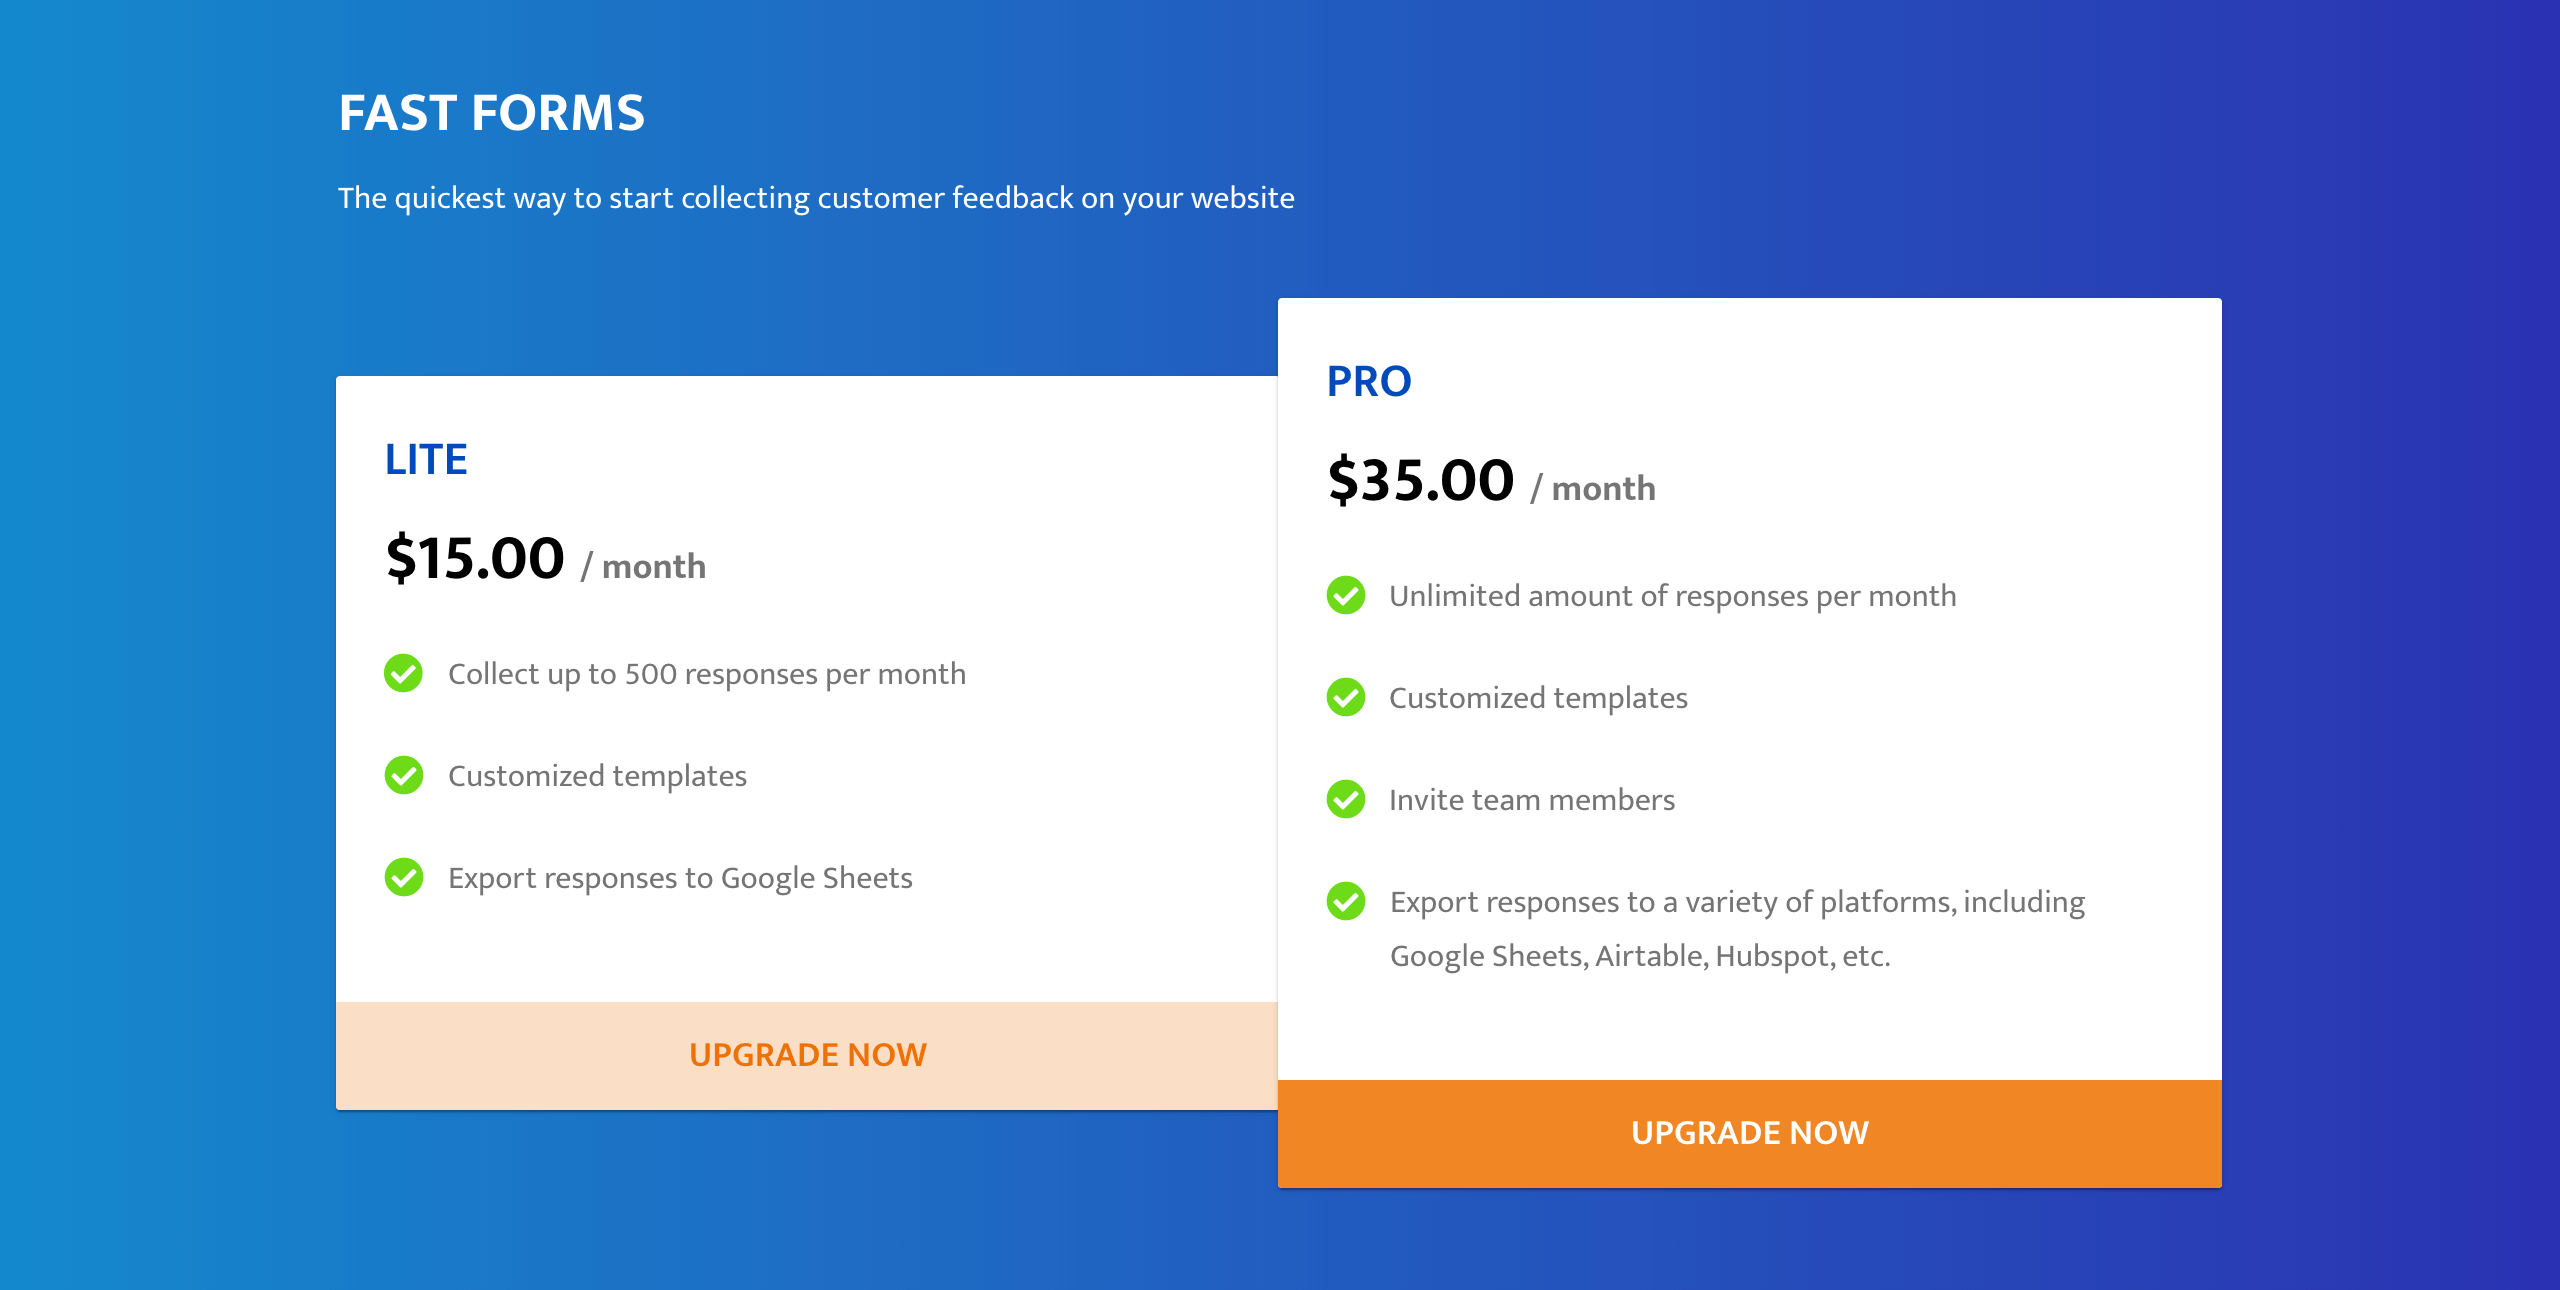
We'll be showing you how to set up a Node application that works with the Stripe API for a fabricated software-as-a-service called "Fast Forms". Fast Forms is a site where users can create customized pop-up surveys to embed on their business' website.
Fast Forms offers the following paid plans:
- Lite — $15.00 / month
- Pro — $35.00 / month
The main objective of this tutorial will be to create the following pricing table, where you can see Fast Forms' plans in more detail:
Stripe Terminology
Product — A product usually represents your business, or some portion of your business. It is the subscription service you are providing.
Plan — A product can have many plans. A plan in this case is the equivalent of a plan you might see on a website's pricing page.
Subscription — A subscription connects a Customer to a Plan.
Let's go ahead and get started!
1. Create Your Product & Plans
Because we'll only be creating 1 Stripe product for our app, Fast Forms, it makes sense to directly create that product through the Stripe Dashboard.
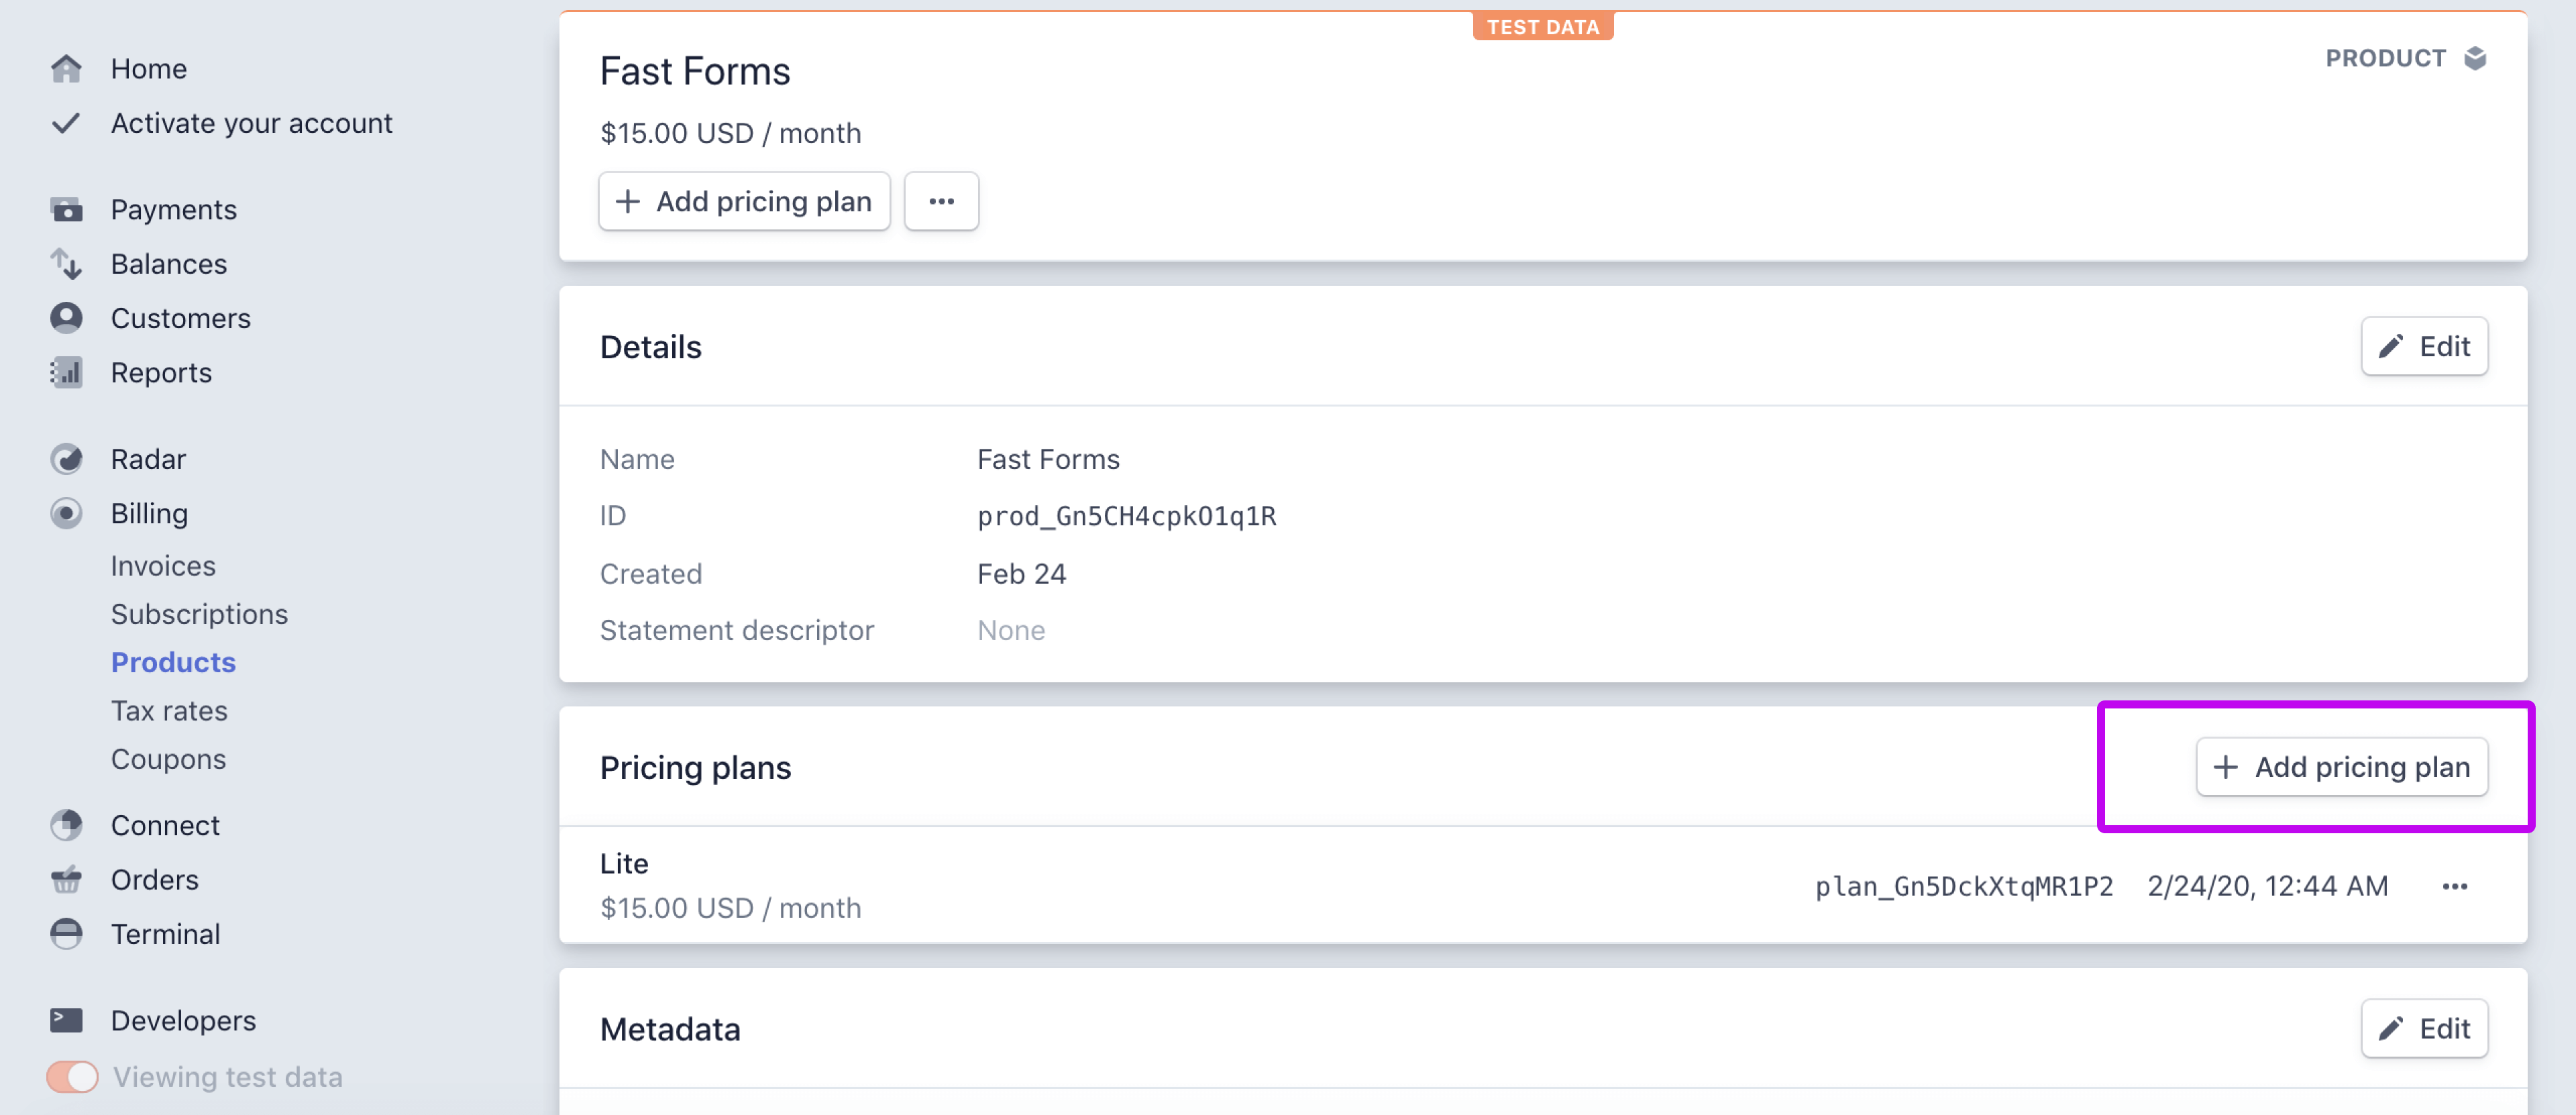
Navigate to the Stripe Dashboard. Click on the Billing option in the left sidebar, and once expanded, click on Products.
Click on the + New option in the subheader to create a product, or if you've never created any products before, you can click + Add a test product.
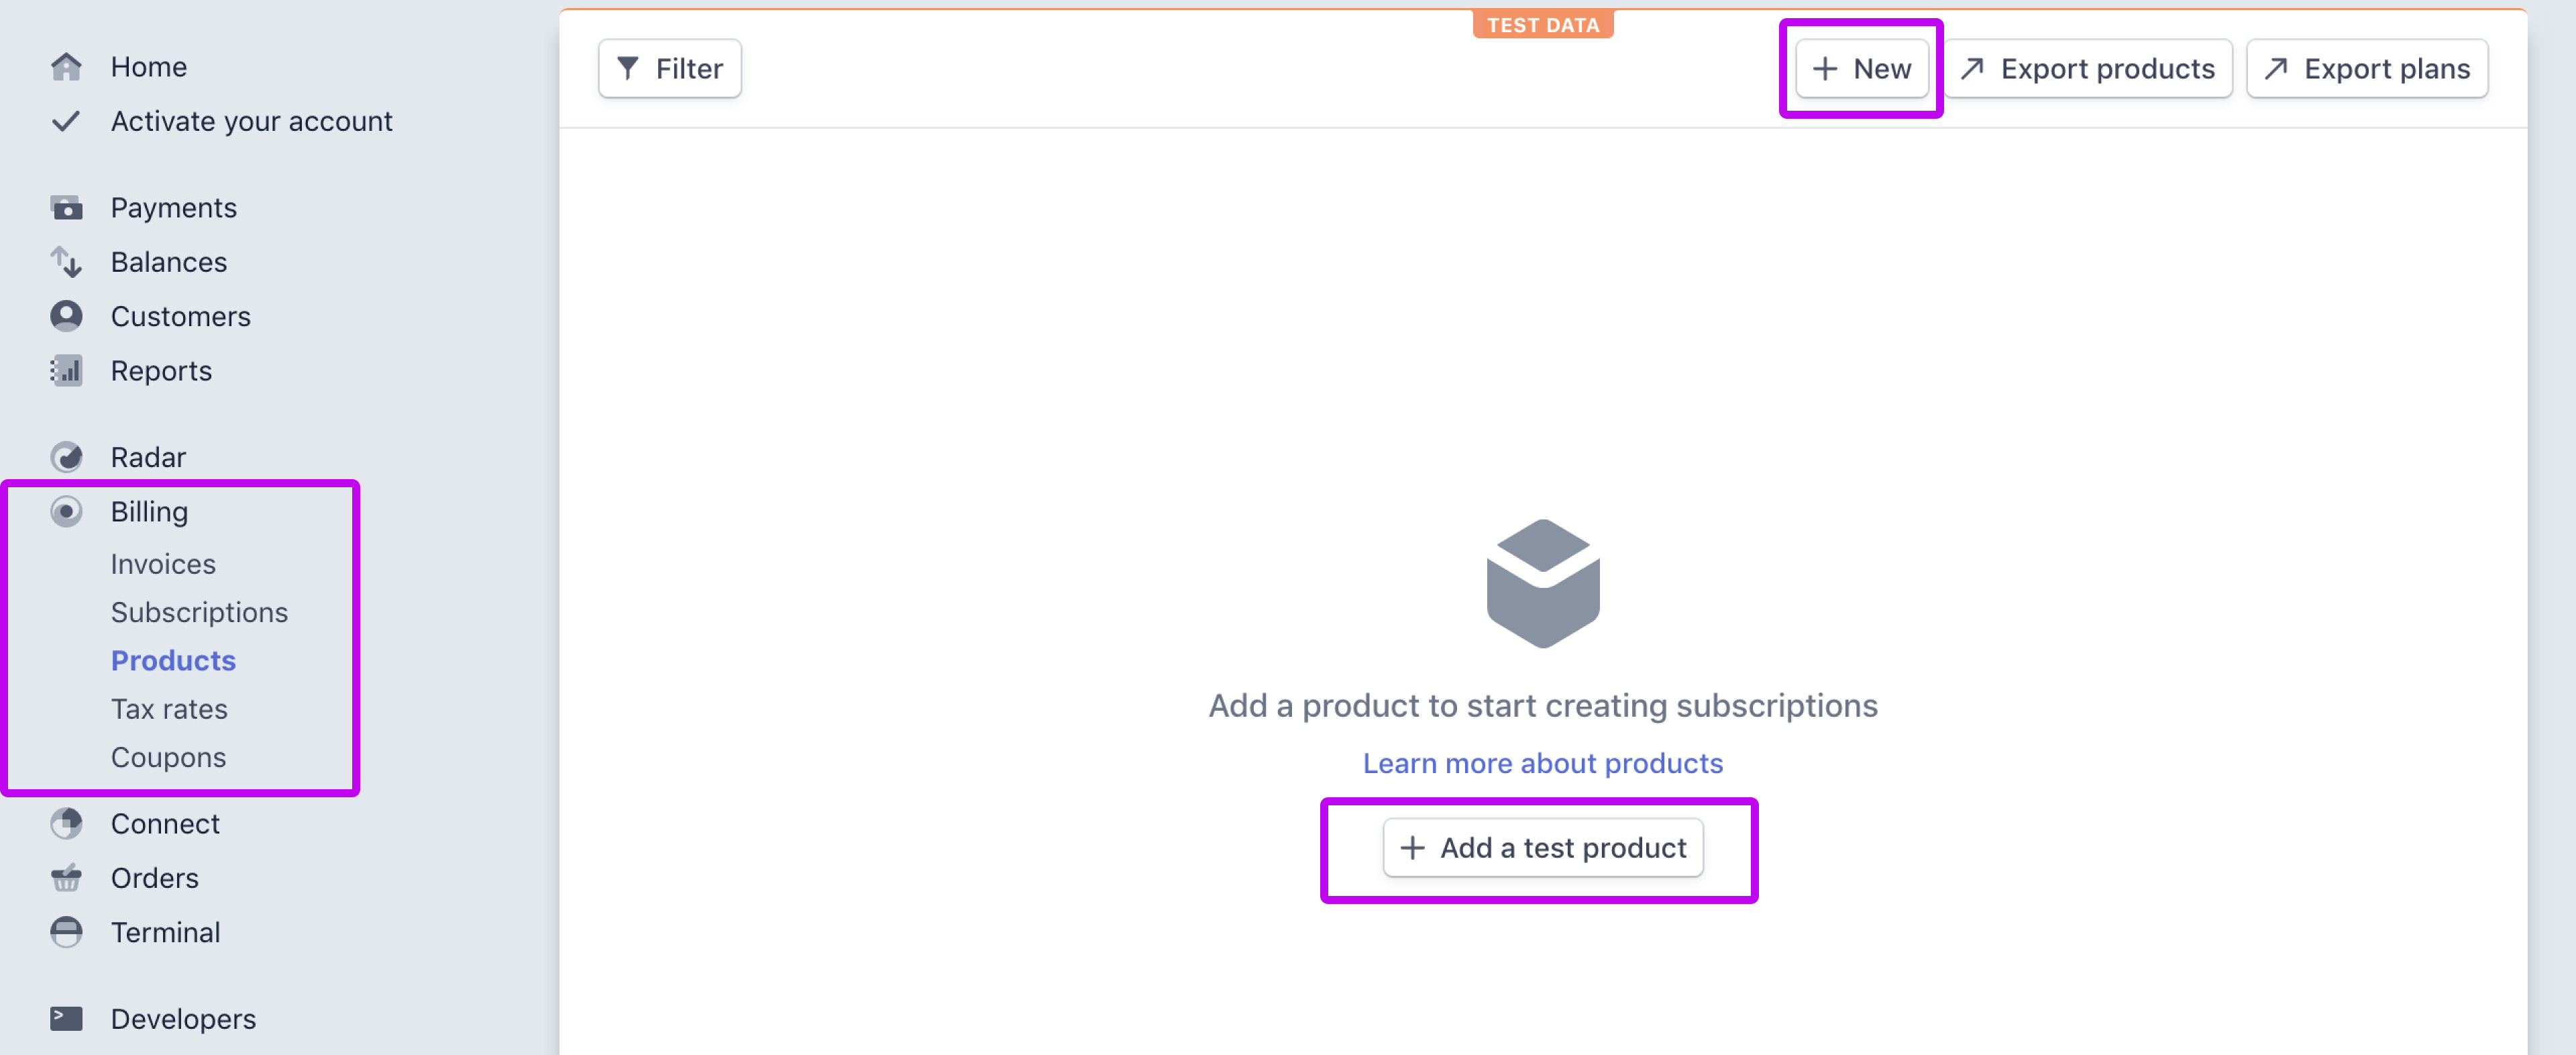
Enter your product name ("Fast Forms") and click on the button in the lower right to create your product.
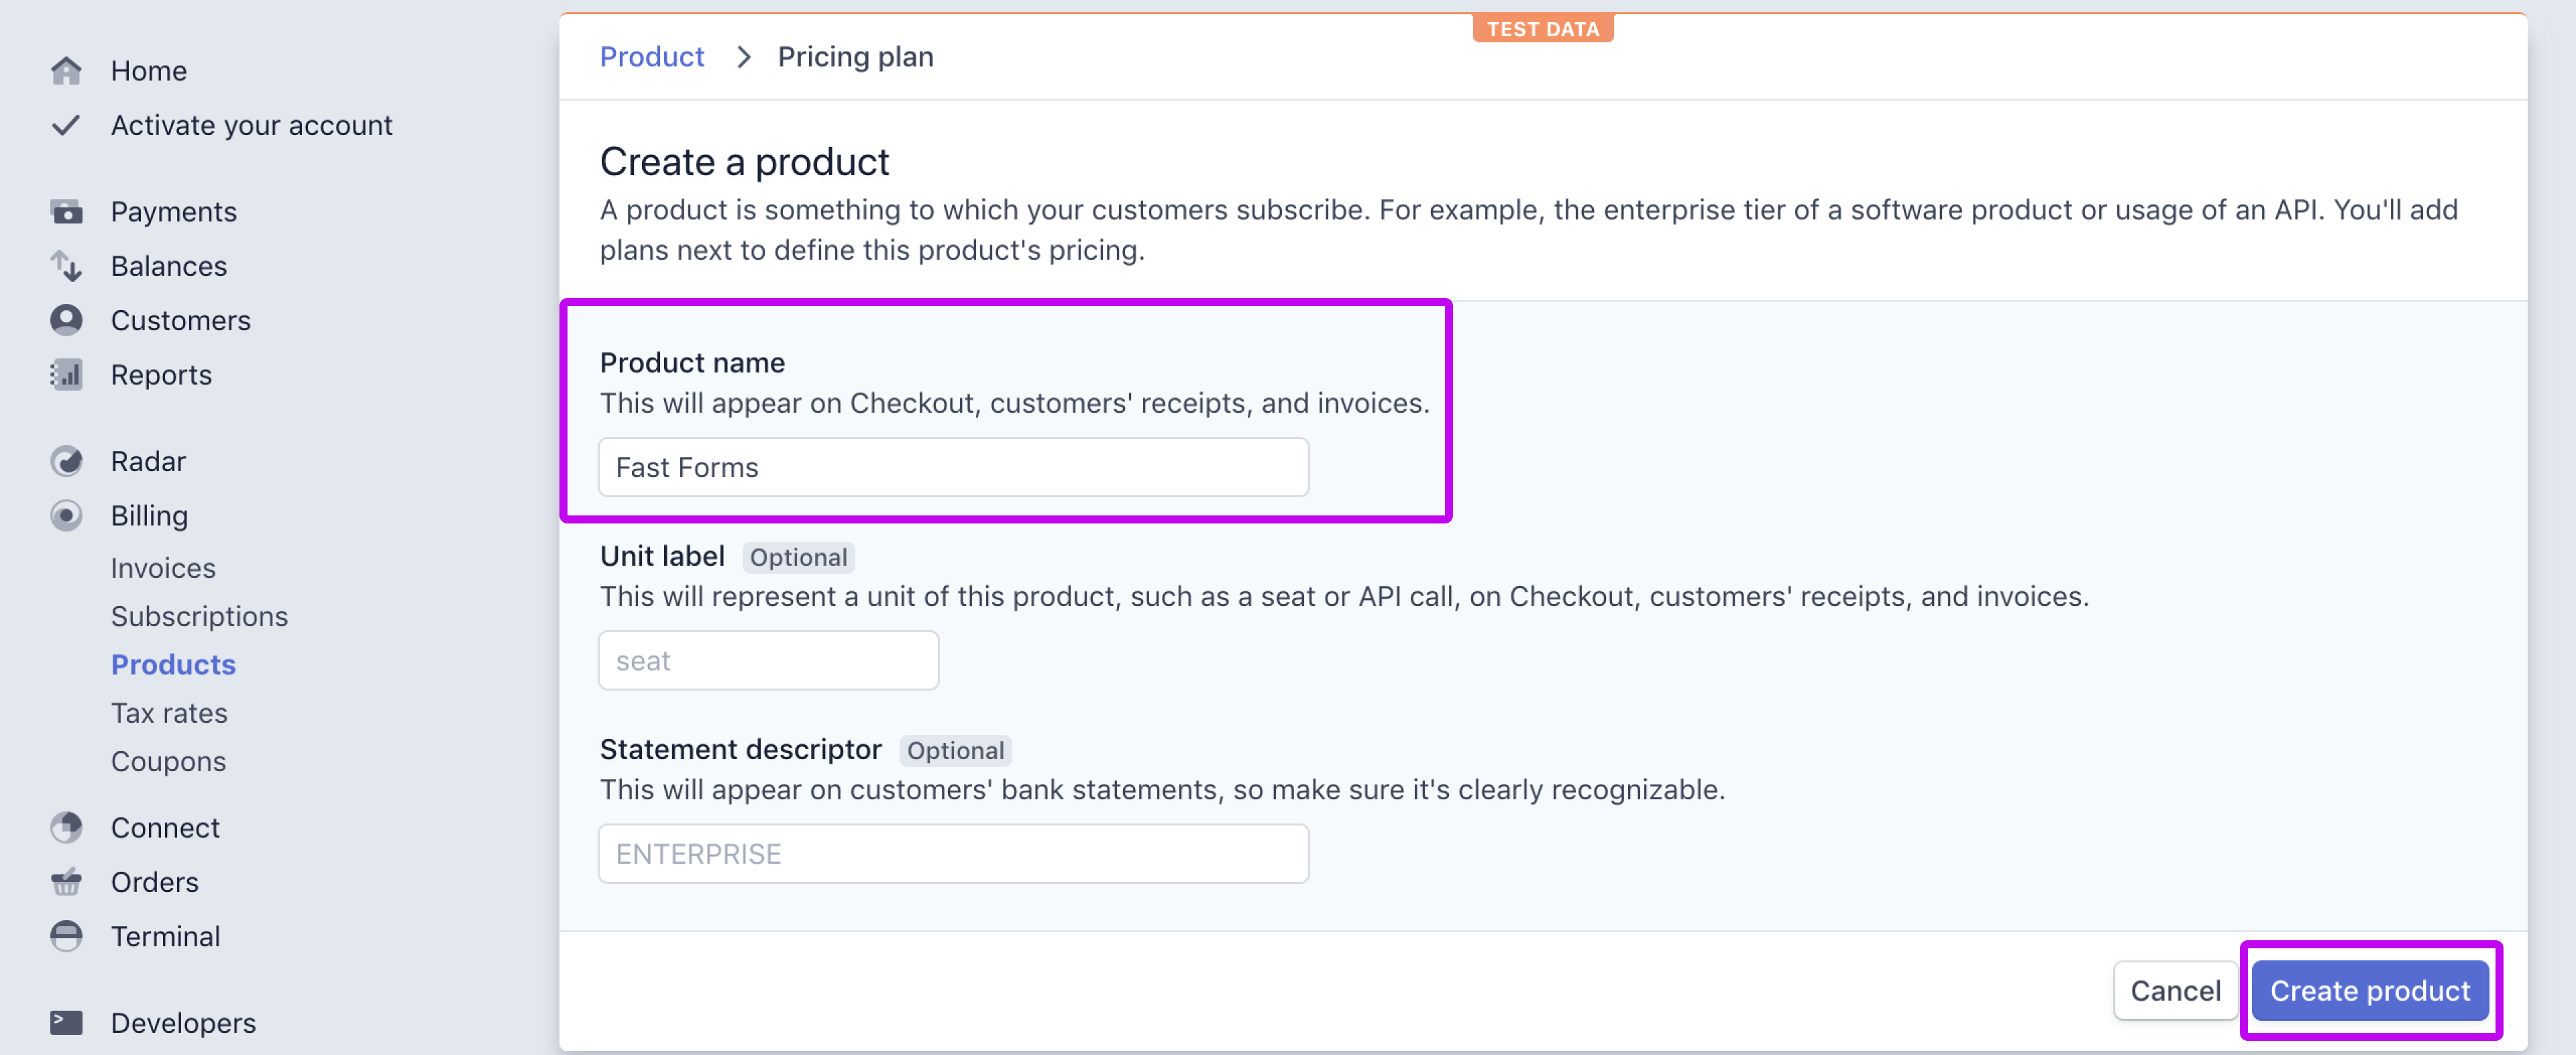
Once you create a product, you'll automatically be taken to a screen to create your first plan associated with that product.
- Enter your Plan nickname — Lite
- Under the Pricing section — select Recurring quantity, since we'll automatically be billing customers each month
- Specify Currency — USD. If you're interested, here is a list of all currencies that Stripe supports
- Enter Price per unit — $15.00
- Specify Billing Interval — Monthly. Because we selected the "Recurring quantity" Pricing option, we are given the choice of Billing Interval.
- (Optional) Enter Trial Period — 14 days.

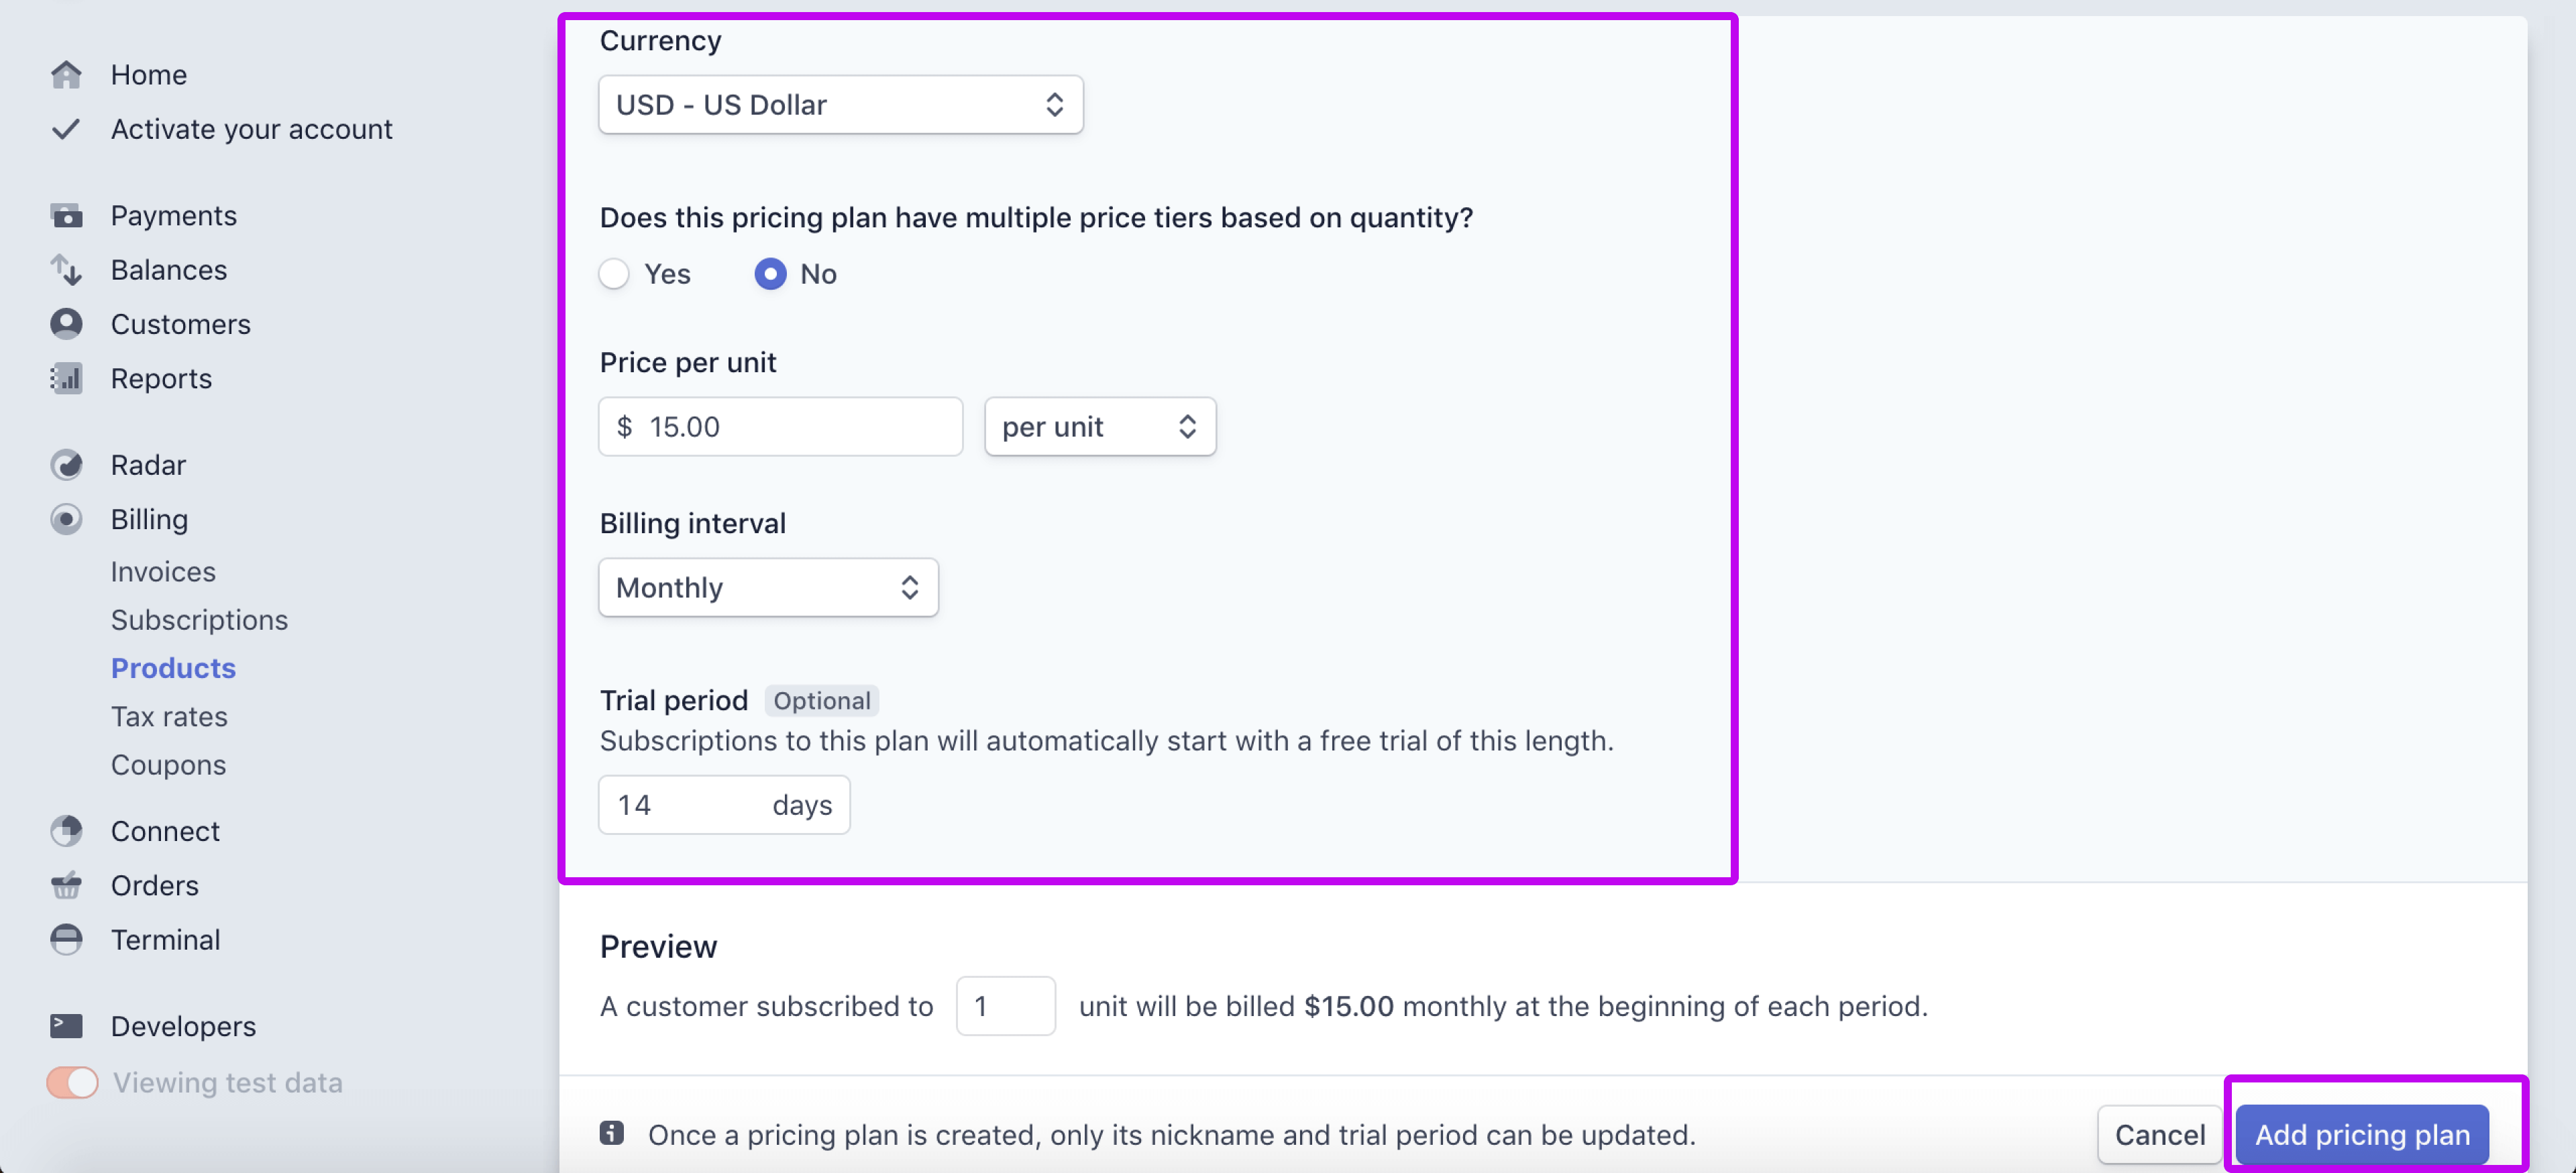
Click on the + Add pricing plan option, and follow the steps above to create the Pro plan, which costs $35.00 / month.
2. Set up Your App and Workspace
Create a new directory to house this app. Then use your terminal to navigate to the directory. Run npm init to initialize your app as an npm module so that you can install various dependencies soon. Quickly run through the questions that appear after running npm init.
If you open up your directory in an editor, you should see that package.json has been created. Add "start" : "node app.js" under the scripts object. The command npm run start will now run node app.js. Once we've added our Express code in app.js, this command will execute all of the logic in that file and start a server.
Next, navigate back to the terminal and install the following packages using your favorite package manager (npm, yarn, etc.):
-
express (https://www.npmjs.com/package/express)
Used to create an application server
-
nunjucks (https://www.npmjs.com/package/nunjucks)
Used for templating and passing data to our HTML files. In your app, you might want to use a specific front-end framework like React, Vue, or Angular
-
stripe (https://www.npmjs.com/package/stripe)
Used to make Stripe API calls
-
dotenv (https://www.npmjs.com/package/dotenv)
Used to house your Stripe Secret Key
package.json
This is where we specify our app's information, scripts to be run from the command line, and dependencies.
      {
        "name": "stripe-subscriptions-2020",
        "version": "1.0.0",
        "description": "An updated tutorial on setting up recurring subscriptions with Stripe.",
        "main": "app.js",
        "scripts": {
          "start": "node app.js",
          "test": "echo \"Error: no test specified\" && exit 1"
        },
        "keywords": [
          "stripe",
          "recurring",
          "billing",
          "subscriptions",
          "sca",
          "payment-intents"
        ],
        "author": "",
        "license": "ISC",
        "dependencies": {
          "dotenv": "^8.2.0",
          "express": "^4.17.1",
          "nunjucks": "^3.2.0",
          "stripe": "^8.15.0"
        }
      }
Next, create the following folders and files within your app (ignore package.json, node_modules, yarn.lock)
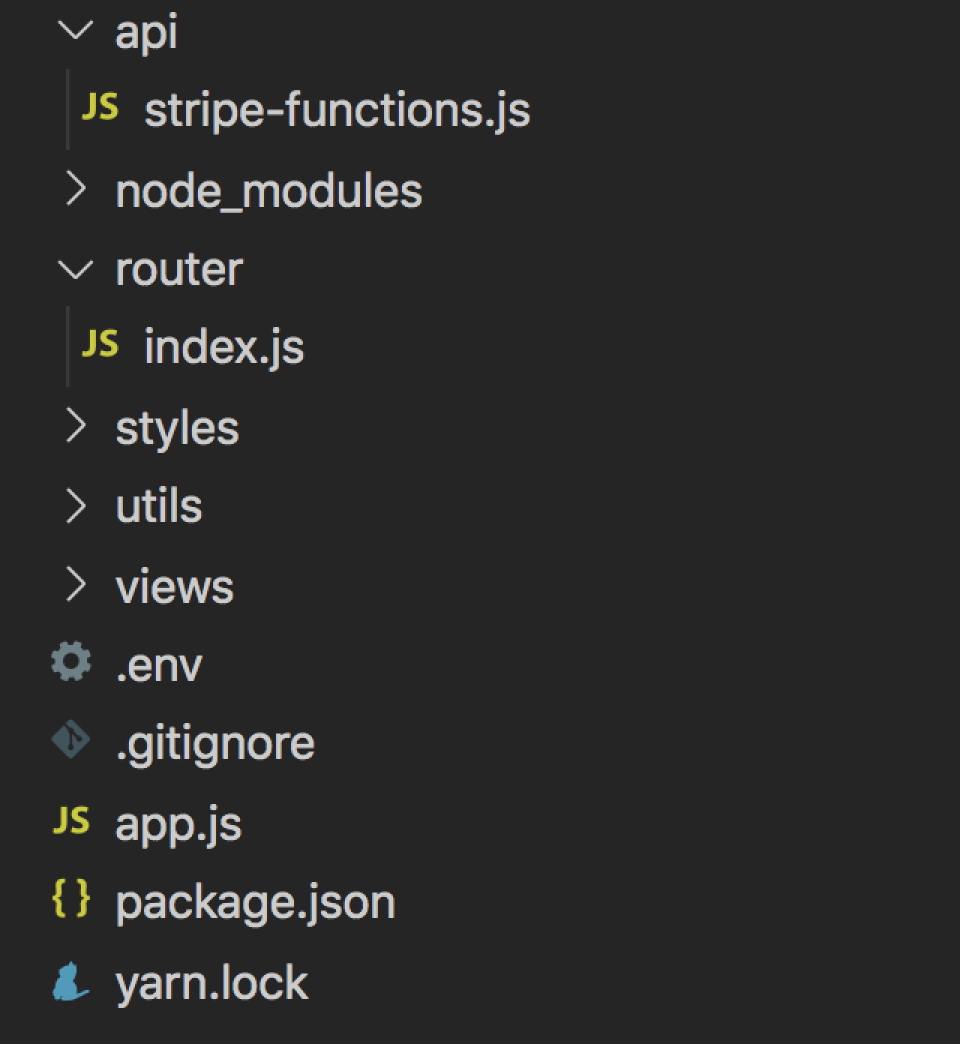
Here's an overview of these folders and files:
- api — where we define all methods that interact with the Stripe API
- router — where we define all our app's routes and API calls
- styles — home for our CSS files
- utils — home for miscellaneous variables and helper functions
- views — home for our HTML files
- .env — home for your unshareable Stripe Secret Key
- .gitignore — where you add which files should not be version controlled and checked into your Github repository
- app.js — holds our overall application logic, ties all the other files together, and starts our server
app.js
Here's what you will do in this file:
- Import your Express router (housed in the router directory), which routes client requests to various pages
- Set up Nunjucks with Express to serve and render HTML files
- Set up Express to serve and render content in the styles directory (CSS files)
- Set up our Express app to start a server and listen for connections on the specified port (3000)
      const express = require('express');
      const nunjucks = require('nunjucks');

      const app = express();
      const router = require('./router');
      const port = 3000;

      /* Set up Express to serve HTML files using 'res.render' with the help of Nunjucks */
      app.set('view engine', 'html');
      app.engine('html', nunjucks.render);
      nunjucks.configure('views', { noCache: true });

      /* To host CSS from the server */
      app.use(express.static(__dirname));
      app.use('/styles', express.static('styles'));

      /* To use 'req.body' -- to parse 'application/json' content-type */
      app.use(express.json());

      /* To use 'req.body' -- to parse 'application/x-www-form-urlencoded' content-type */
      app.use(express.urlencoded({ extended: true }));

      /* Set up router */
      app.use('/', router);

      app.listen(port, () => {
        console.info(`Stripe Subscriptions demo running on port ${port}`);
      });
views/base.html
This file is your base HTML template. We'll be extending all other HTML files from this bare-bones template, so that you don't need to repeat any code. The other HTML files' code will be injected into the block under the div with class app.
<!-- Stripe Client Library -->
<script src="https://js.stripe.com/v3/"></script>
styles
I've separated the styles into 3 files
- app.css — includes general styling for headers, text, inputs, buttons, cards, etc.
- pricing.css — includes additional styling for the pricing table
- register.css — includes additional styling for the payment form
Some of the CSS files are a bit long, so I won't include them in this tutorial. But please check out the code and copy it from here:
https://github.com/code-nebula/stripe-subscriptions-sca/tree/master/styles
.env
You can store environment variables — key-value pairs loaded into the application at build time — in your .env file.
As mentioned in our earlier posts, for security purposes, we want to house our Stripe Secret Key in our .env file. We don't want anyone else to know or access this value, so we don't want to share it on places like Github.
To find your Secret Key, click on the Developers option in your Stripe Dashboard sidebar, and once expanded, click on API Keys.
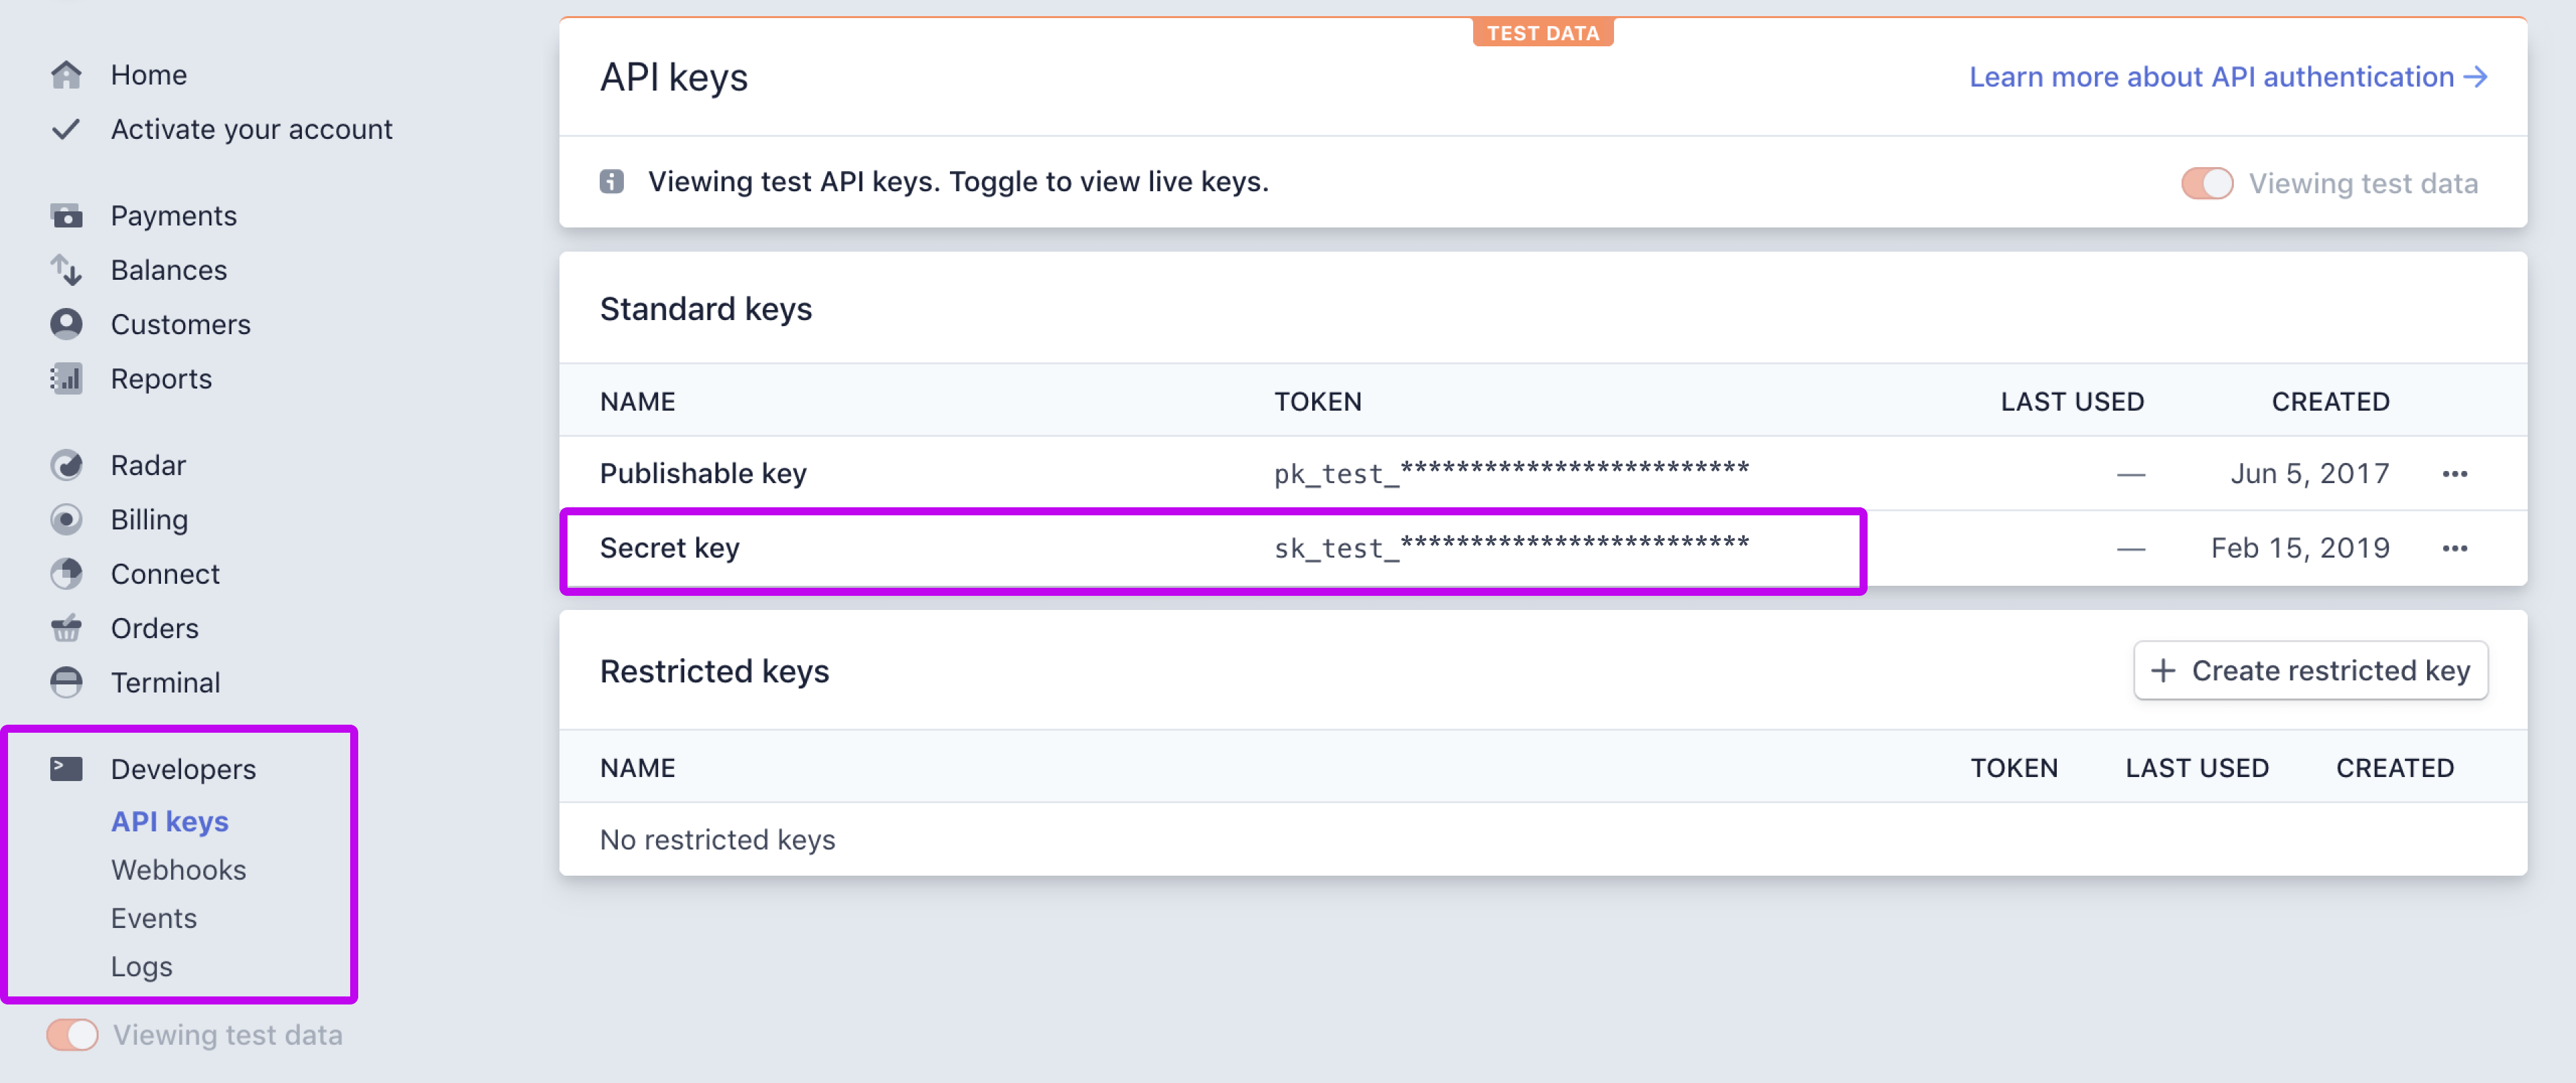
Copy the Secret Key value into your .env file and save it as STRIPE_API_KEY.
STRIPE_API_KEY="sk_test_************************"
We'll reference the Secret Key as process.env.STRIPE_API_KEY in our other application files.
.gitignore
As mentioned in the section above, we do not want to share our Stripe Secret Key with anyone else. If you're using git and want to check in your code, it's important that you do NOT upload your .env file to Github or whatever service you're using.
We can ignore this file by specifying it in a .gitignore file. As a reminder, it's also good practice to not check in your node_modules, since this can inflate your storage and lead to unwanted merge conflicts in the future. Your node_modules can always be reproduced by running npm install.
      .env
      /node_modules
3. Set up Your Pricing Table
In this section, we'll be setting up the following pricing table:
utils/index.js
In this file, we define some constants and helper functions that will be used after we fetch our Stripe product and plan information in the next section.
First, we define constants that help us format our pricing table.
- A product subheader — this is a catchy description of our product
- Plan features — these are a list of what's included in each specific plan
Next, we define some helper functions to go between Stripe amounts and formatted USD numbers. The Stripe amount is stored as a number which represents the price in cents (e.g., our Lite plan amount would be 1500).
    /* Additional display information for your Stripe Products
     * subheader - string representing appealing product description
     */
    const PRODUCT_INFO = {
      'Fast Forms': {
        subheader: 'The quickest way to start collecting customer feedback on your website',
      },
    };


    /* Additional display information for your Stripe Plans
     * features - array of features specific to plan
     * highlight - boolean specifying whether plan should be highlighted
     */
    const PLAN_INFO = {
      Lite: {
        features: [
          'Collect up to 500 responses per month',
          'Customized templates',
          'Export responses to Google Sheets',
        ],
        highlight: false,
      },
      Pro: {
        features: [
          'Unlimited amount of responses per month',
          'Customized templates',
          'Invite team members',
          `Export responses to a variety of platforms,
          including Google Sheets, Airtable, Hubspot,
          etc.`,
        ],
        highlight: true,
      }
    };


    /**
     * One level deep version of Lodash's 'get' function: https://lodash.com/docs/4.17.15#get
     * @param {Object} obj
     * @param {string} property A key we expect to be present in "obj"
     * @param {*} defaultValue If "obj" or "obj[key]" are undefined, return this default value
     * @return {*} Value at obj[key] if defined, otherwise "defaultValue"
     */
    function getValue(obj, property, defaultValue) {
      return obj && obj[property] ? obj[property] : defaultValue;
    }


    /**
     * @param {number} stripeAmount The price in cents
     * @return {string} The price represented as a formatted USD string ($X.YZ)
     */
    function formatUSD(stripeAmount) {
      return `$${(stripeAmount / 100).toFixed(2)}`;
    }


    /**
     * @param {string} USDString The price represented as a formatted USD string ($X.YZ)
     * @return {number} The price in cents
     */
    function formatStripeAmount(USDString) {
      return parseFloat(USDString) * 100;
    }


    module.exports = {
      PRODUCT_INFO,
      PLAN_INFO,
      getValue,
      formatUSD,
      formatStripeAmount
    };
api/stripe-functions.js
To make our code more modular and organized, we recommend having an api directory to house all our Stripe specific functions. Since we'll only be using a handful of functions in this tutorial, we'll store all our functions in one file, stripe-functions.js.
If you ever do end up needing to call the Stripe API more, I'd recommend separating the files out by which portion of the Stripe API you're using (e.g., a file for all Product related functionality, a file for all Customer related functionality, etc.).
Here's an overview of what's happening in this file:
- We first configure the dotenv package to be used in our application, so that we can reference our Stripe Secret Key.
-
We use this key to initialize our instance of the Stripe API so that we can make API calls. We specifically do this by importing the Stripe node package and passing our secret key (
process.env.STRIPE_API_KEY) as a parameter. - We import constants and helper functions from the utils directory
-
We create a function called
getProductsAndPlans. This function uses the following stripe functions
-
stripe.products.list({}) -
stripe.plans.list({})
-
-
Once we get all the product and plan data, we perform some operations to format and sort the data.
We add additional display information such as a product subheader and specific plan features.
We sort the plans by ascending order of price (the amount field) before formatting the Stripe amount in dollars and cents.
Next, we'll add a JSON formatted version of the plan as well — so we can easily pass information from the frontend to the backend via form submission. This is a "hacky" way of doing things since we're not using a frontend framework such as Vue or React.
- We attach the appropriate plans to their corresponding product, so that the product now has a plans field. Lastly, we filter for products that have at least 1 plan set up.
      require('dotenv').config();
      var stripe = require('stripe')(process.env.STRIPE_API_KEY);

      /* Import constants and helper functions */
      const UTILS = require('../utils/index');

      /**
       * @param {Array} products An array of Stripe products
       * @return {Array} An array of Stripe products with additional display information
       */
      function formatProducts(products) {
        products.forEach(product => {
          /* Append additional display information */
          product.subheader = UTILS.getValue(UTILS.PRODUCT_INFO[product.name], 'subheader', '');
        });

        return products;
      }


      /**
       * @param {Array} plans An array of Stripe plans
       * @return {Array} An array of Stripe plans with additional display information
       * This array is also sorted by amount
       */
      function sortAndFormatPlans(plans) {
        plans = plans.sort((a, b) => {
          /* Sort plans in ascending order of price (amount)
          * Ref: https://www.w3schools.com/js/js_array_sort.asp */
          return a.amount - b.amount;
        });

        plans.forEach(plan => {
          /* Format plan price (amount) in USD */
          plan.amount = UTILS.formatUSD(plan.amount);

          /* Append additional display information */
          plan.formatted = JSON.stringify(plan);
          plan.features = UTILS.getValue(UTILS.PLAN_INFO[plan.nickname], 'features', []);
          plan.highlight = UTILS.getValue(UTILS.PLAN_INFO[plan.nickname], 'highlight', false);
        });

        return plans;
      }


      /**
       * @param {Array} plans An array of Stripe plans
       * @param {Array} products An array of Stripe products
       * @return {Array} An array of Stripe products with attached plans
       * Products with no plans are filtered out
      */
      function attachPlansToProducts(plans, products) {
        products.forEach(product => {
          const filteredPlans = plans.filter(plan => {
            return product.id === plan.product;
          });

          product.plans = filteredPlans;
        });

        return products.filter(product => product.plans.length > 0);
      }


      /**
       * @return {Array} An array of Stripe products that have 1+ plans
       * Each Stripe product contains an array of Stripe plans
       */
      function getProductsAndPlans() {
        return Promise.all([
          stripe.products.list({}), // Default returns 10 products, sorted by most recent creation date
          stripe.plans.list({}), // Default returns 10 plans, sorted by most recent creation date
        ]).then(stripeData => {
          var products = formatProducts(stripeData[0].data);
          var plans = sortAndFormatPlans(stripeData[1].data);
          return attachPlansToProducts(plans, products);
        }).catch(err => {
          console.error('Error fetching Stripe products and plans: ', err);
          return [];
        });
      }

      module.exports = {
        getProductsAndPlans,
      };
We currently retrieve all products and plans in this tutorial so that you don't have to hardcode any product or plan information.
However, you could always retrieve specific product (API docs) and plan (API docs) information if you would prefer that (e.g., if you have multiple products, if don't want to show specific plans, etc.) .
router/index.js
Now we're ready to set up our first route. We define a pricing route, which calls the getProductsAndPlans function we set up above and returns a list of products.
Then we render our pricing view (template) and pass in the product data.
    const express = require('express');
    const STRIPE_API = require('../api/stripe-functions');
    var router = express.Router();

    router.get('/', async (req, res) => {
      const products = await STRIPE_API.getProductsAndPlans();
      res.render('pricing.html', { products });
    });

    module.exports = router;
views/pricing.html
In this file, we iterate through all products and their corresponding plans. On the real site, you may only want to display the plans for 1 specific product.
We set up a subscription registration form for each plan, including hidden fields for productName and all plan information (as a stringified JSON). This is the simplest way of passing data to another page.
Once the user clicks on a plan's Upgrade Now button, the product name and plan information will be submitted to our Express server via a POST request (form action="/register")
router/index.js
We then handle the submitted information and render our register.html page, dynamically passing in {{ productName }} and {{ plan }} as variables using Nunjucks.
      router.post('/register', (req, res) => {
        const plan = JSON.parse(req.body.plan);
        plan.formatted = req.body.plan;

        res.render('register.html', {
          productName: req.body.productName,
          plan,
        });
      });
At this point, you can start the app via npm run start and navigate to port 3000 to see and interact with the pricing table!
The next section introduces how to set up your registration/payment form and provides a link for next steps.
views/register.html
Here's an example version of register.html that would display the relevant {{ productName }} and {{ plan }} and render a form with a customer name and email input.
We show the product name, "Fast Forms", on the top of the form.
Next, we set up the html for our payment form. Here's what we do inside this form:
- We access the name, amount, interval, and interval_count properties in the plan object to show the appropriate plan information to the customer.
- We include a hidden input to store the plan information
- We create 2 inputs for customer name and email
- We create a container div for our Stripe Elements instance
- We create a container div for our any error messages that our Stripe Elements instance sends us
- We include a button of type submit to submit our form
<script></script>
To learn how to mount a Stripe card element on this page and use the form submission create a subscription, check out our tutorial on creating Stripe subscriptions with SCA, which continues from here.
