Who is this for?
This tutorial is for developers and technical business owners who want to learn how to use Stripe webhooks to detect and respond to Stripe events in real-time. We use failed subscription payments in our example, but the methods can be extrapolated for any kind of Stripe events.
What do I need before I start?
This post assumes that you have both a working Stripe account and enough technical knowledge to set up a backend server that can receive POST requests, preferably using Node.js and Express.
If you prefer to use another backend such as Django or Ruby, the instructions below can still apply, but should be translated for your chosen framework.
Some resources for Node.js and Express:
https://docs.npmjs.com/cli/start (Node Package Manager setup guide)
https://nodejs.org/en/docs/guides/getting-started-guide/ (Node.js getting started guide)
http://expressjs.com/en/starter/hello-world.html (Express.js starter)
What will I learn?
By the time you're done with this guide, you should be able to:
- Configure your Stripe account to send specific webhook events to an endpoint of your choice
- Write code to handle the webhook POST request to automatically email a customer the first time their subscription payment fails
You can find all of the code posted here at:
https://github.com/code-nebula/stripe-webhooks-handler
Let's Get Started
First things first — what is a webhook?
Put simply, a webhook is an HTTP POST request triggered by an event.
With Stripe, this event can be the creation of a new customer, change in a subscription plan, or a failed payment.
The great thing about Stripe webhooks is that you get to configure where the POST request gets sent (the endpoint), and which events Stripe will send a webhook for.
Let's start by looking at Stripe's list of webhook events here: https://stripe.com/docs/api/events/types
As you can see, the list is quite long and it’s easy to get lost in the terminology. For example, what's the difference between charge.failed and invoice.payment_failed?
Well, Charges are any attempt to receive a payment from a customer’s credit or debit card, whereas Invoices are statements of amounts owed by a customer.
An Invoice is created every time a customer purchases a product through Stripe, and if a customer has a subscription, every time a payment is due for that subscription.
These invoices usually result in a charge object if an attempt at a payment is made, but not always (for example, if a subscription is set to email invoices to a customer rather than charge automatically).
Likewise, a Charge can be created through the Stripe API or Dashboard without necessarily having a related invoice.
It's these subtle but important differences that can lead to mistakes when working with Stripe’s API.
For the goal of this guide, let’s say that we want to set up a webhook handler to email a customer whenever their subscription's payment fails for the first time.
While we could use some combination of charge.failed or invoice.payment_failed events to find failed payments for subscriptions, information on the subscription itself is not directly contained in these events. It would also be difficult to determine whether the event was the first instance of a failed payment or not.
There’s a much easier way that we actually use to catch first-time failed payments for customers of our users at https://www.profitkit.io, and that is to simply check for a change in a subscription's status to see if a subscription payment has failed for the first time.
Stripe subscription statuses and what they mean
- Trialing: the customer has not been billed for their current period of use yet, as the subscription is still in its trial period.
- Active: no problems. The customer has either successfully paid their last bill or is on a free plan.
- Past due: the subscription has had failed payments, but not enough instances that it is unpaid yet. Stripe will continue attempting to charge the customer based on your retry settings.
- Unpaid: the subscription has had enough payment failures (default of 4) that Stripe will no longer attempt to automatically charge the customer. This subscription is effectively cancelled via involuntary churn
- Cancelled: the customer has cancelled their subscription and will no longer be billed
You can see from the above that an easy way of detecting a Stripe subscription's first payment failure is to simply look for a change in status from Active to Past due.
It's important that it's this specific change we look for. A change from Active to Cancelled, for example, or Trialing to Active does not indicate a payment failure.
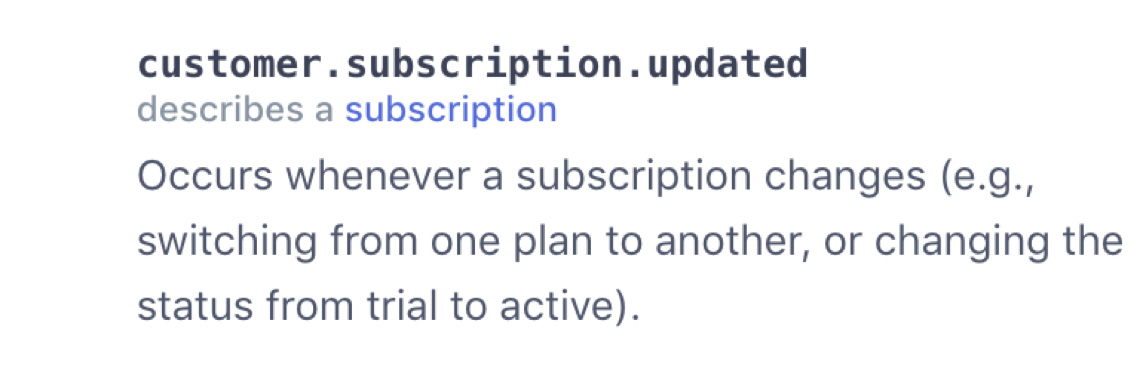
So is there a webhook event that would represent a change in a subscription’s status? There is! It's customer.subscription.updated:
Setting up webhooks from the Stripe dashboard
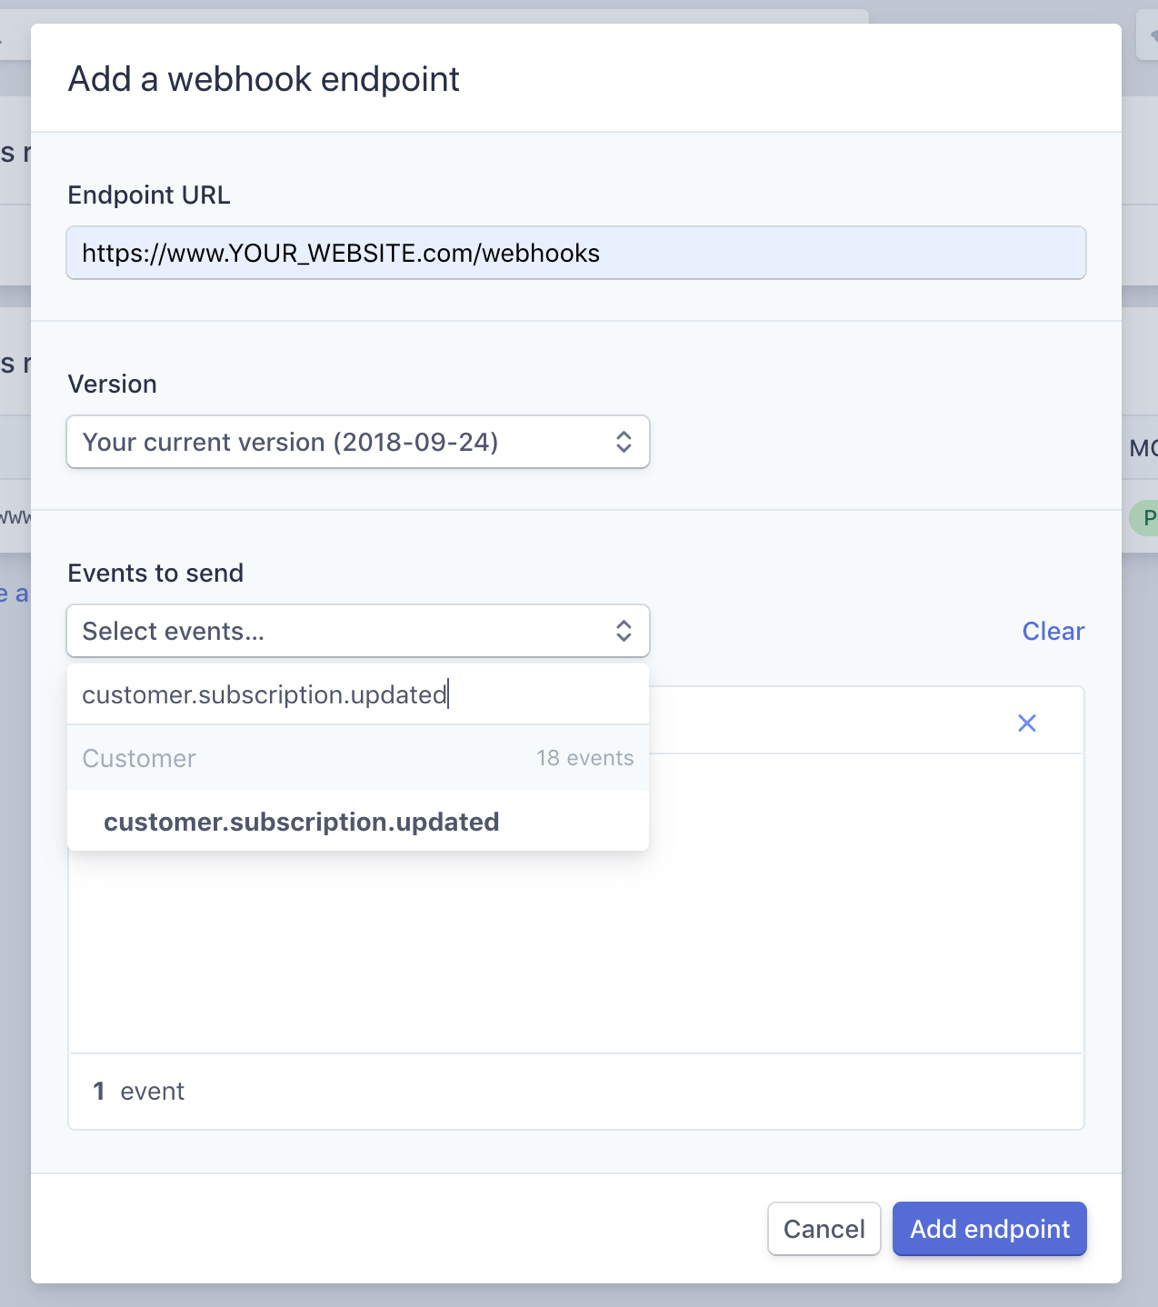
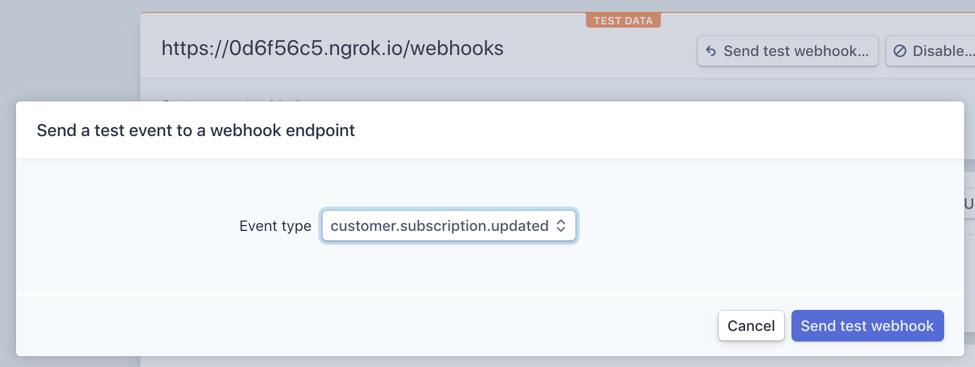
Now let's head to the Stripe Dashboard and configure our webhook settings to receive webhooks at a specified url:
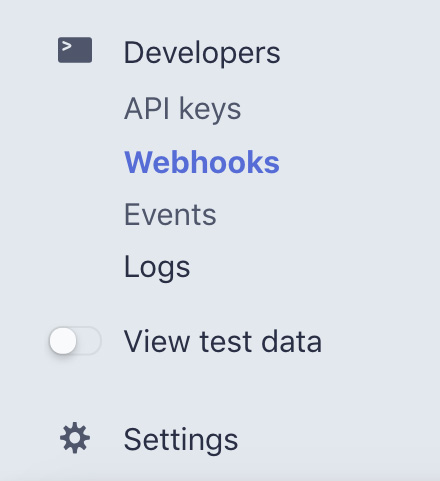
1. Under Developers -> Webhooks in the sidebar, find the Add endpoint option

2. Add a webhook endpoint with an Endpoint URL that matches where your backend server will receive the POST request from, and specify the event type(s) you’d like to receive webhooks for

Great! We’ve set up the webhooks we want to be sent to our desired endpoint, /webhooks. Before we write the code for our route to handle these webhooks though, let's take a closer look at what exactly we'll be receiving in the POST request from Stripe.
The anatomy of a Stripe webhook
https://stripe.com/docs/api/events/object
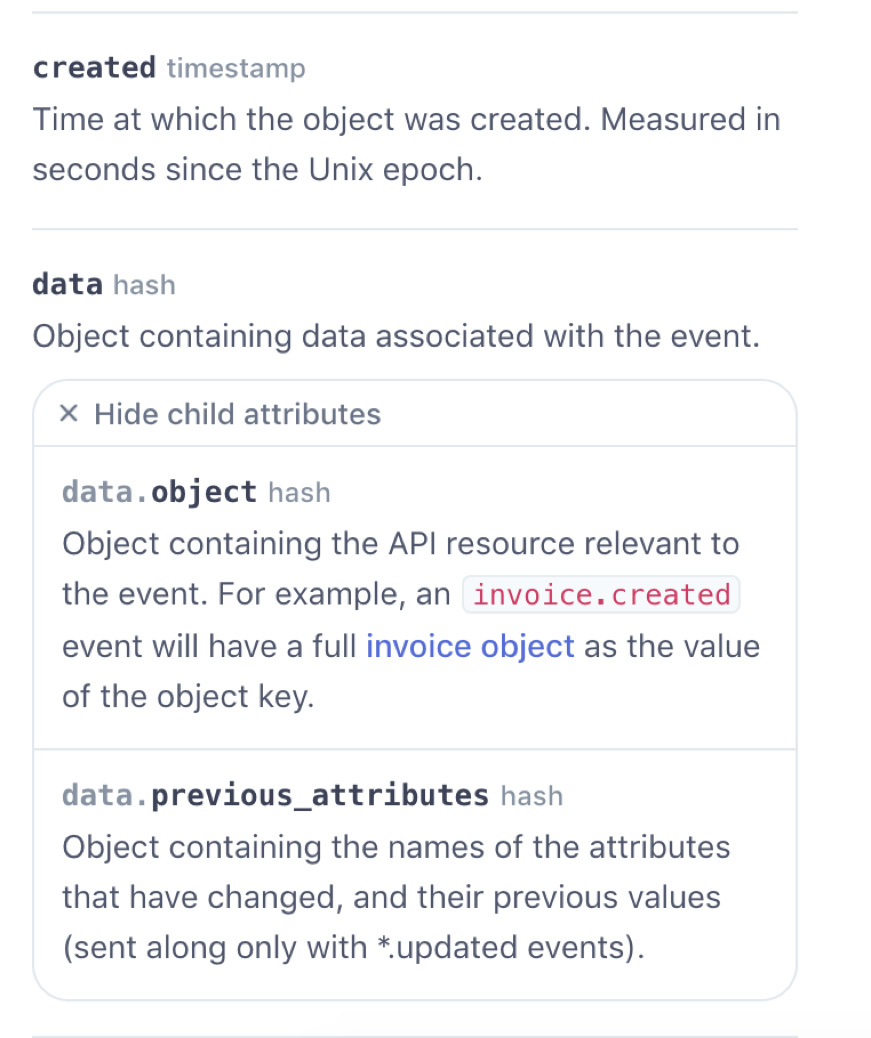
The two things we want to pay attention to here are data.object and data.previous_attributes.
Stripe's docs explain it pretty well, but basically data.object is the latest version of the API resource that was changed, while data.previous_attributes contains the old key-value pairs of all fields that were changed in this webhook event.
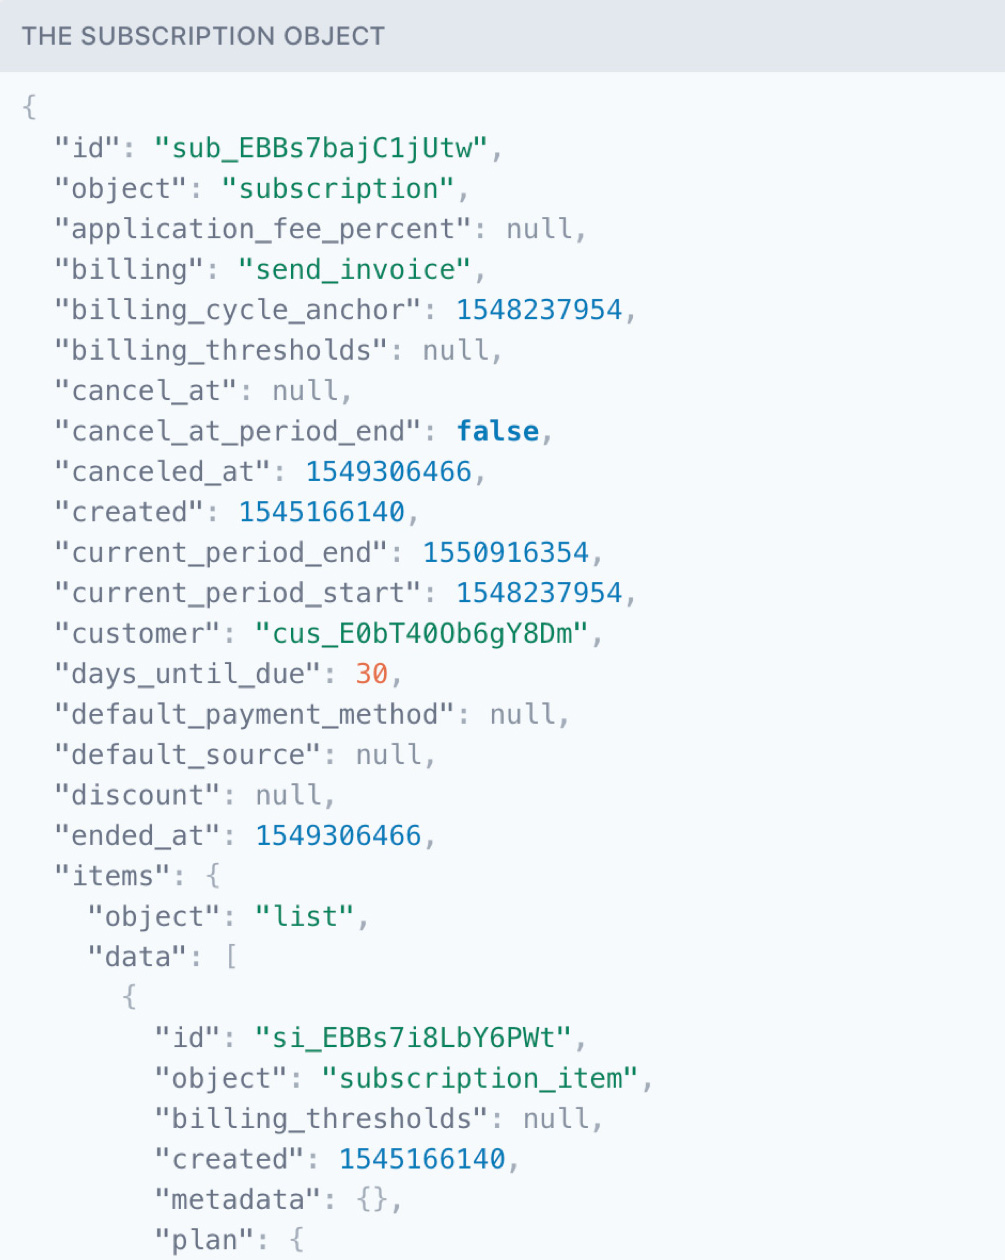
Let's take our customer.subscription.updated event as an example.
The API resource in this case is a
subscription object and this is what will be returned in data.object. It'll look something like this:
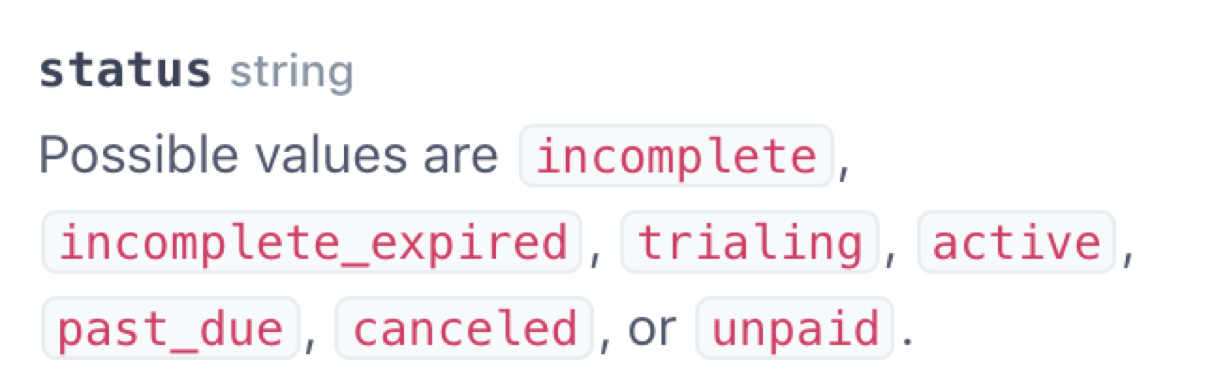
Since we're looking for a change from a status of Active to Past Due, on data.object we want to look for a status = past_due (based on the Stripe API's
values for subscription statuses
)
We also want to check a couple things in data.previous_attributes:
-
First of all, we want to make sure
statusis indata.previous_attributesas a key value. If it's not, that means the status wasn't changed at all in this event. This seems obvious but is a surprisingly easy mistake to make. -
Secondly, we want the value of
data.previous_attributes.statusto equal'active'
So in summary, the webhook POST request we're expecting should carry a body with this general format:
      {
          data: {
              object: [Subscription Object],
              previous_attributes: [Previous Attribute Values]
          }
      }
And we want to filter those requests for bodies with these specific values:
      {
          data: {
              object: {
                  ...[Subscription Object],
                  status: 'active'
              },
              previous_attributes: {
                  ...[Previous Attribute Values],
                  status: 'past_due'
              }
          }
      }
Easy enough, right? Now let's get to coding our webhook handler!
Receiving the webhook POST request
The way Stripe works with webhooks is that it will continuously retry to send a webhook until a success (200 response) is received.
Therefore, it is very important that you return a 200 response in the event of a successful webhook delivery, even if the request body doesn't match the criteria we're looking for!
Important Note
Make sure you have error handlers in place and do not return a 500 response unless you want Stripe to send the webhook again!
I've made the mistake of returning a 500 in the past because there was an error in latter half of my code to handle the webhook, only to have Stripe trigger the first half of my webhook handler 6 times in a row without reaching the end. This can lead to… unintended consequences.
Assuming that we have a basic backend setup, let's create a POST route that matches the endpoint we defined earlier in our webhook settings, with a basic try-catch error handler to prevent Stripe from sending another webhook if something goes wrong:
      router.post("/webhooks", async function (req, res) {
          try {
              console.log("/webhooks POST route hit! req.body: ", req.body)
              res.send(200)
          }
          catch (err) {
              console.log("/webhooks route error: ", err)
              res.send(200)
          }
      }
Now let's write the code to make sure the event triggering the webhook is a change in a subscription's status from active to past due. As a safeguard against errors, I’ll also add a line to check that the type of the webhook event is customer.subscription.updated:
      router.post("/webhooks", async function (req, res) {
          console.log("/webhooks POST route hit! req.body: ", req.body)

          let { data, type } = req.body
          let { previous_attributes, object } = data

          try {
              if ('status' in previous_attributes
                  && type === 'customer.subscription.updated'
                  && previous_attributes.status === 'active'
                  && object.status === 'past_due') {
                  console.log("A subscription payment has failed! Subscription id: ",
                  object.id)
              }
              res.send(200)
          }
          catch (err) {
              console.log("/webhooks route error: ", err)
              res.send(200)
          }
      }
The "meat and potatoes" of our webhook handler is done! We now have our webhooks configured to send a POST request whenever a customer's subscription is updated, and we've set up our route to handle that information and filter for events that match our criteria.
We could stop here… but let's take it a step further and actually send our customer an email notifying them of their subscription's failed payment with details on the subscription itself.
Doing something with our webhook data
The subscription object itself has some information we can use, but unfortunately does not have the customer's email. It also does not have another key piece of information we'd like to show the customer, which is the subscription product's name (note that this is different from the subscription plan's name - if you need a review of products vs. plans, you can get caught up on our previous blog post here). It suffices for now to know that subscription plans belong to subscription products.
Both of these pieces of information however, can be found by getting two Stripe objects related to the subscription: the Customer and the Product objects.
If we reference the Stripe API docs on the subscription object, we can see that the related customer's id is under subscription.customer. For the product ids, where they're located depends on whether the subscription has a single plan or multiple plans.
For the purposes of this example, let's assume that all customer subscriptions will be limited to one plan and one product. This will make this process easier to follow and allow us to find the id of the subscription product, which will be under the subscription's plan object: subscription.plan.product.
Note: if a subscription had multiple plans and products, we'd get the product IDs from the items.data array.
Now that we have the customer and product id, we can use Stripe's API to get the related objects with the information we need.
Let’s install stripe as an npm package and import it at the top of our file along with our Stripe API secret key (for security reasons, consider storing your secret key as an environment variable):
const stripe = require('stripe')('YOUR_SECRET_API_KEY_HERE')Next, we use the Stripe API to fetch information on the related customer and product in our if-statement:
      if ('status' in previous_attributes &&
          previous_attributes.status === 'active'
          && object.status === 'past_due') {
          console.log("subscription payment has failed! Subscription id: ",
          object.id)

          let customer_id = object.customer
          let product_id = object.plan.product
          // https://stripe.com/docs/api/subscriptions/object

          let customer_object = await stripe.customers.retrieve(
              customer_id,
              { expand: ["default_source"] }
          )

          let product_object = await stripe.products.retrieve(
              product_id
          )

          let customer_email = customer_object.email
          // https://stripe.com/docs/api/customers/object
          let product_name = product_object.name
          // https://stripe.com/docs/api/service_products/object
          let plan_name = object.plan.nickname
          // https://stripe.com/docs/api/plans

          res.send(200)
      }
Now, all that's left is to send our customers an email notifying them of the failed payment.
For this step, I'll be using the Nodemailer module and npm package:
const nodemailer = require('nodemailer')I won't go into detail on how to set this up, but the docs (https://nodemailer.com/about/) are pretty straightforward to follow.
Let’s write code to send an email to our customer with information on their subscription product and plan.
Note that I use a Gmail address as an example here, but nodemailer can be configured to work with any mail provider, including custom addresses, using SMTP.
      if ('status' in previous_attributes &&
          previous_attributes.status === 'active'
          && object.status === 'past_due') {
          console.log("subscription payment has failed! Subscription id: ", object.id)

          let customer_id = object.customer
          let product_id = object.plan.product
          // https://stripe.com/docs/api/subscriptions/object

          let customer_object = await stripe.customers.retrieve(
              customer_id,
              { expand: ["default_source"] }
          )

          let product_object = await stripe.products.retrieve(
              product_id
          )

          let customer_email = customer_object.email
          // https://stripe.com/docs/api/customers/object
          let product_name = product_object.name
          // https://stripe.com/docs/api/service_products/object
          let plan_name = object.plan.nickname
          // https://stripe.com/docs/api/plans

          // Nodemailer configuration
          let emailer = nodemailer.createTransport({
              service: 'gmail',
              auth: {
                  user: 'YOUR_EMAIL@gmail.com', //Your gmail address goes here
                  pass: 'YOUR_EMAIL_PASSWORD' //Your email password goes here
              }
          });

          // Send an email to the customer with information on their product and plan
          emailer.sendMail(
              {
                  from: 'YOUR_EMAIL@gmail.com', //Your gmail address goes here
                  to: customer_email,
                  subject: 'Your subscription payment has failed!',
                  html:
                      `<p>An automatic payment for your subscription to ${product_name}
                      - ${plan_name} has failed. Please log in and update your payment information to ensure your subscription remains valid.</p>`
              },
              function (err, info) {
                  if (err)
                      console.log("error sending email: ", err)
                  else
                      console.log("error information: ", info);
              });

          res.send(200)
      }
Our entire route should now look something like this:
https://github.com/code-nebula/stripe-webhooks-handler/blob/master/router/index.js
Now, all we have to do is plug in a valid email and password and our webhooks handler is ready to catch failed payments!
How to test webhooks locally
While this might seem relatively straightforward, testing our webhook route locally can be tricky for a number of reasons.
For one, Stripe cannot send webhooks to your local address. This means you need to use a service like ngrok to make your local server available on a live URL (for more information, check out the end of Step 1 in Stripe’s webhook setup guide: https://stripe.com/docs/webhooks/setup)
Secondly, it can be difficult to replicate the exact event you want to send a webhook for when you're testing.
While Stripe allows you to send webhooks of a certain type to a desired endpoint in test mode, it does not allow you to specify the details of the webhook event. For example, you can specify a test event with a customer.subscription.updated type, but you can’t specify a status change from active to past_due.
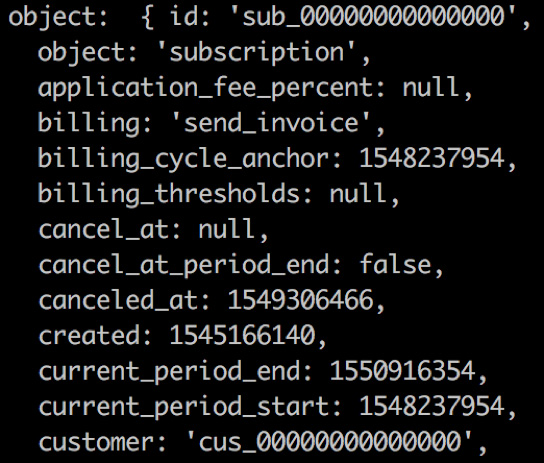
Finally, data contained in test webhooks will also only contain dummy id values that you cannot use to retrieve further information from the Stripe API.
For example, check out the data.object values of a test webhook event below. If we were to use the provided customer id to retrieve the subscription’s customer from the Stripe API, we would encounter an error as there is no customer with an id of cus_00000000000000:
Is there solution to this problem?
There’s no perfect way of testing your webhooks code locally, but my preferred method is to simulate the webhook event as best as possible in Stripe’s test mode.
This means triggering an event in Stripe's test mode that will set off a webhook based on your settings, which is different from sending a test webhook to your endpoint directly.
Some events though, like a subscription becoming past due, are hard to simulate without having to wait days for the billing date to arrive.
In those cases, just trigger an event that's close enough to what you want to test (e.g. you can manually cancel a subscription's trial to trigger a status change, although it will be from trialing to active instead of from active to past due).
This way, the webhook POST request contains valid data and IDs on actual objects from your test account that you can then use to get information on the related customers, products, etc.
You now know how to set up, handle and test webhooks for your Stripe account. We hope you found this guide useful and feel free to reach out if you have any questions or ideas on what you'd like to see us cover next!
Want this done for you?
We built a product that uses this same method to detect your customers’ failed payments and send them payment recovery emails from your own address. Include an optional link to a built-in payment update form hosted by us and never worry about unintentional churn again!
Learn more at https://www.profitkit.io
If you'd like to receive a downloadable version of this guide, join our mailing list below and we'll send you a formatted PDF via email.
