We recently wrote an updated version of this tutorial to cover the Strong Customer Authentication requirement for online payments.
We recommend checking out the following 2 tutorials in place of this 3-part tutorial:
Who is this for?
This tutorial is for online business owners who would like to set up subscription billing on their website. It is fairly technical, and we assume most readers will have some development experience with Stripe and Javascript.
What do I need before I start?
Like many of the other posts on this site, this post also assumes you have a working Stripe account and know how to set up a basic Node / Express server to serve HTML files and receive HTTP requests. If you don’t know how to do these things, no problem! You can still follow along but you may want to consider checking out these docs:
https://docs.npmjs.com/cli/start
https://nodejs.org/en/docs/guides/getting-started-guide/
http://expressjs.com/en/starter/hello-world.html
What will I learn?
In this tutorial, you will learn how to
- Create subscriptions and incorporate them into your site
- Create multiple pricing plans
- Charge customers by setting up your own payment form
- Interact with the Stripe Dashboard and API
This tutorial is broken up into 3 parts:
PART 1 (You're here): Provides a general overview and demonstrates how to create subscription plans via the Stripe Dashboard.
PART 2: Goes into best practices when it comes to setting up your workspace with Node, Express, the Stripe API, etc.
PART 3: Shows you how to use the customer's inputted card number to create a Stripe Token, Customer, and Subscription.
You can find all of the code posted here at:
https://github.com/code-nebula/stripe-recurring-subscriptions
You might notice that some of the code in our repository isn't featured in this tutorial. That's because the repository includes code for
- An Admin View — Where you can create "Products" and "Plans" through the Stripe API. We'll be covering how to do this in an upcoming blog post.
- A Client View — Where your users can view and pay for your "Plans". We are covering how to set this up in this tutorial.
If any of these Stripe terms are unfamiliar to you, don't worry, we'll be covering them below.
Let's get started!
In this tutorial, we'll be showing you how to set up Stripe subscriptions for a fabricated software-as-a-service website called "Simple Albums." As the name suggests, Simple Albums is a site where users can upload their photos and create beautiful, online-hosted albums.
As the owner of Simple Albums, you want to offer the following paid plans:
- Hobbyist ($20.00/month) — users get up to 16GB in storage
- Professional ($50.00/month) — users get unlimited storage and can invite other people to collaborate on albums
The video below outlines a customer sign-up workflow:
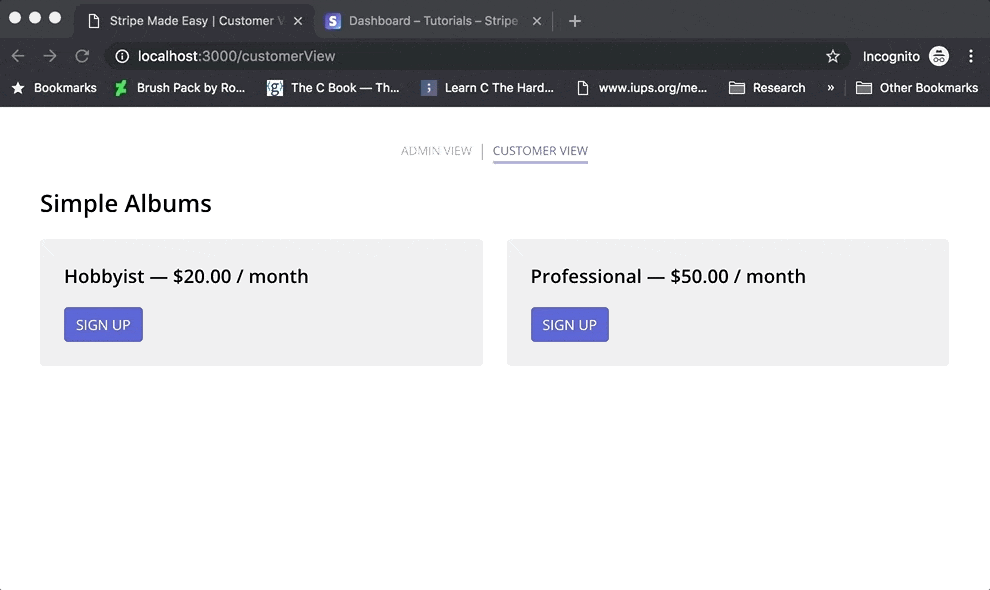
Your customers will see two pricing plans that they can choose from. When they click to sign up, they will be directed to a sign up form when they enter their payment credentials.
In the real (not demo) version of the site, it may make more sense to 1. have the payment form inside your application (past the sign up screen) and 2. appear after a trial period. For the purposes of keeping this tutorial direct, though, we've included payment with the sign-up form.
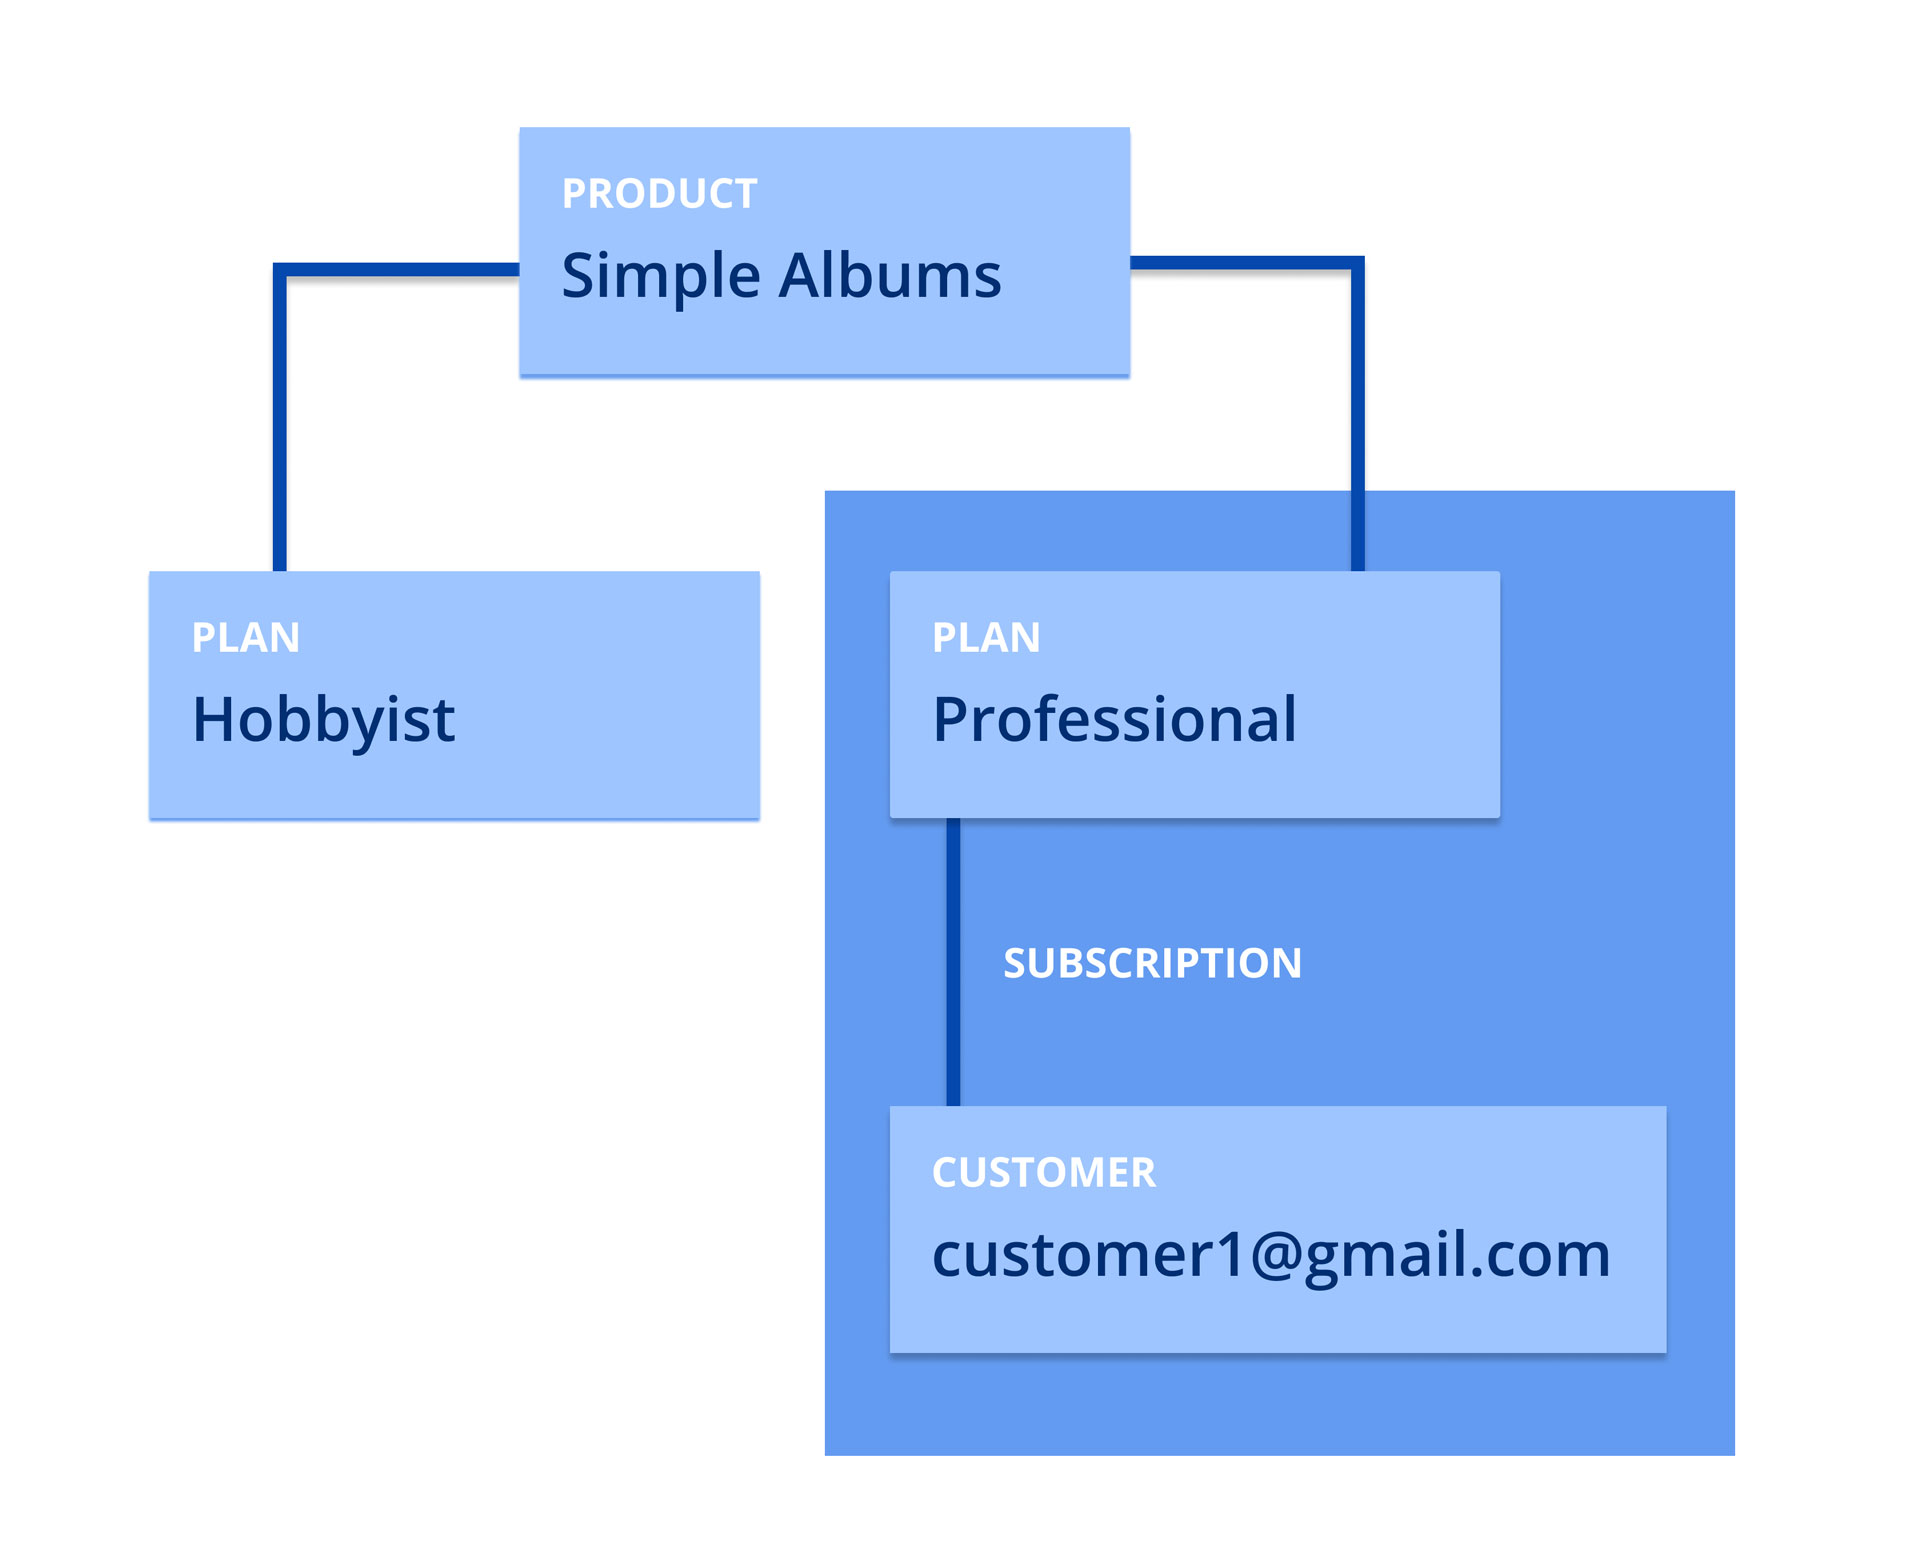
1. Understand Stripe's terminology (Products, Plans, Subscriptions, and Customers)
It's important for you to understand Stripe's terminology, especially since it can be a bit misleading if you're new to Stripe. For instance, it might be tempting to jump right into Stripe's Subscription object, but you should really start with Stripe's Product object. So what's the difference?
A Product is essentially the subscription service you are offering. A Product can have many Plans. A Subscription connects a Customer to a Plan.
Here's a diagram that might help you visualize these terms:
We'll cover these Stripe terms more in depth throughout the tutorial, but if you'd like to read more on your own, we'd recommend taking a look at the Stripe API docs.
2. Create a Product
You can create a product using the Stripe API or Dashboard. Because we only need to create 1 Stripe Product, it makes more sense to use the Stripe Dashboard. (As mentioned above, we'll be covering how to create products and plans via the API in an upcoming post.)
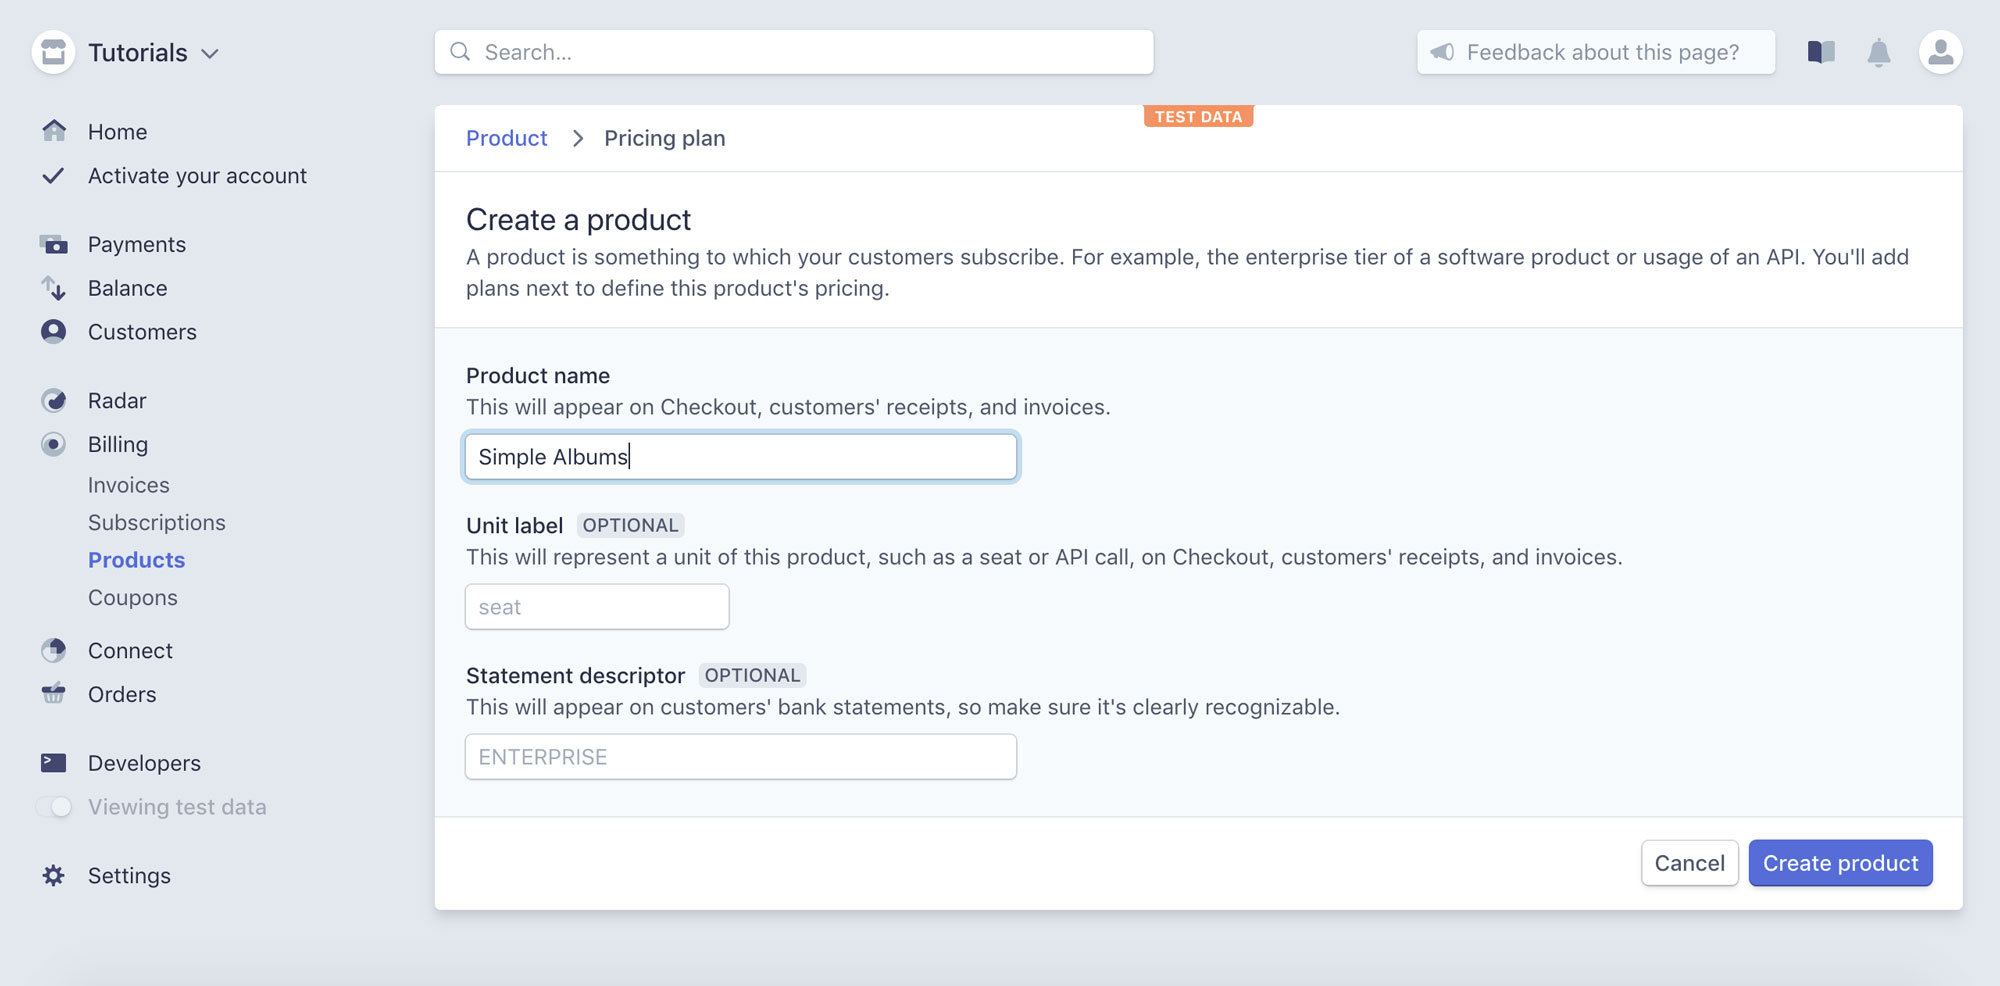
Navigate to your Stripe Dashboard (www.dashboard.stripe.com). In the left sidebar, click on the "Billing" menu item to expand your options. Once expanded, click on "Products".
Click on the "+ New" option in the subheader to create a new product.
Creating a Product is as simple as entering a name. In this case, we'll call our Product "Simple Albums".
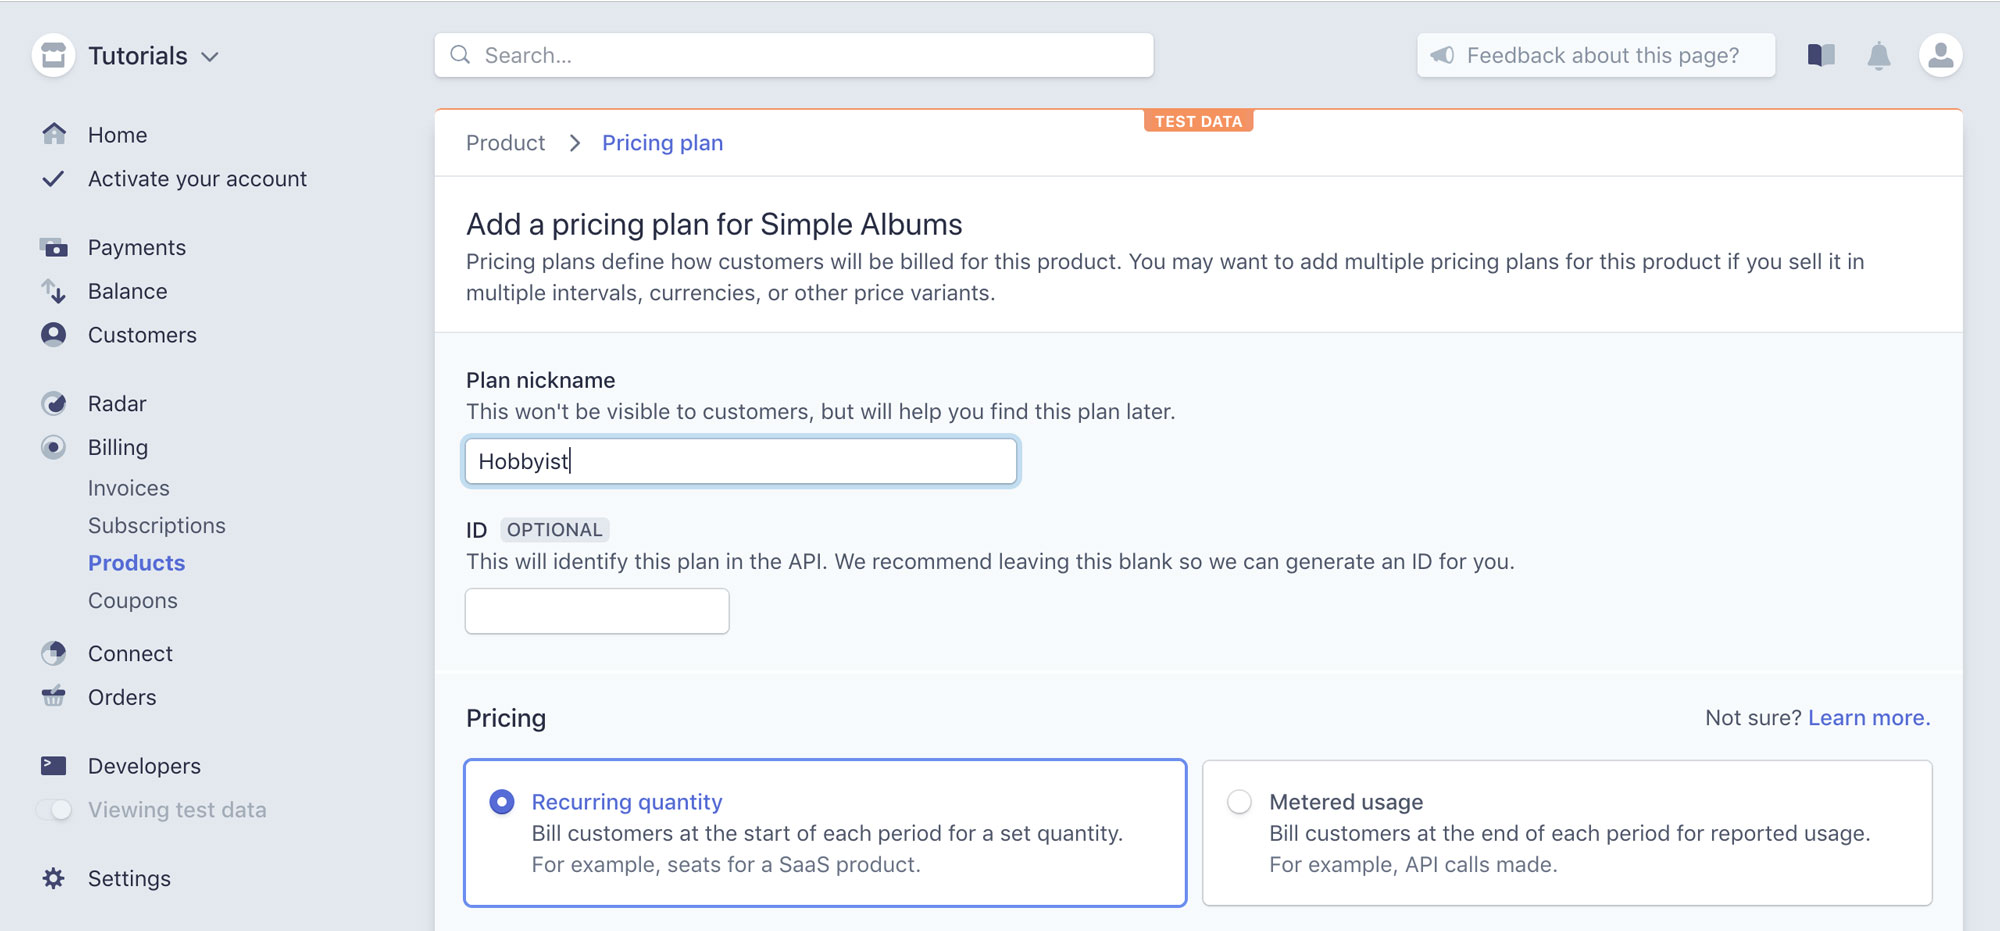
3. Create a Plan
When you create a Product in the Dashboard, Stripe automatically assumes that you want to attach a pricing Plan to that Product.
Stripe gives you numerous options when allowing you to create your pricing Plan.
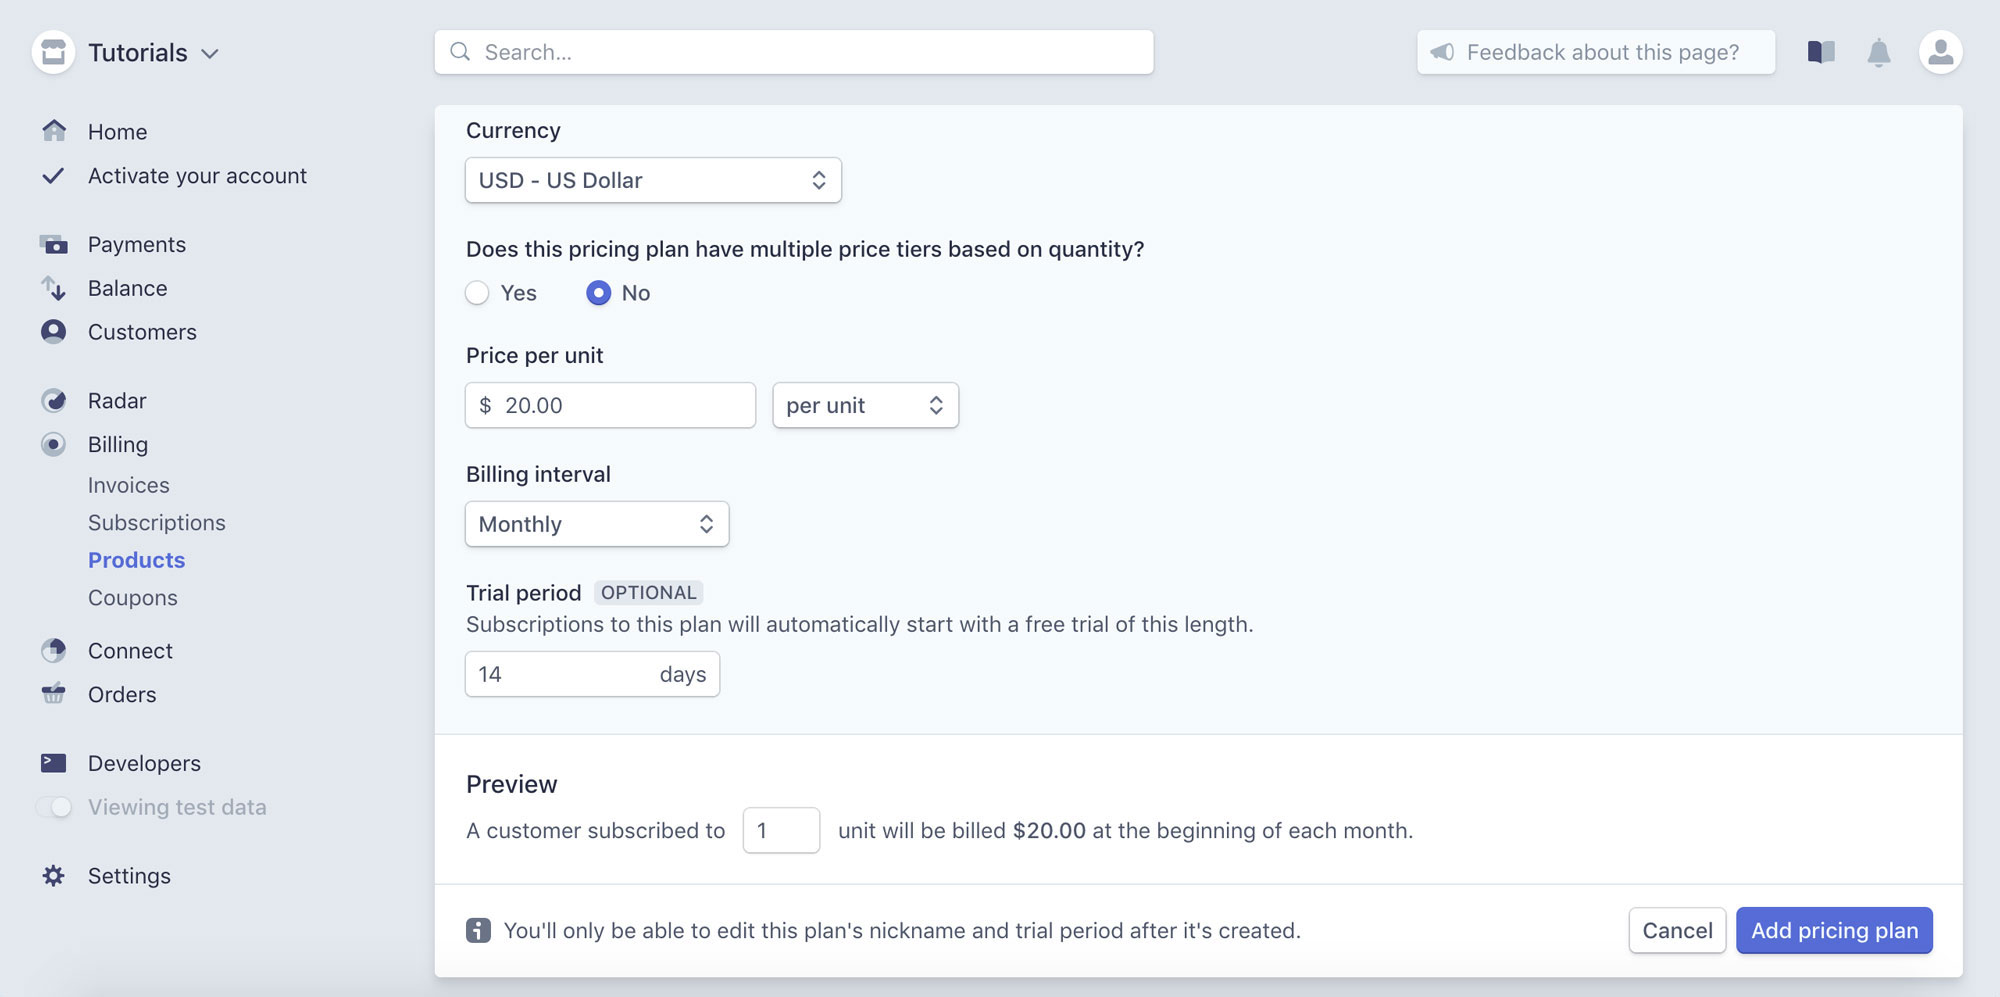
In this step, we'll first create the "Hobbyist" Plan for Simple Albums, which costs $20.00/month. For our Plan, under the Pricing option, select the "Recurring quantity" option, since we'll be automatically billing each month.
The other option, "Metered usage", is based on how much you use an application. The example Stripe gives of "Metered usage" is a case where you are charged for the number of API calls you make. The first real-world example I can think of is Clarifai, which is free for the first 5,000 operations but then costs $1.20 for the next 1000 operations.
Next, you can specify the currency. We will choose "USD". If you're interested in seeing all the currencies that Stripe supports, here is a list: https://stripe.com/docs/currencies.
Because we selected the "Recurring quantity" Pricing option, we can now select the Billing Interval. We will choose "Monthly". Stripe gives you a lot of flexibility with the Billing Interval. If you wanted to charge $20.00/2 months, you could select "Custom" and specify the billing interval type (Month) and number (2).
Lastly, you can specify the Trial Period if you'd like. You typically want a Trial Period if you want users to enter card numbers up front but also want to give them the option to cancel before the trial period ends.
Once you have created the Hobbyist Plan, feel free to create the Professional Plan, which, remember costs $50.00/month.
If you're having trouble creating this plan, navigate back to the "Products" page ("Billing > Products" from the left sidebar). Click into the "Simple Albums" Product. Under the header, you'll see the option to "+ Add pricing plan". Click on that option, and repeat the process outlined above to now create the Professional Plan.
Now that we've set up the Product and Plans, we're ready to jump into the code!
Continue on to Part 2 of this tutorial
Want to read this all in one place?
Sign up for our mailing list below and get a free PDF version of this 3-part series with bookmark navigation!
