We recently wrote an updated version of this tutorial to cover the Strong Customer Authentication requirement for online payments.
We recommend checking out the following 2 tutorials in place of this 3-part tutorial:
As a reminder, this tutorial is broken up into 3 parts:
PART 1: Provides a general overview and demonstrates how to create subscription plans via the Stripe Dashboard.
PART 2 (You're here): Goes into best practices when it comes to setting up your workspace with Node, Express, the Stripe API, etc.
PART 3: Shows you how to use the customer's inputted card number to create a Stripe Token, Customer, and Subscription.
You can find all of the code posted here at:
https://github.com/code-nebula/stripe-recurring-subscriptions
You might notice that some of the code in our repository isn't featured in this tutorial. That's because the repository includes code for
- An Admin View — Where you can create "Products" and "Plans" through the Stripe API. We'll be covering how to do this in a separate blog post.
- A Client View — Where your users can view and pay for your "Plans". We are covering how to set this up in this tutorial.
If any of these Stripe terms are unfamiliar to you, don't worry, they're covered in Part 1.
In the last section, we created our Stripe Product, Simple Albums and our 2 Plans, Hobbyist and Professional. In this section, we'll be setting up our web application and grabbing data about these Products and Plans via the Stripe API.
Now, on to the technical part!
4. Set up Your Workspace and Application Server
First, open up your terminal and create a new Express app. As mentioned above, if you're not familiar with Express, no worries -- the Express site has some easy-to-follow documentation here: http://expressjs.com/en/starter/installing.html.
Next, install the following packages using your favorite package manager (npm, yarn, etc.):
- body-parser (https://www.npmjs.com/package/body-parser)
- nunjucks (https://www.npmjs.com/package/nunjucks)
- dotenv (https://www.npmjs.com/package/dotenv)
- stripe (https://www.npmjs.com/package/stripe)
We will use the body-parser package to parse incoming request bodies as "req.body" in our server-side code. We will use nunjucks for templating and passing data into our HTML files. We will use the dotenv package to house Stripe Secret keys. Lastly, we will use the stripe package to make Stripe API calls.
Next, set up your workspace to follow a similar format:
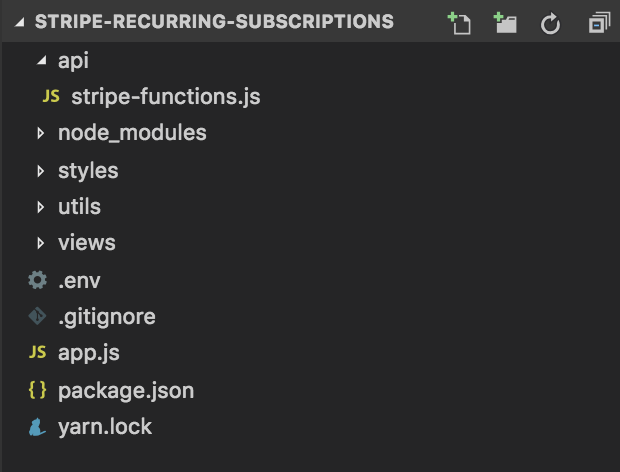
Here's an explanation of the important directories and files:
- api (We recommend having an "api" directory with the Stripe API calls in an effort to make your code more organized and modular)
- node_modules (Holds your installed dependencies)
- styles (For CSS files)
- utils (For helper functions)
- views (For your templates -- your HTML files)
- .env (For your Stripe Secret API key)
- .gitignore (Where you will note which files -- like ".env", which houses unshareable secret keys -- should not be version controlled and checked into your Github repository)
- app.js (For all of your server and application routing logic)
- package.json (Holds information about your app, including which dependencies you are using, etc.)
app.js
Here we officially set up an Express application and import all necessary dependencies like body-parser and nunjucks.
Here's a summary of what you will do in this file:
- Set the server to listen on port 3000
- Import our Stripe API functions (we will set these up soon)
- Set up Nunjucks with Express to serve up and render HTML files
- Set up the content in the styles directory to be served up through the Express app
- Set up your Express router to route client requests to different pages
- Set up our Express app to start a server and listen for connections on the specified port
      const express = require('express');
      const bodyParser = require('body-parser');
      const nunjucks = require('nunjucks');

      const app = express();
      const port = 3000;
      const router = express.Router();

      const STRIPE_API = require('./api/stripe-functions.js');


      /* Set up Express to serve HTML files using "res.render" with help of Nunjucks */
      app.set('view engine', 'html');
      app.engine('html', nunjucks.render);
      nunjucks.configure('views', { noCache: true });

      app.use(express.static(__dirname));
      app.use('/styles', express.static('styles'));
      app.use(bodyParser());
      app.use('/', router);


      /* Place all routes here */


      /* Start listening on specified port */
      app.listen(port, () => {
        console.info('Example app listening on port', port)
      });
views/base.html
This file is your base HTML template. All other HTML files will be extended from this template, so you don't have to repeat all the "set-up" code. By this, I mean the document metadata (the stuff under the "head" tag) and base structure (including all content within the styled "app-container" div).
Notice that there is some logic concerning an "Admin" vs. "Client"/"Customer" View. As mentioned in Part 1, this tutorial series will only cover the "Client"/"Customer" View. A separate blog post will cover the "Admin" view, where we will show you how to create Products and Plans via the Stripe API.
Also note that this file imports two CSS files, adminView.css and customerView.css. I won't be including the code snippets in this tutorial, because they're a bit long, but feel free to check them out here:
https://github.com/code-nebula/stripe-recurring-subscriptions/tree/master/styles
<!-- Import Stripe Client-Side Library -->
<script src="https://js.stripe.com/v3/"></script>
package.json
An important piece of logic you need in your package.json is the "start" script (see "scripts" -> "start"). The command npm run start will run node app.js to make your Express application start a server (basically this command will execute all of the logic specified in your app.js file).
      {
        "name": "stripe-recurring-subscriptions",
        "version": "1.0.0",
        "description": "A tutorial on setting up recurring subscriptions with Stripe.",
        "main": "app.js",
        "scripts": {
          "test": "echo \"Error: no test specified\" && exit 1",
          "start": "node app.js"
        },
        "keywords": [
          "stripe",
          "recurring",
          "billing",
          "subscriptions"
        ],
        "author": "",
        "license": "ISC",
        "dependencies": {
          "body-parser": "^1.18.3",
          "dotenv": "^6.2.0",
          "express": "^4.16.4",
          "nunjucks": "^3.1.7",
          "stripe": "^6.25.1"
        }
      }
.env
The dot env file is a place where you can store environment variables. Environment variables are essentially key-value pairs that are loaded into the application at build time (in this case, they're loaded in as process.env.{VARIABLE_NAME}. Environment variables can be used for many purposes.
In this case, we'll be treating the Stripe Secret key as an environment variable for security purposes. We don't want other people to see this value (like on Github), yet we need it to be included in our application in order to properly configure the Stripe API. The dot env file allows us to store this secure data separately from our application logic. To use it in our application, we will later
- Require and configure dotenv and
- Load in our Secret key via
process.env.STRIPE_API_KEY
To find the Secret key, go to the Stripe Dashboard -- www.dashboard.stripe.com -- and click on the "Developers" menu item in the left sidebar to expand your options. Once expanded, click on "API keys". In the main dashboard, you'll see a section called "Standard Keys". In this section, click to reveal the "Secret Key" token. This is the value of your Stripe Secret Key.
STRIPE_API_KEY="sk_test_************************"
.gitignore
If you're using git and are considering uploading your repository online, it's important that you do NOT upload your Stripe Secret key stored in your .env file. Remember this is sensitive data that can allow other people to have programmatic access to your Stripe account.
We need to make sure that the .env file is not version controlled or checked in at any point. We can ignore it by specifying it in a .gitignore file. It's also good practice to ignore checking in your node_modules, as checking these in can inflate storage and lead to many unnecessary merge conflicts in the future. Remember that your node_modules can always be reproduced by running npm install.
      .env
      /node_modules
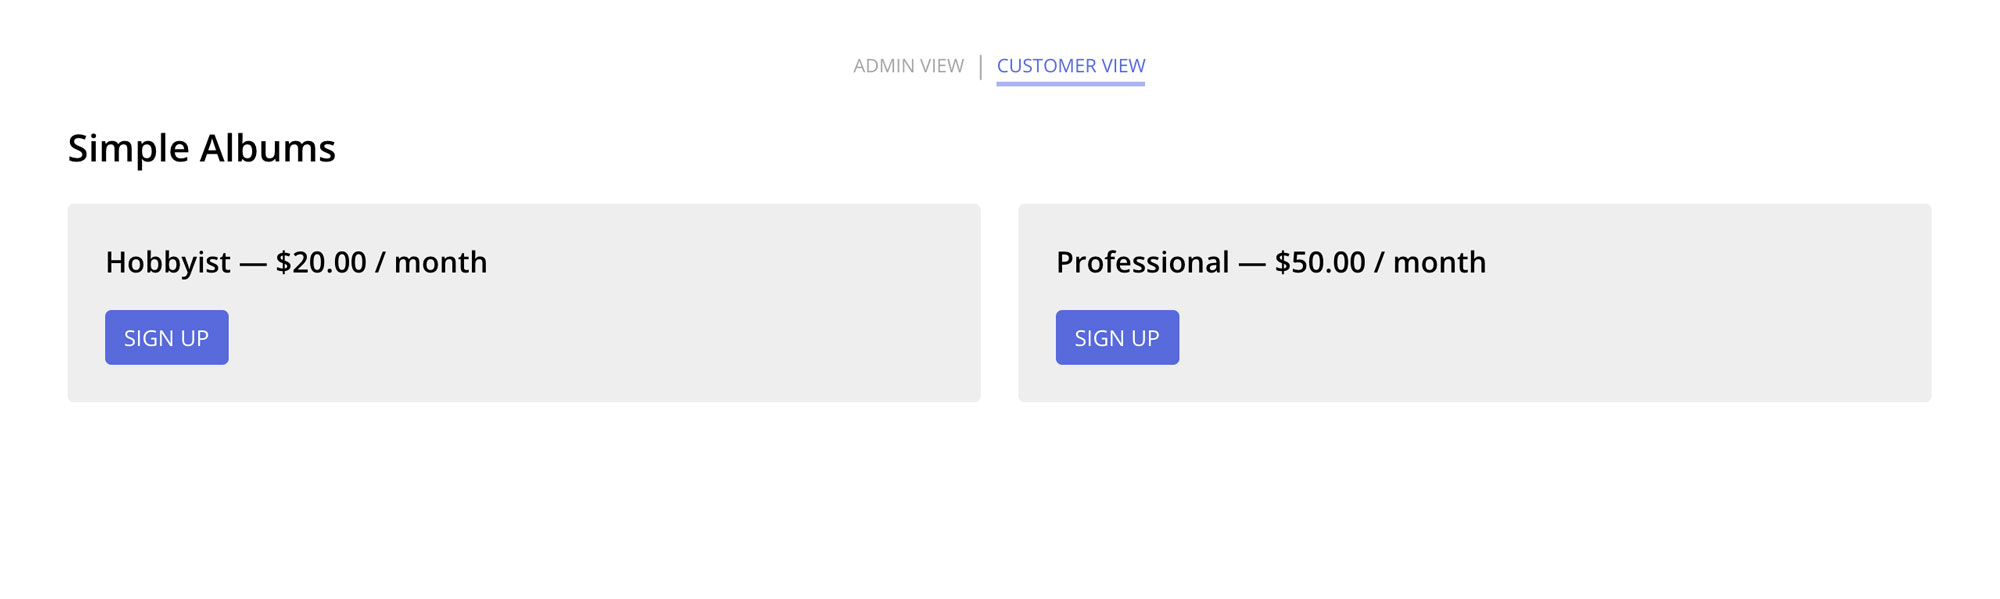
5. Set up Your Pricing "Table"
In this step, we will create the Pricing Plan table customer view:
api/stripe-functions.js
As stated above, we recommend having an "api" directory with the Stripe API calls in an effort to make your code more organized and modular. Ideally, you may want a file for each part of the Stripe API you're dealing with, but since we don't make too many API calls in this tutorial, we'll put everything within a "stripe-functions.js" file.
First, we will configure the "dotenv" package to be used in our application. Then we will initialize our instance of the Stripe API. We do this by importing the Stripe package and passing our Stripe secret key (as process.env.STRIPE_API_KEY) as a parameter.
Next, we will import some helper functions from the "utils" directory (I will showcase these functions as the next code snippet).
Then we create a function called getAllProductsAndPlans. This function utilizes the Stripe functions stripe.products.list({}) and stripe.plans.list({}) to grab all of your Stripe account's products and plans. Since these two functions return Javascript Promises and the functions are independent of each other, we use "Promise.all" to resolve them both at the same time (instead of chaining together the two promises and waiting for one to return before we call the second).
Once we get all the product and plan data, we sort the plans in ascending order of price (the "amount" field). Then we format the amount in dollars and cents. The Stripe amount is stored as a number, and it represents the price in cents. For instance, our Hobbyist Plan's Stripe amount would be 2000 (which represents $20.00).
Lastly, we attach the appropriate plans to their corresponding product, so that the product now has a "plans" field that we can iterate through.
Instead of retrieving all products, you could have also retrieved the product ("Simple Albums") that you were interested in by calling the "Retrieve a Product" function and passing in the desired Product Id.
      /* Server Side -- Stripe API calls */
      require('dotenv').config();
      const stripe = require('stripe')(process.env.STRIPE_API_KEY);
      const UTILS = require('../utils/format-numbers.js');

      function getAllProductsAndPlans() {
        return Promise.all(
          [
            stripe.products.list({}),
            stripe.plans.list({})
          ]
        ).then(stripeData => {
          var products = stripeData[0].data;
          var plans = stripeData[1].data;

          plans = plans.sort((a, b) => {
            /* Sort plans in ascending order of price (amount)
              * Ref: https://www.w3schools.com/js/js_array_sort.asp */
            return a.amount - b.amount;
          }).map(plan => {
            /* Format plan price (amount) */
            amount = UTILS.formatUSD(plan.amount)
            return {...plan, amount};
          });

          products.forEach(product => {
            const filteredPlans = plans.filter(plan => {
              return plan.product === product.id;
            });

            product.plans = filteredPlans;
          });

          return products;
        });
      }

      module.exports = {
        getAllProductsAndPlans,
      };
utils/format-numbers.js
This file contains some helper functions to go between formatted USD numbers and Stripe amounts. (See section above for info on Stripe amounts)
      function formatUSD(stripeAmount) {
        return `$${(stripeAmount / 100).toFixed(2)}`;
      }

      function formatStripeAmount(USDString) {
        return parseFloat(USDString) * 100;
      }

      module.exports = {
        formatUSD,
        formatStripeAmount
      };
app.js
In this file, we call the function getAllProductsAndPlans to grab all of our Stripe product and plan information. Once we receive that data, we filter for products that actually have plans set up.
Then we render our "Customer View" and pass in the filtered product data.
      router.get('/customerView', (req, res) => {
        STRIPE_API.getAllProductsAndPlans().then(products => {
          products = products.filter(product => {
            return product.plans.length > 0;
          });

          res.render('customerView.html', {products: products});
        });
      });
views/customerView.html
The goal of this "Customer View" page is to iterate through all products and their corresponding plans. In the real site, you may only want to display the plans for 1 specific product.
We set up a Sign Up form for each plan, and in the form, we include hidden inputs for the product name and the plan id, nickname, amount, interval, and interval_count.
Since we're not using a Javascript front-end framework, this is our way of passing data to another page.
Once a user clicks on a specific plan's "Sign Up" button, the data mentioned above (product name, plan id, plan nickname, plan amount, plan interval, and plan interval_count) will be submitted to our Express server through a POST request (via form action="/signUp").
At this point, if you run your app via npm start and navigate to localhost:3000/customerView, you should see the following:
Next, we will handle what happens when you click on either of the "Sign Up" buttons.
app.js (Back here)
Here we will take the submitted product and plan data and pass it to a plan-specific sign up page.
    router.post('/signUp', (req, res) => {
      var product = {
        name: req.body.productName
      };

      var plan = {
        id: req.body.planId,
        name: req.body.planName,
        amount: req.body.planAmount,
        interval: req.body.planInterval,
        interval_count: req.body.planIntervalCount
      }

      res.render('signUp.html', {product: product, plan: plan});
    });
The next section will cover how to create a form that when submitted, creates a Stripe token, customer, and subscription.
Continue on to Part 3 of this tutorial
Want to read this all in one place?
Sign up for our mailing list below and get a free PDF version of this 3-part series with bookmark navigation!
