Note: This post assumes you know how to set up a basic Node & Express server to serve html files and receive HTTP requests. If you don't know how to do these things yet, you can still follow along but may want to consider checking out the following docs:
https://docs.npmjs.com/cli/start (Node Package Manager setup guide)
https://nodejs.org/en/docs/guides/getting-started-guide (Node.js getting started guide)
http://expressjs.com/en/starter/hello-world.html (Express.js starter)
You should also have a Stripe account set up (it's free!)
The instructions below are targeted towards Node.js & Express developers but will work with any kind of backend or MVC framework (such as Django or Ruby on Rails). You'll just have to do the work of translating the server-side code to your chosen framework and language.
TLDR
Jump to Step 4 to learn how to write some nifty client-side JavaScript to take a Stripe token from your form and pass it to a backend route. Steps 5 & 6 detail how to handle the stripe token on your backend and use it to create a customer.
You can also find all of the code mentioned in this post here:
https://github.com/code-nebula/simple-stripe-checkout
Preview
By the time you're done with this guide, you should be able to:
- Create a frontend Stripe form that takes in a user's credit or debit card information
- Wire up the form to generate a stripe token on submission and pass it to your backend
- Use server-side code to handle the stripe token and create a customer you can manage and bill on your Stripe Dashboard
Why It's Important
Learning how to pass Stripe tokens from the frontend to your server is the key to actually doing anything payment-related.
The way Stripe works is by using tokens to store a user’s payment information instead of allowing you to pass payment information directly from the frontend to your server. It’s a smart system that prevents customers’ payment information from being mishandled or stored in a vulnerable setting.
The downside of course, is that this layer of security can complicate the process of collecting a customer’s payment information through a frontend form. Since we can’t pass a user’s payment information from a Stripe form directly to the server, we need to write some client-side JavaScript to do the work of grabbing the token and sending it to the backend for us.
I’ve tried to make this guide as universally applicable as possible by only using vanilla JavaScript on the frontend, but since we do need a server to handle our Stripe token, I’ve decided to use Node.js and Express. Feel free to adapt what I’ve done here with any backend server framework of your choice (such as Ruby or Django).
The Steps
1. Create your front-end Stripe form
For this step, we’re going pull an example straight from Stripe’s Quickstart page, though our method will work for any stripe token that’s generated through a Stripe Elements form (not to be confused Stripe Checkout, which has a slightly different process for creating tokens).
Feel free to use the example HTML file we’re about to create or your own frontend Stripe form code if you already have it set up.
Let’s go to the Stripe Elements Quickstart page and look at their first example. You’ll notice HTML, CSS, and JavaScript tabs that will reveal code snippets you can copy:
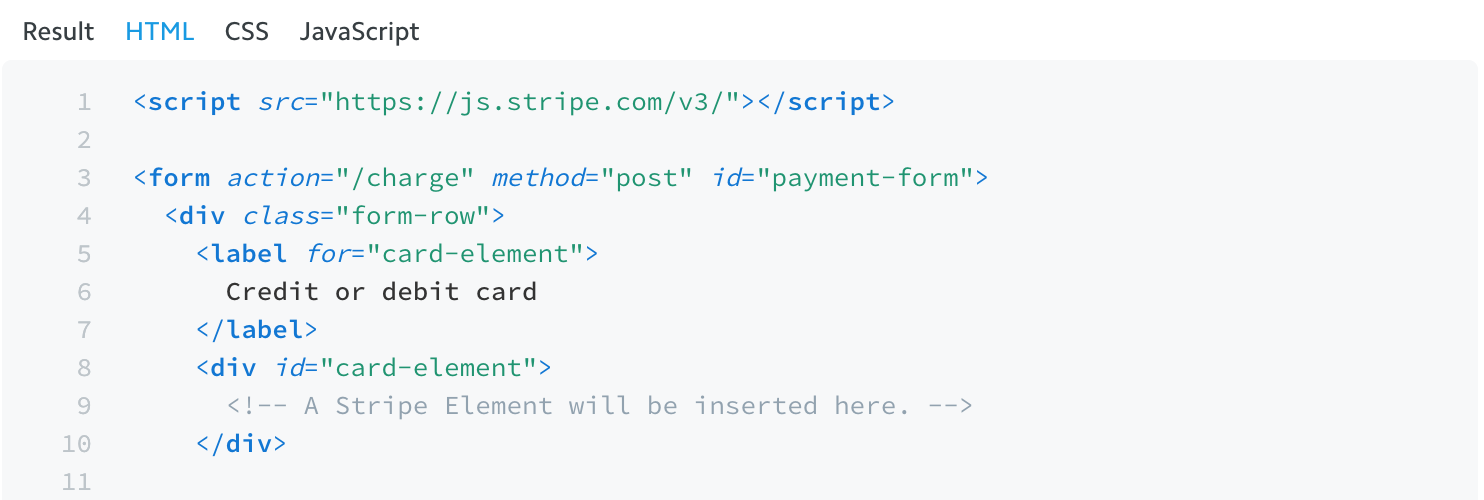
Create a new HTML file titled stripeForm.html, and paste the following code snippets from the above Stripe example in the following order:
      [HTML Code Snippet]
      <script>
          [JavaScript Code Snippet]
      </script>

      <style>
          [CSS Code Snippet]
      </style>
(Remember to wrap the CSS and JavaScript snippets with the appropriate HTML tags!)
Your stripeForm.html file should now look something like this:
https://github.com/code-nebula/stripe-starter-kit-node/blob/master/views/stripeFormDefault.html
If you scroll to the top of the file, you'll notice a form inside the HTML code:
This is where the payment form will be rendered in our HTML. The JavaScript code snippet we pasted at the bottom of the form will transform these elements into a Stripe credit card form.
Let’s change the action value of our form to be the name of a route we
want to send the stripe token to, for example: "/stripe-information"
Set the action value of the form to your desired backend route (in this case "/stripe-information" so the token will be sent to EXAMPLE_URL/stripe-information when the form is submitted:
You can also add the following CSS into your style tags to make the form look more like the example on Stripe's website:
    body, html {
        height: 100%;
        background-color: #f7f8f9;
        color: #6b7c93;
      }

      #card-element {
        height: 16px;
      }

      #card-errors {
        margin: 0 auto;
        height: 20px;
        padding: 4px 0;
        color: #fa755a;
      }

      button {
        border: none;
        border-radius: 4px;
        outline: none;
        text-decoration: none;
        color: #fff;
        background: #32325d;
        white-space: nowrap;
        display: inline-block;
        height: 40px;
        line-height: 40px;
        padding: 0 14px;
        box-shadow: 0 4px 6px rgba(50, 50, 93, .11), 0 1px 3px rgba(0, 0, 0, .08);
        border-radius: 4px;
        font-size: 15px;
        font-weight: 600;
        letter-spacing: 0.025em;
        text-decoration: none;
        -webkit-transition: all 150ms ease;
        transition: all 150ms ease;
        float: left;
        margin-left: 12px;
        margin-top: 24px;
      }

      button:hover {
        transform: translateY(-1px);
        box-shadow: 0 7px 14px rgba(50, 50, 93, .10), 0 3px 6px rgba(0, 0, 0, .08);
        background-color: #43458b;
      }

      #payment-form {
        background-color: #f7f8f9;
        flex-direction: row;
        color: #6b7c93;
        font-family: "Helvetica Neue", Helvetica, sans-serif;
        padding: 30px;
        margin: auto;
        width: 50%;
        -webkit-font-smoothing: antialiased;
        display: block;
      }

      label {
        font-weight: 500;
        font-size: 14px;
        display: block;
        margin-bottom: 8px;
      }

      .form-row {
        width: 70%;
        float: left;
      }
At this point, your stripeForm.html file should look like this:
https://github.com/code-nebula/stripe-starter-kit-node/blob/master/views/stripeFormStyled.html
2. Set up a Node and Express server that can serve up HTML files and handle HTTP requests (link to docs)
Let’s set up a simple one-page application using Node.js and Express to serve up our stripeForm.html and create a server that we can pass Stripe tokens to.
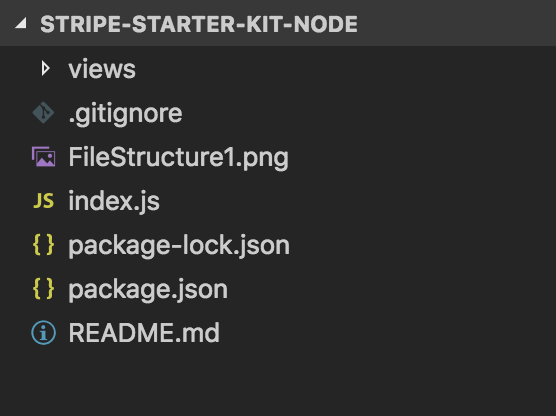
I set up a simple backend server by running npm init in my root
directory and setting up the following file
structure:
I’ll also need to include a templating engine to serve up HTML files and body parsing middleware to read data from post requests.
I use the Node packages nunjucks and body-parser for these purposes and include
them in my Node app
by running npm install nunjucks --save and npm install body-parser --save in the root
directory.
Finally, I set up the following code in index.js so my Node app will be
rendered on http://localhost:8000 when I run node index.js from the root
directory:
    const express = require('express')
    const bodyParser = require('body-parser');
    const nunjucks = require('nunjucks');
    const stripe = require('stripe')('sk_test_5wRrRkW71NRhb4cIHdRL9Z32');
    const app = express();

    app.get('/', (req, res) => {
      res.send('Hello World!')
    });

    app.listen(8000, () => {
      console.log('Example app listening on port 8000!')
    });

    // have res.render work with html files
    app.set('view engine', 'html');
    // when res.render works with html files, have it use nunjucks to do so
    app.engine('html', nunjucks.render);

    nunjucks.configure('views', { noCache: true });

    app.use(express.static(__dirname))
    app.use(bodyParser());

    const router = express.Router();

    app.use('/', router)
Notice how I configure nunjucks to work with Express to serve up HTML files from my /views directory:
    app.engine('html', nunjucks.render);
    nunjucks.configure('views', { noCache: true });
3. Create a route to serve up your stripeForm.html file
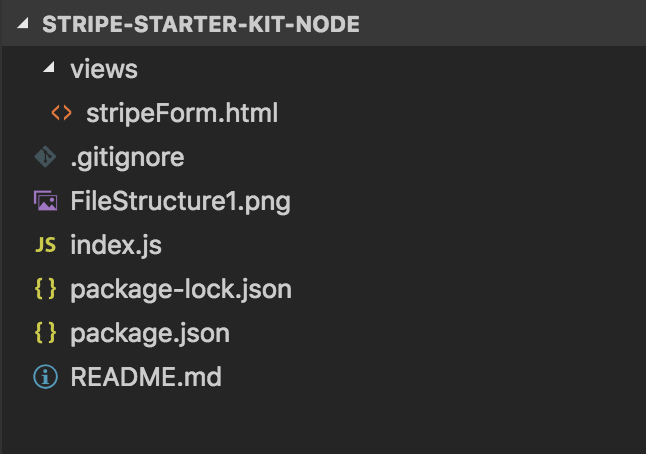
Let's add our stripeForm.html file into our app's /views folder so that the file structure now looks something like this:
Next, I set up a router using Express and create a route called “/stripe-form” to serve up stripeForm.html as an HTML page using res.render(), by adding the router.get() line to the bottom of index.js:
    const router = express.Router();

    app.use('/', router)

    router.get('/stripe-form', function (req,res,next) {
        res.render('stripeForm', {title:'Stripe Form Title'});
    })
Now if we start our server using node index.js from our file directory
and navigate to http://localhost:8000/stripe-form, we should see
something like this:

4. Write some client-side JavaScript to handle our Stripe Token
Now for the most important step. We need to modify our stripeForm.html file to pass the stripe token to our backend server when it's created.
If you go back to our stripeForm.html file, you’ll notice that at the bottom of our JavaScript code snippet, there’s a convenient stripeTokenHandler()function that’s called on our stripe token — the only problem is that it’s not defined yet. Let’s define stripeTokenHandler() to take our stripe token and pass it to our backend!
Doing this without using a client-server framework like AJAX can be tricky, but luckily there’s a workaround to this. Essentially, we want our function to take the stripe token and pass it in as an input to the form we’ve already created before submitting the form itself, sending the stripe token and any other information within the form to the route defined in our form’s “action” attribute from Step 1.
Add this code to the bottom of the <script></script> tags
in stripeForm.html, right below the form.addEventListener function:
      function stripeTokenHandler(token) {
        // Insert the token ID into the form so it gets submitted to the server
        var form = document.getElementById('payment-form');
        var hiddenInput = document.createElement('input');
        hiddenInput.setAttribute('type', 'hidden');
        hiddenInput.setAttribute('name', 'stripeToken');
        hiddenInput.setAttribute('value', token.id);
        form.appendChild(hiddenInput);
        // Submit the form
        form.submit();
      }
At the end of this step, your stripeForm.html file should look something like this:
https://github.com/code-nebula/stripe-starter-kit-node/blob/master/views/stripeForm.html
5. Create a route to handle the Stripe token that will be passed to your backend
In our index.js file, we’re going to set up a route method that will receive a POST request (sent when the form is submitted) and handle our Stripe token on the backend. Let’s make sure to match the URL to the value in our form action we defined previously.
Add this snippet to the bottom of our index.js:
    router.post('/stripe-information', function (req, res, next) {
      console.log('Stripe token received: ', req.body)
      res.send("Stripe token received")
    })
Try out our new token handling route by starting the app and submitting a test credit card number through our form! Stripe has a default set of credit card numbers available here:
https://stripe.com/docs/testing#cards
If you submit the form with a test credit card number of 4242 4242 4242 4242 and any set of numbers for the expiry Year, Month and Zip Code, you should see the stripe token appear in your server console logs:

Stripe token received: { stripeToken : 'tok_1DEWOJJ14t7rQNsfi29sqPao' }6. Import Stripe in our server and configure the route to use the token to create a Stripe customer
Install Stripe for Node.js by running the following terminal command in your project root directory:
npm install stripeNext, get your secret API key from your Stripe Dashboard
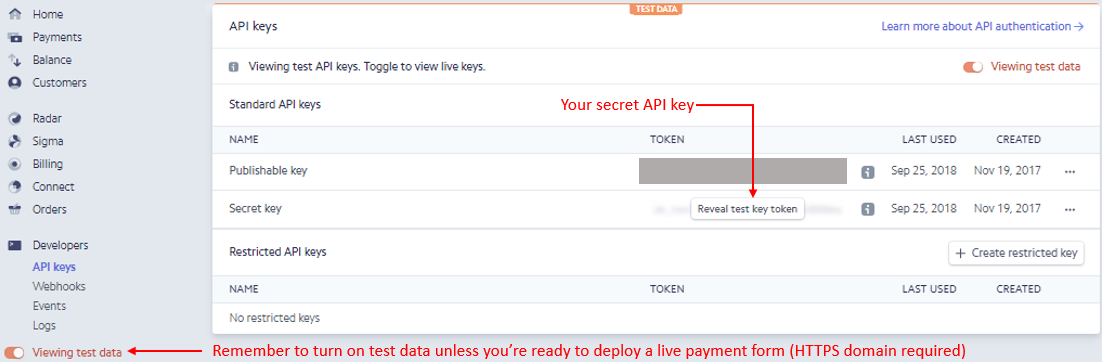
Note: using Stripe in live mode requires an HTTPS domain. Since we want to test out our new backend without purchasing an SSL certificate, let’s use our test secret key for this example.
Require and configure Stripe with your secret key by placing this line of code at the top of your index.js file (replace SECRET_KEY_HERE with your Stripe secret key):
const stripe = require('stripe')('SECRET_KEY_HERE');Use the methods from the Stripe Customers API to create a customer when a token is received in your "/stripe-token" route by adding this code inside your new POST method route at "/stripe-information":
    router.post('/stripe-information', function (req, res, next) {
      console.log('stripe information received: ', req.body);

      stripe.customers.create({
        description: 'My new customer',
        source: req.body.stripeToken,
      }, function(err, customer) {
        console.log('err: ', err, '|customer: ', customer)
        if (err) {
          res.json(err)
          return
        }
        res.json(customer)
        return
      })
    })
You can add extra fields to your form that will be passed into this route and provide information that can be linked to your new customer.
Test it out! Try running the app again and submitting the form with a sample credit card:
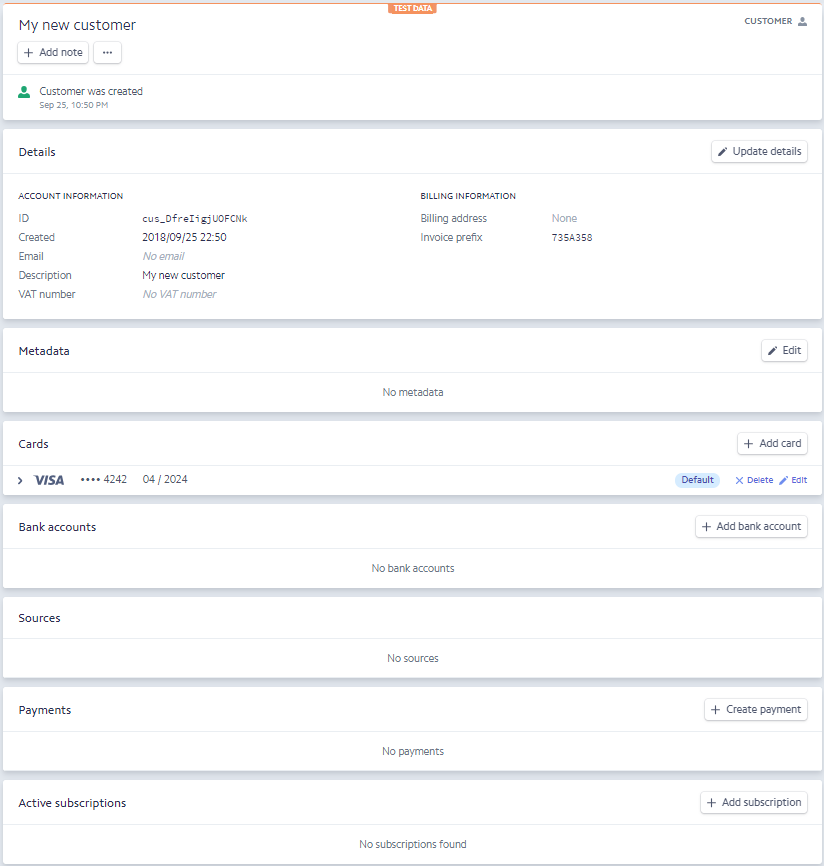
You should now be able to log into your Stripe Dashboard and see the customer you just created.

You can manage the customer from your Stripe dashboard, where you can edit the customer’s profile information and metadata, charge the card they submitted through the payment form or subscribe them to a recurring payment plan under Active Subscriptions:
We're All Done!
Congrats! You now know how to set up a basic Stripe payment form that sends a token to your server’s backend. You can use this information to create customers, charge credit cards, and create recurring subscription payments.
We hope this was helpful and if you want more tips and tricks on how to use Stripe effectively, sign up for our mailing list below!
