Note: This post assumes you have a working Stripe account and know how to set up a basic Node/Express server to serve HTML files and receive HTTP requests. If you don't know how to do these things, no problem! You can still follow along but you may want to consider checking out these docs:
https://docs.npmjs.com/cli/start
https://nodejs.org/en/docs/guides/getting-started-guide/
http://expressjs.com/en/starter/hello-world.html
TLDR
Go to Section 4 (Set up your Simple Stripe Checkout Form and Retrieve Inputted Parameters) to get a general sense of how to pass customer-inputted parameters down from your Stripe form to another form.
You can find all of the code posted here at:
https://github.com/code-nebula/simple-stripe-checkout
Introduction
In your journey to become a fullstack web developer, it is not long until you stumble upon the magic that is Stripe Checkout ( https://stripe.com/docs/checkout ). You see the beautiful, comprehensive form and are instantly sold on using it to handle payments on your site.
So you sit down to integrate Stripe Checkout and think, “This should be a piece of cake”. But then…a few minutes in, you start feeling overwhelmed by the loads of parameters. You start asking yourself, “Should I use the Simple or Custom form?" You continue reading the docs and messing around with the code, but before you know it, a few hours have passed and you’re left thinking Stripe’s Checkout Form is an untouchable, black box.
To help you demystify Stripe Checkout, we’ve devised a list of 4 simple exercises:
- Passing parameters from the Simple Stripe Checkout form to your own HTML form (this post)
- Passing parameters from the Custom Stripe Checkout form to your own HTML form
- Passing parameters from your own HTML form to the Simple Stripe Checkout form
- Passing parameters from your own HTML form to the Custom Stripe Checkout form
This post will deal with the first exercise:
1. Passing parameters from the Simple Stripe Checkout form to your own HTML formNot only is this a great exercise to help you deep-dive into Stripe Checkout but it is also a workflow you may want to include on your site.
The video below outlines this workflow for you:
A new customer visits your site and purchases a product that will be shipped to them. After the customer pays, you redirect them to a form where they can opt-in to your email newsletter in order to get updates on new posts or products. You would like to auto-fill the name and email fields of this form using the information submitted via the Simple Stripe Checkout form.
Now that you’ve gotten a preview of what you’ll be building out, let’s get started!
Note: You can find all of the code mentioned in this post here:
https://github.com/code-nebula/simple-stripe-checkout
The 5 Steps
1. Understand which form elements the Stripe Checkout data parameters correspond to
Re-read the documentation under the "Simple Tab" (https://stripe.com/docs/checkout#integration). Try to determine which parameters would be the most useful for you.
In my case, I used the following parameters:
    data-key="pk_test_6pRNASCoBOKtIshFeQd4XMUh" /* Stripe's equivalent of a public key */
    data-allow-remember-me="true"
    data-billing-address="true"
    data-shipping-address="true"
    data-name="Your Website Name"
    data-description="1 Product ($25.00)"
    data-amount="2500"
    data-image="./../assets/image-placeholder-cropped.png"
    data-label="Buy this Product!"
    data-panel-label="Purchase"
See the photos below to see how these parameters correspond to your Simple Stripe Checkout form:
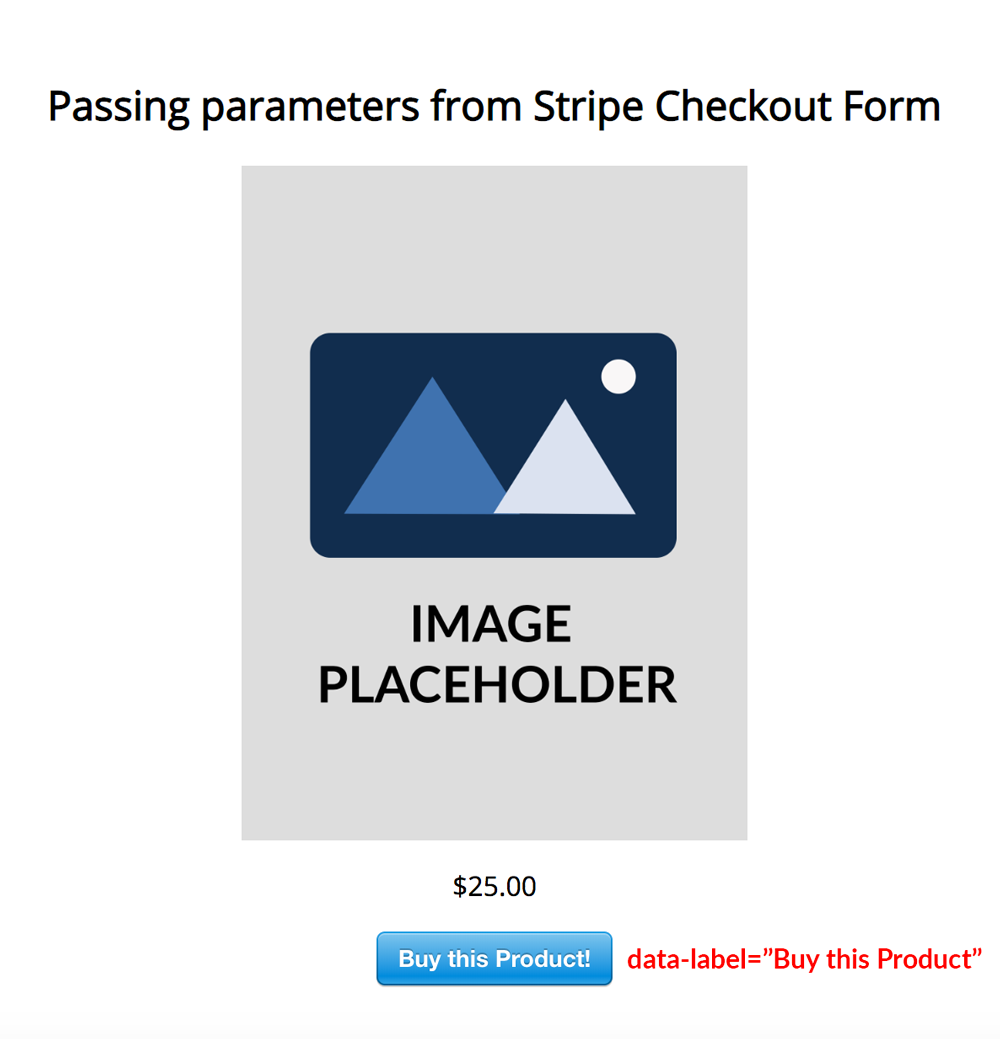 Simple Stripe Checkout Form Parameters Visualized (Part 1)
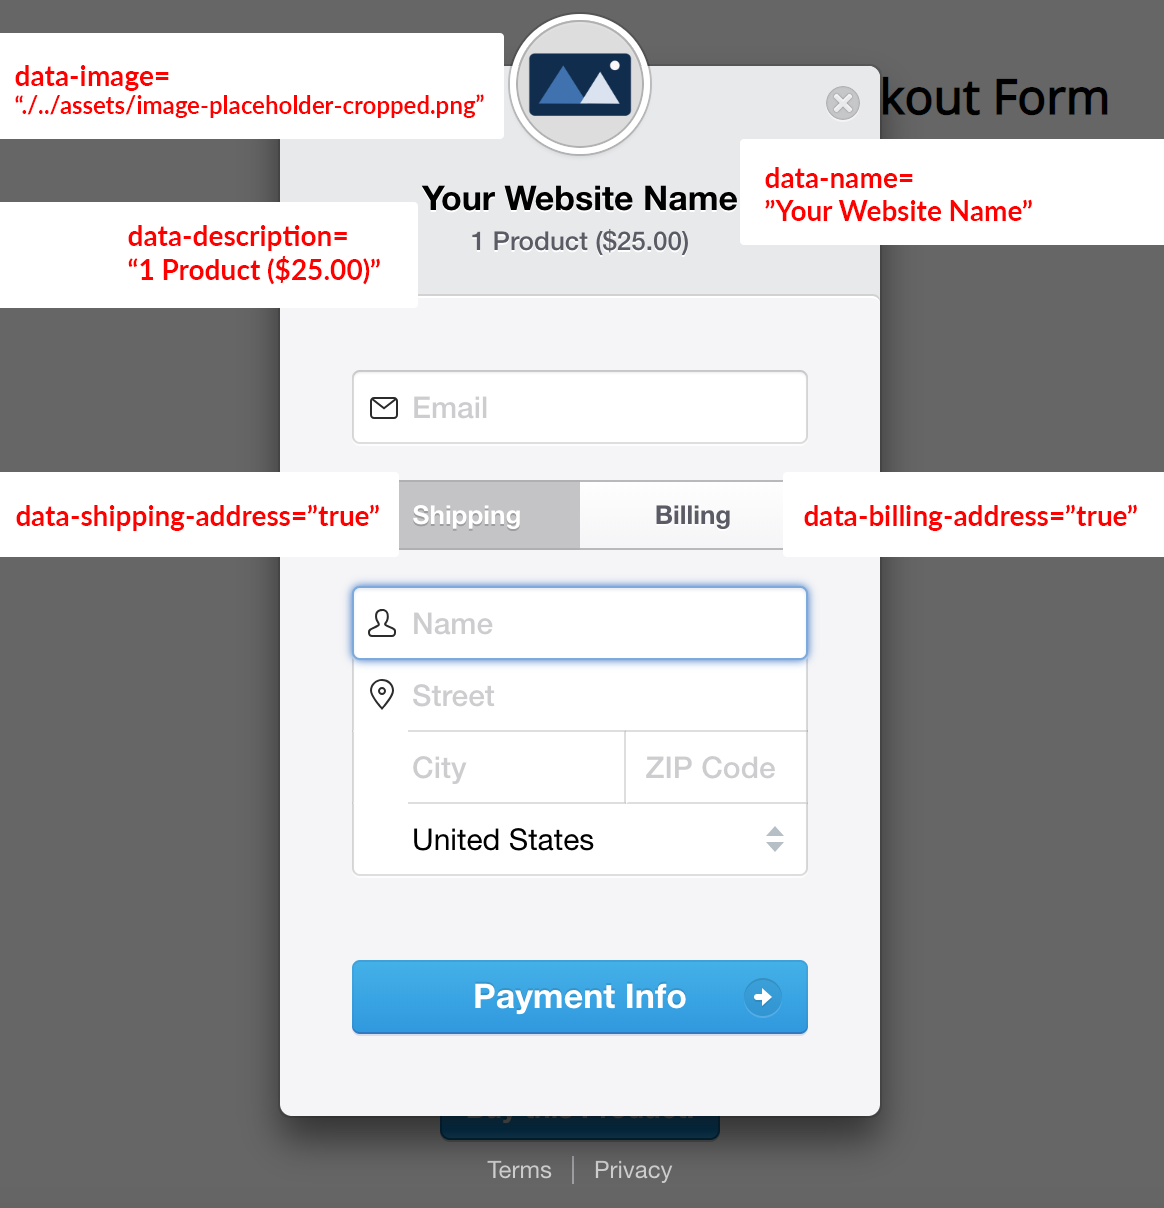 Simple Stripe Checkout Form Parameters Visualized (Part 2)
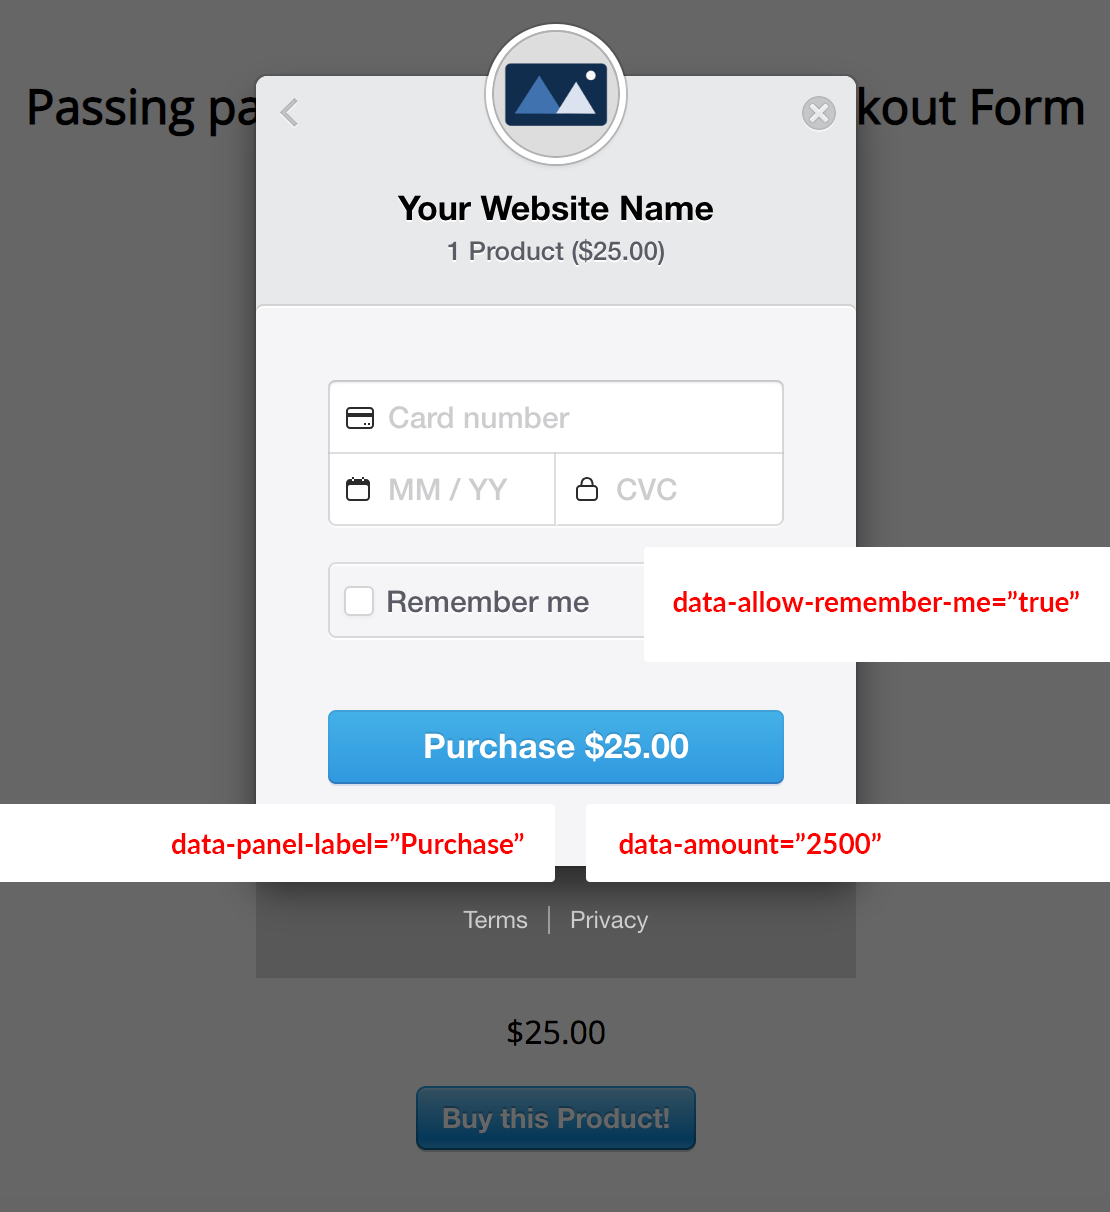 Simple Stripe Checkout Form Parameters Visualized (Part 3)
2. Understand why need server side code to process the payment and extract the inputted parameters
When you first stumble upon the Simple Stripe Checkout Form, it may be tempting to simply embed the script in your front-end code and assume that Stripe takes care of the rest after you provide your Stripe Publishable Key (essentially a public key).
However, the action in
is a clear indication that some work is needed in order for this form to be successfully processed.
The "action" attribute specifies where you want to send your form data to after the form has been submitted. The most ideal use case is to send this form data back to your server to process it.
How do you do this? Well, when the Stripe Checkout Form is successfully submitted, the customer-inputted data will first hit a Stripe endpoint. Stripe will then return some of that inputted information (e.g., email) along with a token (for security reasons, Stripe does not return any payment information such as credit card number, CVC, etc.). You should then pass this token into a token handler that you have set up on your server. The token handler will process the payment via a series of steps.
If you're coming from more of a front-end background, you might also be wondering, "Can I extract the customer-inputted values directly from the form?"
You certainly can, but we would not recommend it, as the process is very "hacky". You could find the id or class name that corresponds to the inputs using HTML DOM methods or jQuery:
$(‘input#email.control')[0].value -> Grab the user's email
$('.telInput input.control’)[0].value -> Grab the user's phone number from the “Remember Me” section
However, there are 2 major issues with this approach:
- Stripe at any point might decide to change the class name of the input elements, which would cause your logic to instantly break (note that you can’t lock down the version of Stripe Checkout that you use — Stripe automatically rolls out changes to https://checkout.stripe.com/checkout.js)
- You would need to know exactly when to look for the elements in order to grab the final user-inputted value. Note that not all of the form elements are always mounted to the DOM. The elements change depending on which screen you’re looking at on the form — for instance, you would have to collect the email information on the first screen when the “Payment Info” button is clicked. Here’s the tricky part…to do so, you first need to watch for when the “Payment Info” button is mounted to the DOM. The code to do this becomes very messy, very quickly, and it’s obvious that Stripe doesn’t want you to take this approach
So what should you do? Well, once the form is submitted, Stripe does in fact return some of the customer-parameters (email, shipping address information, etc.). It is much simpler and robust to use what is returned from the form submission.
Set up Your Application Server and Your Workspace
First, open up your terminal and create a new Express app. As mentioned above, if you are not familiar with Express, no worries -- the Express site has some easy-to-follow documentation here: (http://expressjs.com/en/starter/installing.html)
Next, install the following packages using your favorite package manager (npm, yarn, etc.):
- body-parser (https://www.npmjs.com/package/body-parser)
- nunjucks (https://www.npmjs.com/package/nunjucks)
We will use the body-parser package to parse incoming request bodies as "req.body" in our server-side code. We will use nunjucks for templating and passing data into our HTML files.
Next, set up your workspace to follow a similar format:
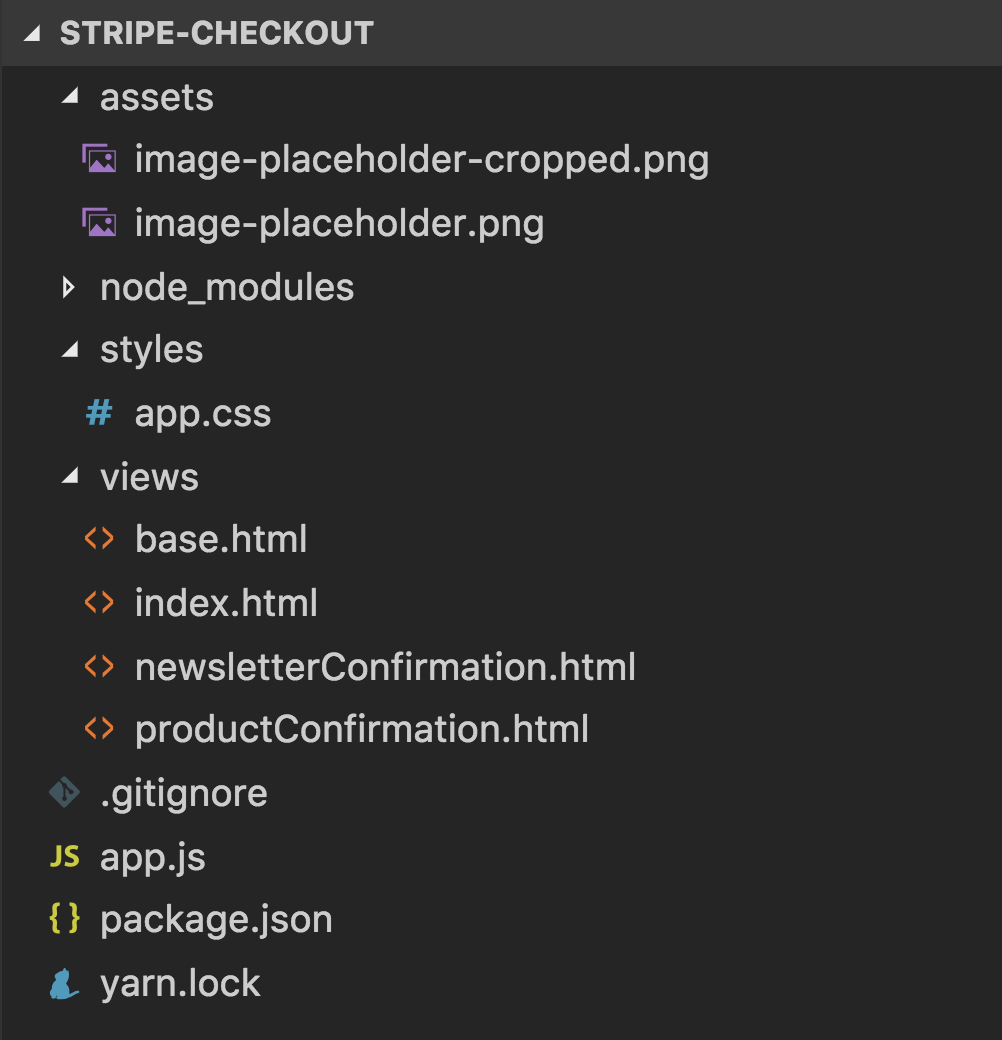
Here's an explanation of the important directories and files:
- assets (Where you will place your image or media files -- think images for your product)
- node_modules (Holds your installed dependencies)
- styles (Where you will place your CSS files)
- views (Where you will place your templates -- your HTML files)
- app.js (Where you will place all of the logic for your application)
- package.json (Holds information about your app, including which dependencies you are using, etc.)
assets
- image-placeholder.png (the image of your product)
- image-placeholder-cropped.png (the thumbnail of your product -- this is included in the Stripe Checkout form)
styles
- app.css (the stylesheet for your entire application)
    body {
        font-family: "Open Sans", "Helvetica", sans-serif;
        margin: 0;
        padding: 0;
        width: 100%;
    }

    .app-container {
        margin: 0 auto;
        margin-top: 48px;
        text-align: center;
        width: 100%;
    }

    /* Index CSS */
    .image-container {
        margin-bottom: 16px;
        width: 100%;
    }

    .image-placeholder {
        display: block;
        margin: 0 auto;
        width: 300px;
        height: 400px;
    }

    /* Custom Form CSS */
    hr {
        border: none;
        border-top: 1px solid #ddd;
        width: 75%;
    }

    label {
        display: block;
        font-weight: bold;
    }

    .signup-form {
        background-color: #eee;
        border-radius: 6px;
        margin: 24px auto 0;
        padding: 24px;
        width: 400px;
    }

    .signup-field {
        display: block;
    }

    .signup-text {
        border: none;
        border-radius: 4px;
        font-size: 16px;
        font-family: "Open Sans", "Helvetica", sans-serif;
        margin: 4px 0 12px;
        padding: 12px;
        text-align: center;
    }

    .signup-button {
        background-color: #112d4e; /* dark blue */
        border-radius: 4px;
        color: #fff;
        font-family: "Open Sans", "Helvetica", sans-serif;
        font-size: 14px;
        padding: 12px;
    }
views
- base.html (Uses Nunjucks to set up a template for your other HTML files)
- index.html (We will revisit later -- will be the homepage featuring the product)
- productConfirmation.html (We will revisit later -- includes confirmation of your received order and features your own native form to prompt the user to sign up for your newsletter)
- newsletterConfirmation.html (We will revisit later -- includes confirmation that the user signed up for your newsletter)
app.js
Here we officially set up an Express application and import all necessary dependencies like body-parser and nunjucks.
Here’s a summary of what you will do in this file:
- Set the server to listen on port 3000
- Set up Nunjucks with Express to serve up and render HTML files
- Set up the content in the /assets and /styles directories to be served up through the Express app
- Set up our Express router to route client requests to different pages
- Set up our Express app to start a server and listen for connections on the specified port
    const express = require('express')
    const bodyParser = require('body-parser');
    const nunjucks = require('nunjucks');

    const app = express();
    const port = 3000;
    const router = express.Router();
    const path = require('path');

    /* Set up Express to serve HTML files using "res.render" with help of Nunjucks */
    app.set('view engine', 'html');
    app.engine('html', nunjucks.render);
    nunjucks.configure('views', { noCache: true });

    app.use(express.static(__dirname));
    app.use('/assets', express.static('assets'))
    app.use('/styles', express.static('styles'));
    app.use(bodyParser());
    app.use('/', router)

    /* Place all routes here */
    router.get('/', (req, res) =>; {
        res.render('index.html')
    });

    /* Start listening on specified port */
    app.listen(port, () => {
        console.info('Example app listening on port', port)
    });
package.json
An important piece of logic you need in your package.json file is the "start" script (see "scripts" -> "start"). The command npm run start will run node app.js to make your Express application start a server (basically this command will execute all of the logic specified in your app.js file)
    {
      "name": "stripe-checkout",
      "version": "1.0.0",
      "description": "",
      "main": "index.js",
      "scripts": {
        "test": "echo \"Error: no test specified\" && exit 1",
        "start": "node app.js"
      },
      "author": "",
      "license": "ISC",
      "dependencies": {
        "body-parser": "^1.18.3",
        "express": "^4.16.3",
        "nunjucks": "^3.1.3"
      }
    }
4. Set up your Simple Stripe Checkout Form and Retrieve Inputted Parameters
We will first extend our index.html file using the base template provided in base.html. All content will be contained in a div containing the class app-container.
Set up your index.html to look like the following:
<script
src="https://checkout.stripe.com/checkout.js"
class="stripe-button"
data-key="pk_test_6pRNASCoBOKtIshFeQd4XMUh"
data-allow-remember-me="true"
data-billing-address="true"
data-shipping-address="true"
data-name="Your Website Name"
data-description="1 Product ($25.00)"
data-amount="2500"
data-image="./../assets/image-placeholder-cropped.png"
data-label="Buy this Product!"
data-panel-label="Purchase"
>
</script>We will be using the test key that Stripe provides by default, though you should eventually get a Stripe Test Key for development and Stripe Publishable Key for production.
Notice that we specified the form action to go to the /charge route. What this means is that when the form is successfully submitted, all data returned from the form will be posted to the /charge route on the server.
Now, let's make sure we set that route up! Navigate to the app.js under the /* Place all routes here */ comment. Add the following:
    router.post('/charge', (req, res) => {
      /* 1. Have a handler here to process "req.body.stripeToken" to complete payment
        * 2. Store email, billing address, or shipping address (follow various compliance rules -- GDPR, PCI, etc.)
        */

      /* Example:
          req.body = {
              stripeToken: 'tok_1DDe1f2eZvKYlo2C3JanAVvx',
              stripeTokenType: 'card',
              stripeEmail: 'user@example.com',
              stripeBillingName: 'Jane Doe',
              stripeBillingAddressCountry: 'United States',
              stripeBillingAddressCountryCode: 'US',
              stripeBillingAddressZip: '95104',
              stripeBillingAddressLine1: '1 Infinite Loop',
              stripeBillingAddressCity: 'Cupertino',
              stripeBillingAddressState: 'CA',
              stripeShippingName: 'Jane Doe',
              stripeShippingAddressCountry: 'United States',
              stripeShippingAddressCountryCode: 'US',
              stripeShippingAddressZip: '95104',
              stripeShippingAddressLine1: '1 Infinite Loop',
              stripeShippingAddressCity: 'Cupertino',
              stripeShippingAddressState: 'CA'
          }
      */

      /* 3. Pass relevant data to another page */
      var data = {
          email: req.body.stripeEmail,
          name: req.body.stripeBillingName
      };
      res.render('productConfirmation', data);
    });
The form data will first hit a Stripe endpoint. Stripe will then return a token, the user's shipping address, the user's billing address, and the user's email. Note that at this time, Stripe doesn't not return the phone number entered under the "Remember Me" section.
So what does the code above actually do?
Step 1
As mentioned before, to actually process this payment, you will need to set up a Stripe token handler that deals with the token that Stripe passes back to you.
Step 2
This code snippet gives you an idea of what is returned by Stripe via req.body. In this step, you can process that information however you like -- maybe you want to store some of that information in your own user database.
Step 3
This is where you take the returned user information and pass it down to your own HTML form so that the user doesn't need to enter their personal information repeatedly.
Basically what you're doing is passing the returned data, namely the user's name from the billing address and the user's email, and passing it down to another page, namely the productConfirmation.html page.
5. Pass down the Retrieved Parameters to Your Own Form
Set up your productConfirmation.html file to look like:
Here, we are passing down the user's name via {{ name }} and user's email via {{ email }} and rendering them in our own newsletter signup form. The user has the option to change those inputs if they decide they actually want to use another name or email.
Notice that we specified the form action to go to the /newsletterSignup route. What this means is that when the form is successfully submitted, all data returned from the form (the user's name and email) will be posted to the /newsletterSignup route on the server.
Let's set that route up next!
Once again, navigate to app.js under the /* Place all routes here */ comment. Add the following route method:
    router.post('/newsletterSignup', (req, res) => {
        /* 1. Save this information to database:
          * req.body.email
          * req.body.name
          */

        /* 2. Pass relevant data to another page */
        var data = {
            name: req.body.name
        };
        res.render('newsletterConfirmation', data);
    });
This code is fairly self explanatory, but to be thorough:
Step 1
The form will post the user's name and email via req.body.name and req.body.email, respectively. You can take that information and pass it into a handler that adds the user to your mailing list.
Step 2
To get into the habit of passing information down to your HTML files, we will pass down the user's name to the newsletterConfirmation.html file, which looks like
This file extends base.html and displays the user's name inputted from the newsletter signup form.
And that's basically it -- congrats on getting this far! Go out there and utilize the full power of Simple Stripe Checkout!
